

Sink your teeth into these spooky Vampire Bite Cupcakes that are sure to thrill at any Halloween gathering! This beginner-friendly dessert is a delightful spin on the classic cupcake experience, boasting a moist, fluffy texture that practically melts in your mouth. With just 20 minutes of prep time, 20 minutes of baking, and a brief 5-minute rest on the cooling rack, you’ll have a batch of twelve hauntingly gorgeous treats in under an hour. Each cupcake rings in at about 250 calories, making them a perfectly portioned indulgence for parties or cozy nights in. The pale pink batter gives way to a hidden surprise: a sweet raspberry or strawberry jam filling that oozes crimson “blood” when you take that first, dramatic bite. Topped with your choice of smooth vanilla or tangy cream cheese frosting, and finished with sprightly red drips or edible vampire teeth, these cupcakes offer thrills, chills, and sugary sweetness all in one.
I still laugh when I remember the first time I shared these Vampire Bite Cupcakes with friends around a crackling fire pit. I was experimenting with my favorite vanilla frosting, wondering if the pale pink batter would actually look spooky enough under dim lights. When that jam “blood” burst forth, jaws dropped in delight—and a few playful shrieks echoed through the yard. It quickly became a new Halloween tradition that even my most skeptical buddies raved about. Whether you’re baking for a haunted house soiree, a classroom party, or just because you love bringing a little theatrical fun to the kitchen, these cupcakes are designed to impress. So let’s dive in, have some fun, and discover how easy it is to make a dessert that’s as festive as it is delicious!
KEY INGREDIENTS IN VAMPIRE BITE CUPCAKES
Before you begin whipping up these fang-tastic confections, let’s talk about the essential building blocks that make these cupcakes shine. Each ingredient plays a key role in creating cupcakes that are tender, flavorful, and delightfully spooky.
- All-purpose flour: The backbone of any good cupcake, it gives structure and helps the cake rise to a perfect height without being too dense.
- Granulated sugar: Adds sweetness and helps tenderize the crumb, ensuring each bite is soft and melt-in-your-mouth.
- Baking powder: Acts as a leavening agent, introducing air pockets that give the cupcakes a light, fluffy texture.
- Salt: Balances sweetness and enhances all the other flavors, preventing the cupcakes from tasting flat.
- Unsalted butter: Provides rich flavor and moistness. When creamed properly, it traps air that contributes to a tender crumb.
- Eggs: Bind the ingredients together and add moisture. Beating them in one at a time helps maintain a smooth, homogenous batter.
- Vanilla extract: Infuses the cake with warm, aromatic notes that complement the fruity jam and frosting.
- Whole milk: Adds tenderness and moisture, resulting in a velvety crumb that feels indulgent without being greasy.
- Red food coloring: Transforms the batter into a pale pink hue, setting the stage for the dramatic “bite” effect once the filling is added.
- Raspberry or strawberry jam: Provides the signature “blood” filling. Its natural sweetness and slight tartness create a mouth-watering surprise in every cupcake.
- Vanilla or cream cheese frosting: Creates a smooth, pillowy topping that contrasts perfectly with the tart jam center.
- Red gel icing or edible vampire teeth: Finishing touches that amp up the spook factor. Use gel icing for realistic drips or tiny teeth for a fun, three-dimensional look.

HOW TO MAKE VAMPIRE BITE CUPCAKES
With your ingredients measured out and your kitchen prepped, let’s conjure up these delightful treats. The process is straightforward and designed to guide you through each step so your cupcakes come out perfect every time.
1. Preheat your oven to 350°F (175°C). Make sure the oven reaches the full temperature before baking. Line a 12-cup muffin tin with cupcake liners, pressing them gently into each cup to prevent the edges from collapsing.
2. In a large bowl, whisk together the flour, sugar, baking powder, and salt. Whisking thoroughly ensures the leavening agent is evenly distributed and the dry mixture is lump-free.
3. In another bowl, use an electric mixer to cream the butter until it’s light and fluffy. This usually takes about 2–3 minutes on medium speed and is crucial for incorporating air, which gives a tender crumb.
4. Add the eggs one at a time to the butter, beating well after each addition. This step guarantees a smooth batter and prevents the mixture from curdling.
5. Pour in the vanilla extract and mix on low speed until fully combined, stopping to scrape down the sides of the bowl as needed.
6. Gradually add the dry ingredients and milk alternately to the butter mixture, beginning and ending with the dry ingredients. Mix each addition just until combined—overmixing can toughen the cupcakes.
7. Drop in a few drops of red food coloring and stir until you achieve a uniform pale pink batter. Adjust with more drops if necessary, but aim for a soft hue that won’t overpower the visual effect.
8. Divide the batter evenly among the lined cups, filling each about two-thirds full. This gives enough room for the cupcakes to rise without overflowing.
9. Bake in the preheated oven for 18–20 minutes or until a toothpick inserted into the center of a cupcake comes out clean or with just a few moist crumbs attached.
10. Let the cupcakes cool in the tin for 5 minutes to firm up, then transfer them to a wire rack to cool completely. This prevents sogginess from trapped steam.
11. Once cooled, use a small knife or the back of a spoon to cut or scoop out a small well in the center of each cupcake, being careful not to remove too much cake.
12. Fill each well with raspberry or strawberry jam, allowing the “blood” to nestle into the center for that signature bite burst.
13. Frost each cupcake with a generous swirl of vanilla or cream cheese frosting, using a piping bag or spatula for neat, even coverage.
14. Optional: Use red gel icing to create dripping “blood” effects or press edible vampire teeth into the frosting for a playful, spine-chilling finish.
SERVING SUGGESTIONS FOR VAMPIRE BITE CUPCAKES
When it comes to unveiling these Vampire Bite Cupcakes, presentation is everything. With their hidden jam centers and ghostly red drips, they beg to be showcased in a way that heightens the spooky fun. Whether you’re setting up a buffet table at a Halloween party or sharing these treats one-on-one with adventurous friends, the right garnishes, plating, and atmosphere can turn your cupcakes into the star attraction.
- Serve on a dark, rustic platter lined with black lace or gauze to evoke a haunted-mansion vibe. The contrast between the pale cupcakes and the dark background makes the red jam pop dramatically.
- Pair with a bloody red punch or mocktail in vintage goblets. Rim the glasses with red sugar crystals to echo the cupcake’s ruby filling and create a cohesive, eerie effect.
- Arrange cupcakes on a multi-tiered stand, alternating heights for an elevated display. Accent each tier with plastic spiders, faux cobwebs, or tiny LED tea lights to cast spooky shadows.
- Offer a frosting bar where guests can add their own finishing touches—sprinkles, edible glitter, or additional gel drips. This interactive station lets partygoers personalize their cupcakes, making the experience as memorable as the flavor.
HOW TO STORE VAMPIRE BITE CUPCAKES
Proper storage ensures your Vampire Bite Cupcakes stay moist, flavorful, and picture-perfect for as long as possible. Since these cupcakes contain perishable fillings and frostings, taking the right precautions will maintain both taste and texture. Whether you need to prep a day ahead or have leftovers to tuck away, follow these guidelines to keep your spooky treats at their best.
- Store in an airtight container at room temperature if you plan to serve them within 24 hours. Layer the cupcakes gently, placing a piece of parchment or wax paper between rows to prevent sticking and smear.
- For longer storage of up to 48 hours, refrigerate the cupcakes in a sealed container. Allow them to come to room temperature before serving so the frosting softens and the cake regains its tender crumb.
- If you need to keep them fresh beyond a couple of days, carefully wrap individual cupcakes in plastic wrap, then place them in a freezer-safe container. Freeze for up to one month. Thaw overnight in the refrigerator and let sit at room temperature before unwrapping.
- To revive slightly stale cupcakes, warm them in a preheated oven at 300°F (150°C) for 3–5 minutes. This gentle heat refreshes the cake’s moisture without melting the frosting—you can quickly reapply a thin swirl of frosting if needed for a perfectly renewed finish.
CONCLUSION
From the first whiff of baking butter and sugar to the moment that luscious jam “blood” oozes from your bite, Vampire Bite Cupcakes are a thrilling way to celebrate all things spooky. With beginner-friendly steps, a colorful visual payoff, and enough versatility to adapt the filling, frosting, or decorations, they’re destined to become a Halloween—or any day—favorite. You can print this article or save it for later, ensuring you have every detail at your fingertips when that craving for a creepy-cute treat strikes. Remember, the process is as fun as the final result: whip, swirl, and decorate at your own pace, and don’t be afraid to put your own twist on the theme.
Feel free to scroll down to find a FAQ section for quick tips and troubleshooting if you run into any hiccups while baking. I’d love to hear how your Vampire Bite Cupcakes turn out—drop a comment, question, or share your own spooky decorating ideas below. Whether you’re a seasoned baker or just starting out, I’m here to help you nail every step of this recipe. Happy haunting and happy baking!
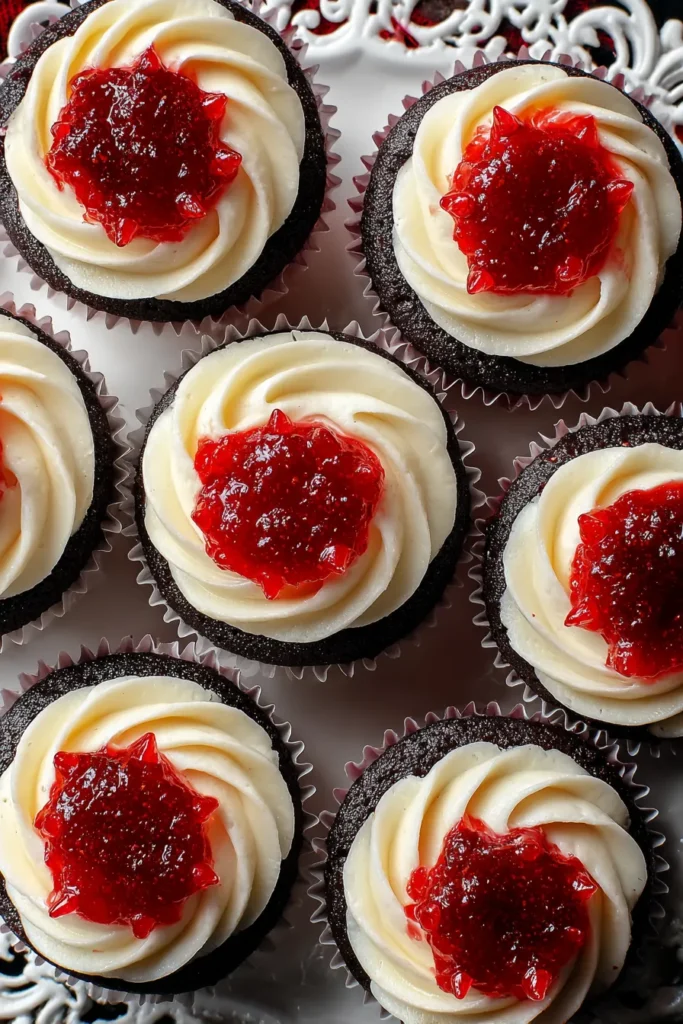

Vampire Bite Cupcakes
Description
These cupcakes boast a moist, fluffy texture with a sweet raspberry or strawberry filling that mimics vampire bites, topped with creamy frosting and sprightly red drips.
Ingredients
Instructions
-
Preheat your oven to 350°F (175°C). Line a 12-cup muffin tin with cupcake liners.
-
In a large bowl, whisk together the flour, sugar, baking powder, and salt.
-
In another bowl, using an electric mixer, cream the butter until light and fluffy.
-
Add eggs one at a time to the butter, beating well after each addition.
-
Mix in the vanilla extract.
-
Gradually add the dry ingredients and milk alternately to the butter mixture, beginning and ending with dry ingredients. Mix until just combined.
-
Add a few drops of red food coloring to achieve a pale pink batter.
-
Divide the batter evenly among the cupcake liners, filling each about two-thirds full.
-
Bake in the preheated oven for 18-20 minutes or until a toothpick inserted into the center comes out clean.
-
Let cupcakes cool in the tin for 5 minutes, then transfer to a wire rack to cool completely.
-
Once cooled, use a small knife to cut a small hole or use the back of a spoon to create a well in the center of each cupcake.
-
Fill each well with raspberry or strawberry jam, resembling vampire bite blood.
-
Frost each cupcake with vanilla or cream cheese frosting.
-
Optional: Use red gel icing to create "blood" drips on the frosting or adorn each with edible vampire teeth for a spooky touch.
Note
- Try incorporating a bit of cocoa powder for a chocolate version of these cupcakes.
- If you can't find red gel icing, you can use a small brush to spread some leftover jam over the frosting for a similar effect.
- These are great for Halloween parties or themed gatherings.
- Storing these cupcakes overnight helps the flavors develop nicely, so consider baking them a day in advance.

