

When spooky season rolls around, it’s time to get creative in the kitchen, and these Spooktacular Halloween S’mores Pops are just the ticket. Think of a classic campfire s’more dressed up in vibrant orange, purple, and black—perfect for Halloween festivities. Each pop is a delightful whirl of soft, pillowy marshmallow, enveloped in a smooth coat of semisweet chocolate or candy melts, then sprinkled with crunchy graham crumbs and festive sprinkles. They’re fun to make, fun to eat, and will bring out the kid in everyone—even those who claim they hate sweets will be tempted to take a bite.
These pops are a total crowd-pleaser: easy enough for beginners but impressive enough to wow a party. With a quick 15-minute prep, 5-minute chocolate melting, and a brief 10–15-minute chill in the fridge, you’ll have a dozen colorful treats ready in no time. At about 150 calories per pop, they’re perfectly portioned for snacking—no sticky fingers or oversized slices required. Whether you’re hosting a haunted house gathering, crafting treats with the kiddos, or simply craving a nostalgic twist on dessert, these Halloween S’mores Pops will become your new favorite seasonal snack.
KEY INGREDIENTS IN HALLOWEEN S'MORES POPS
Every great recipe starts with quality ingredients that bring out the best flavors and textures. In these Halloween S’mores Pops, each component plays a special role—from the fluffy marshmallow base to the crunchy graham crumb coating and the vibrant, melt-in-your-mouth chocolate. Here’s a closer look at what you’ll need:
- Marshmallows
Light and airy, large marshmallows provide that signature gooey center. They’re the canvas for all the chocolate, crumbs, and sprinkles to stick to, giving each pop its classic s’mores texture.
- Semisweet chocolate chips or Halloween candy melts
Whether you choose rich semisweet chocolate or colored candy melts in orange, purple, or black, this melting layer is what binds everything together. It sets up firm enough to hold crumbs and sprinkles but stays soft when you bite in.
- Graham crackers (crumbs)
Finely crushed graham crackers add a toasty, crunchy contrast to the soft marshmallow and silky chocolate. You can even experiment with chocolate or cinnamon graham crumbs for extra flavor.
- Lollipop sticks or skewers
These keep your hands mess-free and make each pop easy to hold. They’re the reason these treats are so kid-friendly and portable—perfect for passing around at a party.
- Halloween sprinkles (optional)
A handful of spooky sprinkles gives these pops their festive flair. Think tiny bats, ghosts, or classic orange and black jimmies to make every bite Instagram-worthy.
HOW TO MAKE HALLOWEEN S’MORES POPS
Ready to dive into the fun? These S’mores Pops come together in a snap with simple steps you can do with family or friends. Follow the detailed instructions below, and soon you’ll have a tray of sweet, festive pops ready for snacking or gifting.
1. Begin by inserting a lollipop stick or skewer into each marshmallow, pushing it about halfway through so your pop holds securely without poking through.
2. In a microwave-safe bowl, melt the semisweet chocolate chips or candy melts in 30-second bursts. Between each interval, stir thoroughly to achieve a smooth, lump-free consistency.
3. Prepare a shallow dish by spreading out the crushed graham crackers into an even layer—this makes it easy to roll and coat each pop.
4. Holding the stick, dip a marshmallow into the melted chocolate, fully submerging it so every angle is covered. Gently tap off any excess chocolate to prevent pooling.
5. Immediately roll the chocolate-coated marshmallow in the graham cracker crumbs, pressing lightly so the crumbs stick evenly across the surface.
6. If you want extra flair, sprinkle Halloween decorations over the still-wet chocolate—this ensures they adhere nicely.
7. Place each finished s’mores pop on a parchment-lined baking sheet to keep them from sticking.
8. Repeat the dipping and coating process for all remaining marshmallows, enjoying the colorful transformation with each one.
9. Once your batch is complete, transfer the baking sheet to the refrigerator for about 10–15 minutes so the chocolate sets firmly.
10. Serve immediately or store in an airtight container for up to 3 days, maintaining crunch and flavor for all your spooky celebrations.
SERVING SUGGESTIONS FOR HALLOWEEN S’MORES POPS
Elevating these Halloween S’mores Pops from tasty snacks to unforgettable treats is all about presentation and pairing. Whether you’re setting them out on a dessert table, gifting them in cellophane bags, or arranging them on a cake stand, a few thoughtful touches can make these pops pop even more! Here are some creative ways to serve them at your next Halloween gathering:
- Festive Pop Display
Arrange your pops upright in a tall mason jar filled with crushed candy corn or colored sand. The visual contrast of orange, purple, and black will catch everyone’s eye, turning your dessert table into a spooky sweet showcase.
- Themed Treat Bags
Place 2–3 pops in clear cellophane bags, tie them with black-and-white striped ribbon, and attach a tiny tag with a Halloween pun. They make perfect take-home favors for guests of all ages.
- Dipping Station
Set out small bowls of extra melted chocolate, warm caramel, or melting peanut butter along with various toppings—crushed Oreos, chopped almonds, or mini M&Ms—for a DIY dipping bar that’s interactive and delicious.
- Edible Centerpiece
Insert the finished pops into a half-cut pumpkin or floral foam hidden inside a jack-o’-lantern. Add LED tea lights around the base to create an eerie glow and an eye-catching centerpiece for your haunted feast.
HOW TO STORE HALLOWEEN S’MORES POPS
After the thrills and chills of your Halloween festivities, you might find yourself with a few pops left over. Proper storage will keep them tasting just as fresh as the day you made them, preserving that satisfying crunch and gooey center. Use these tips to extend their shelf life while maintaining texture and flavor:
- Store in an airtight container at room temperature if you plan to enjoy them within 24–48 hours. Layer parchment or wax paper between pops to prevent sticking.
- For longer storage (up to 3 days), place the container in the refrigerator, which helps keep the chocolate firm and the marshmallow from becoming too soft. Allow pops to return to room temperature for a few minutes before serving.
- If you want to prep ahead of time, freeze fully set pops in a single layer on a baking sheet for an hour before transferring them to a freezer-safe bag. Thaw in the refrigerator, then bring to room temperature to restore their chewy texture.
- Avoid placing pops in direct sunlight or near heat sources, as melting chocolate can lose its shape and the graham crumbs may soften too much.
CONCLUSION
We’ve journeyed through the steps to create these irresistible Halloween S’mores Pops from start to finish. You’ve learned how to assemble the ingredients, master the melting and dipping techniques, and add those final spooky touches that make this dessert so much fun. With a preparation time of just 15 minutes, a quick 5-minute chocolate melt, and a brief 10–15-minute chill, even beginner bakers can achieve professional-looking results. Remember to customize your pops with different graham cracker flavors, draw friendly ghost faces with edible markers, or mix and match candy melt colors to suit your spooky theme.
Feel free to print this article or save it in your recipe collection to make these pops again and again. Below, you’ll find a handy FAQ section to answer any lingering questions you might have. If you give this recipe a try, please let me know how it turned out! Leave a comment, ask for tips, or share your own creative spin on these Halloween S’mores Pops—I’d love to hear from you and help you perfect this festive treat. Have fun, stay spooky, and happy cooking!
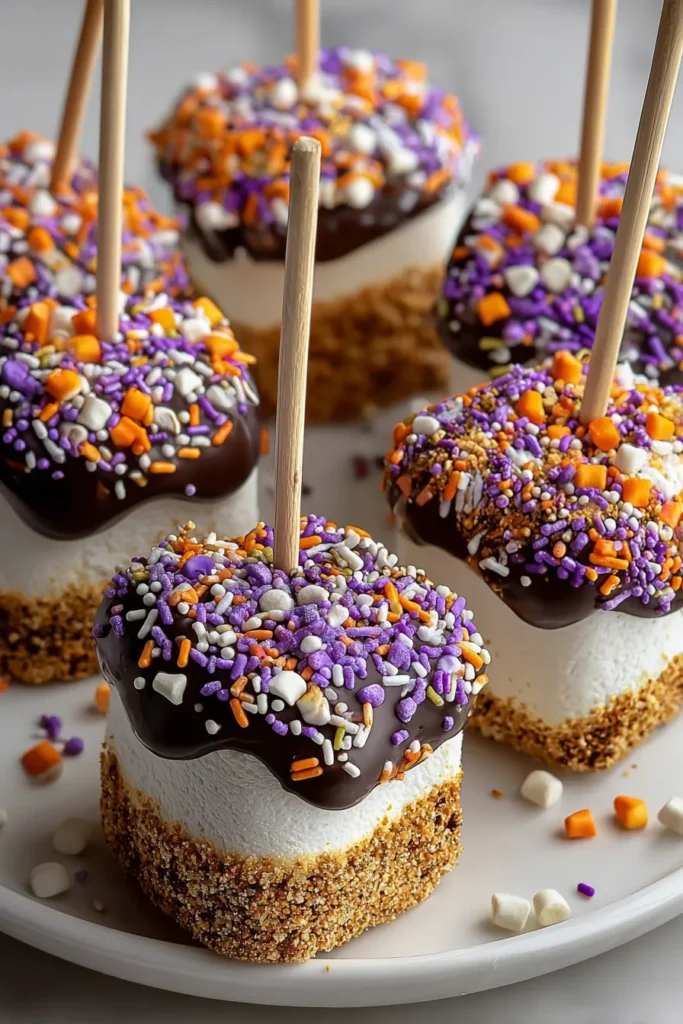

Halloween S’mores Pops
Description
These fun Halloween S'mores Pops combine gooey marshmallows, rich chocolate, and crunchy graham crackers, all dressed up in festive colors and sprinkles for a spooky treat.
Ingredients
Instructions
-
Begin by inserting a lollipop stick or skewer into each marshmallow, pushing it about halfway through.
-
In a microwave-safe bowl, melt the chocolate chips or candy melts in 30-second intervals, stirring in between, until fully melted and smooth.
-
Prepare a shallow dish with the crushed graham crackers.
-
Dip each marshmallow into the melted chocolate, ensuring it is completely covered. Allow any excess chocolate to drip off.
-
Roll the chocolate-coated marshmallow in the crushed graham crackers to coat it completely.
-
If using sprinkles, sprinkle them onto the coated marshmallow while the chocolate is still wet for a festive touch.
-
Place the finished s'mores pop on a parchment-lined baking sheet.
-
Repeat the dipping and coating process with the remaining marshmallows.
-
Once all pops are complete, place the baking sheet in the refrigerator for about 10-15 minutes to allow the chocolate to set.
-
Serve the Halloween S'mores Pops immediately or store them in an airtight container for up to 3 days.
Note
- Use colored candy melts to match your Halloween theme.
- Add some spooky flair by drawing ghost faces on the marshmallows using edible markers.
- Consider using different flavors of graham crackers, like cinnamon or chocolate, for variety.
- These pops are a fun and easy recipe to make with kids.

