

Halloween season just got a whole lot sweeter and creepier at the same time with these bite-sized delights. These Halloween Cookie Cups are a delightful treat packed with gooey chocolate and topped with festive candies—truly spook-tacular! Whether you’re hosting a ghostly gathering or just craving a fun twist on classic sugar cookies, this beginner-friendly dessert has got you covered. With just 20 minutes of prep, 12 minutes of baking, and a quick 10-minute rest, you’ll have 24 perfectly portioned cups brimming with rich chocolate filling and colorful Halloween goodies. Each cup clocks in at around 180 calories, making them an easy treat to share with friends, family, or trick-or-treaters stopping by. I love how simple refrigerated dough transforms into a crunchy-yet-chewy little vessel, ready to cradle a silky ganache that’s flavored with buttery vanilla.
There’s something magically nostalgic about decorating these tiny cookie canvases with candy corn, mini pumpkins, or even mischievous candy eyes. I still remember the first time I lined up my little bakers—my nieces and nephews—around the kitchen island, handing each child a piping bag of warm chocolate and a handful of Halloween candies to create spooky faces. Laughter filled the air as they proudly crowned their creations, some with jack-o’-lantern grins, others resembling miniature witches’ hats. This recipe is as much about making memories as it is about indulging your sweet tooth. From classroom parties to cozy movie nights at home, these Cookie Cups deliver a burst of flavor and festive fun that will have everyone asking for seconds.
KEY INGREDIENTS IN HALLOWEEN COOKIE CUPS
Before you dive into the spooky fun, let’s break down the star players behind these delicious treats. Each ingredient has its own role—from forming the buttery base to lending that luxurious, melt-in-your-mouth chocolate filling—so you’ll know exactly why every component matters.
- Refrigerated sugar cookie dough
This store-bought shortcut delivers a tender, buttery crust without the fuss of making dough from scratch. It bakes up crisp at the edges and soft in the center, perfect for holding all your chocolate and candy toppings.
- Mini chocolate chips
Smaller than standard chips, these mini morsels melt quickly into a silky ganache, creating a rich filling that contrasts beautifully with the lightly golden cookie shell.
- Heavy cream
Adding cream to the melted chocolate chips creates a smooth, velvety texture known as ganache. It softens the sweetness and gives the filling a luxurious mouthfeel.
- Unsalted butter
A knob of butter enriches the ganache, offering extra creaminess and helping the chocolate set with a glossy finish.
- Vanilla extract
Just a splash of vanilla brightens the chocolate filling, balancing its intensity with warm, aromatic notes and rounding out the flavor profile.
- Assorted Halloween candies
Think candy corn, mini pumpkins, candy eyes, and sprinkles. These festive toppings add pops of color, fun shapes, and extra sweetness—plus they let your creativity shine.
- Cooking spray
A light mist prevents your cookie cups from sticking to the mini muffin pan, ensuring they pop out cleanly once cooled.
HOW TO MAKE HALLOWEEN COOKIE CUPS
Ready to bring these playful bites to life? In a few simple steps, you’ll transform ordinary cookie dough and chocolate into festive, snackable cups that are as fun to assemble as they are to eat.
1. Preheat your oven to 350°F (175°C) and lightly spray a 24-cup mini muffin pan with cooking spray. This ensures each cookie cup bakes evenly and releases easily from the pan.
2. Cut the sugar cookie dough into 24 even pieces. Roll each piece into a smooth ball, then place one ball into each cup of the prepared muffin pan. Uniform balls guarantee cups of the same size.
3. Press the center of every dough ball gently using your finger or the back of a small spoon. Create a shallow “cup” in each one—this is where your decadent chocolate filling will live.
4. Bake the cookie cups for 10–12 minutes, or until the edges turn a light golden hue. As soon as they come out of the oven, use the end of a wooden spoon to press the centers down again, reinforcing that perfect cup shape before the cookies cool and set.
5. Allow the cookie cups to cool in the pan for about 10 minutes. Then carefully remove them and transfer to a wire rack to cool completely. Fully cooled cups hold their shape and keep the filling from oozing out.
6. Make the chocolate filling by combining mini chocolate chips, heavy cream, butter, and vanilla extract in a medium saucepan over low heat. Stir continuously until the mixture is completely melted and smooth, forming a glossy, pourable ganache.
7. Spoon or pipe the warm chocolate mixture into each cooled cookie cup, filling them right to the brim. Using a piping bag or zip-top bag with a corner snipped off gives you extra precision.
8. Decorate each cup with your assorted Halloween candies, pressing them gently into the soft ganache. Get creative—make ghosts, pumpkins, spiders, or any spooky design you fancy.
9. Set the cookie cups at room temperature until the chocolate filling firms up, or refrigerate for quicker setting. Once the ganache is solid, these treats are ready to gobble up!
SERVING SUGGESTIONS FOR HALLOWEEN COOKIE CUPS
When it comes time to unveil your Halloween Cookie Cups, the way you present them can take your celebration from cute to unforgettable. Whether you’re planning a haunted-hostess spread or a laid-back movie marathon, these serving ideas will help you create a festive display that steals the show. Remember to arrange your cups on a decorative platter, coordinate colors with other treats, and think about pairing them with complementary beverages to elevate the sweet experience.
- Serve on a themed platter lined with black lace doilies or orange parchment paper for a pop of spooky color. Position mini LED pumpkins around the edge to enhance the haunted vibe.
- Pair with a spiced latte or hot apple cider in matching Halloween mugs. The warm spices in your drink will harmonize beautifully with the buttery cookie and creamy chocolate.
- Offer as a DIY decorating station at your party. Lay out plain cookie cups, bowls of ganache, and tubs of candies. Guests can channel their inner mad scientist and craft custom Cookie Cups—perfect for kids’ activities.
- Package as spooky party favors by placing two or three cups in small cellophane bags tied with Halloween ribbon. Add a personalized tag for a charming takeaway that will have your guests howling with delight.
HOW TO STORE HALLOWEEN COOKIE CUPS
Keeping your Halloween Cookie Cups fresh and flavorful is easy if you follow a few smart storage tricks. Whether you’re preparing them a day ahead or trying to stretch their shelf life for a week-long spooky celebration, these tips will ensure your treats stay crisp, creamy, and candy-topped. Remember that temperature and humidity play a big role in chocolate’s texture, so choose your storage method based on how soon you plan to serve them.
- Airtight container at room temperature
Place cookie cups in a single layer (or use parchment paper between layers) inside an airtight container. Store in a cool, dry spot away from direct sunlight—this will keep the ganache firm and the cookies crisp for up to two days.
- Refrigerate for extended freshness
If you want to make these up to a week in advance, line a container with a paper towel and arrange the cookie cups in a single layer. Seal tightly and refrigerate. Before serving, allow them to come to room temperature for 15–20 minutes to soften the ganache.
- Freeze individual cups
For longer storage, flash-freeze the fully set cookie cups on a baking sheet. Once solid, transfer to a freezer-safe bag, separating layers with parchment paper. Freeze for up to one month. Thaw in the fridge overnight and then rest at room temperature before serving.
- Separate layers with parchment paper
If you’re stacking, place a square of parchment or wax paper between each layer of cookie cups to prevent sticking and preserve your spooky toppers.
CONCLUSION
From the first crackle of sugar-cookie crust to the last drizzle of rich, vanilla-kissed chocolate, these Halloween Cookie Cups deliver playful flavor and festive flair in every single bite. This beginner-level dessert combines convenience—thanks to refrigerated dough—with the fun of hands-on decorating. Whether you’re whipping them up for a classroom party, a neighborhood potluck, or a cozy movie night in, you’ll love how simple it is to create a tray of spook-tacular goodies that disappear as fast as the carved pumpkins on your doorstep. With just 20 minutes of prep, 12 minutes of baking, and a brief rest time, you’ll have 24 perfect cups that pack about 180 calories of joy each—ideal for sharing or savoring at your leisure.
Feel free to print this article and save it for later reference, or tuck it into your digital recipe binder where it’ll be waiting anytime the Halloween mood strikes. Don’t forget—there’s a FAQ section below to answer any lingering questions about variations, substitutions, or troubleshooting your cookie cups. If you try this recipe, I’d love to hear how it went! Leave your comments, questions, or feedback right here. Whether you have a tip on an adult-only twist with a splash of liqueur, or you discovered a new candy combo that blew your mind, let’s keep the conversation going so every home cook can enjoy these festive little cups to the fullest. Happy haunting—and even happier baking!
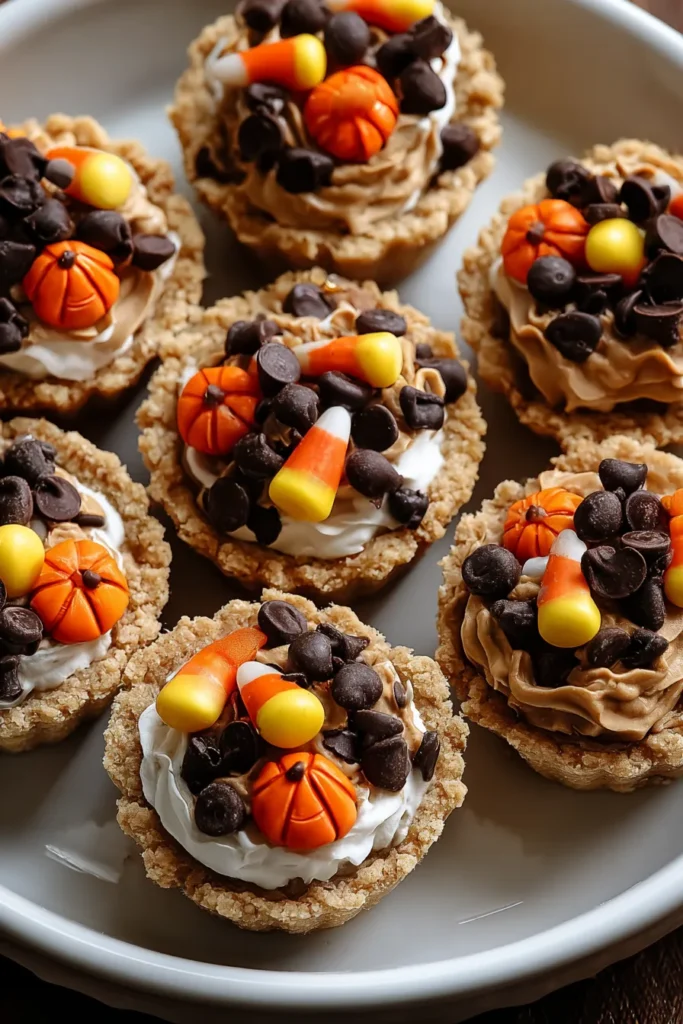

Halloween Cookie Cups
Description
These Halloween Cookie Cups are a delightful treat packed with gooey chocolate and topped with festive candies. Perfect for celebrating the spooky season with a burst of flavor!
Ingredients
Instructions
-
Preheat your oven to 350°F (175°C). Lightly spray a 24-cup mini muffin pan with cooking spray.
-
Cut the sugar cookie dough into 24 even pieces. Roll each piece into a ball and place in each muffin cup.
-
Press the center of each dough ball gently to form a small indentation or "cup" shape.
-
Bake the cookie cups in the preheated oven for 10-12 minutes or until the edges are lightly golden. Remove from oven and immediately use the end of a wooden spoon to press down the center of each cookie again, creating a cup shape.
-
Allow the cookie cups to cool in the pan for about 10 minutes, then remove them from the pan and transfer to a wire rack to cool completely.
-
While the cookie cups cool, make the chocolate filling. In a medium saucepan, combine the mini chocolate chips, heavy cream, butter, and vanilla extract over low heat. Stir continuously until the mixture is completely melted and smooth.
-
Spoon or pipe the chocolate mixture into each cooled cookie cup, filling them to the top.
-
Decorate each cookie cup with the assorted Halloween candies, pressing them gently into the chocolate filling.
-
Allow the cookie cups to sit at room temperature until the chocolate filling sets, or refrigerate them for quicker setting.
Note
- These cookie cups can be made a day in advance and stored in an airtight container.
- For a fun twist, try using different flavored candies or add a pinch of sea salt to the chocolate filling for extra flavor.
- Customize the decorations to match the Halloween theme; use themed sprinkles, edible glitter, or create spooky faces with icing.
- For an adult version, consider adding a splash of your favorite liqueur to the chocolate filling for a rich, deeper taste.

