

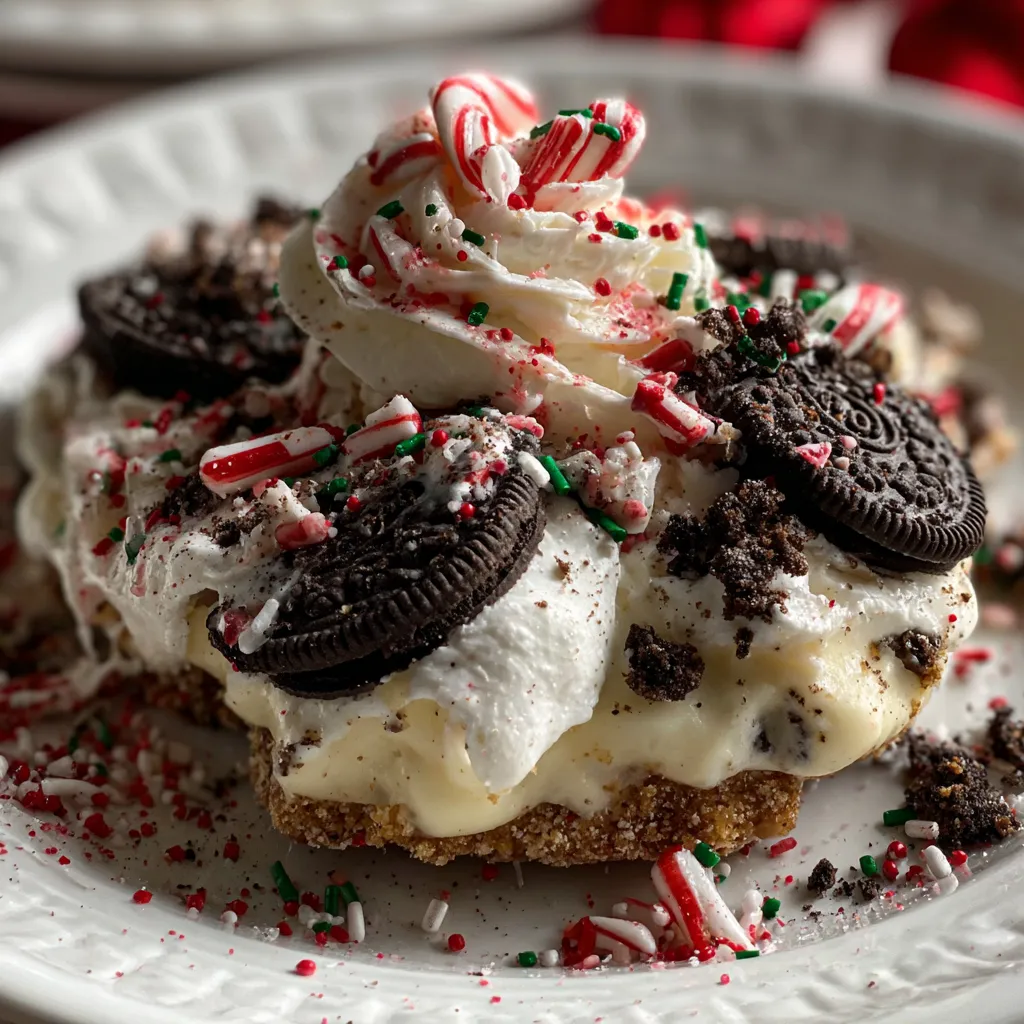
This festive no-bake Christmas Cookie Lush Dessert layers crunchy Oreo crust, creamy cheesecake filling, and luscious vanilla and chocolate puddings into a showstopping treat. Finished with clouds of whipped topping and peppermint sprinkles, it’s the ultimate holiday dessert that you can whip up in just minutes—and chill until guests arrive. Let’s dive into how to build this layered delight and make your season even sweeter!
Key Ingredients
Gather the essentials to build this layered holiday dessert from a chocolatey crust to fluffy whipped topping.
- 1 package (14.3 oz) Oreo cookies, crushed: Creates a rich chocolate base with a satisfying crunch that holds all the layers together.
- ½ cup unsalted butter, melted: Binds the Oreo crumbs into a firm, sliceable crust.
- 1 package (8 oz) cream cheese, softened: Provides a silky cheesecake layer that balances the sweet pudding.
- 1 cup powdered sugar: Sweetens and stabilizes the cream cheese filling.
- 1 container (8 oz) whipped topping, thawed: Adds light, fluffy clouds to the cheesecake and pudding layers.
- 2 cups milk: The liquid base for both pudding mixes.
- 1 package (3.4 oz) instant vanilla pudding mix: Delivers a smooth, sweet vanilla layer.
- 1 package (3.4 oz) instant chocolate pudding mix: Adds a decadent chocolate layer.
- ½ teaspoon vanilla extract: Enhances the flavor of the vanilla pudding.
- Sprinkles or crushed candy canes for garnish: Gives a festive crunch and bright color on top.
How To Make Festive No Bake Christmas Cookie Lush Dessert
Ready to layer up this easy holiday masterpiece? You’ll start by crafting a sturdy Oreo crust, then build a creamy cheesecake layer before alternating vanilla and chocolate puddings. Finish with whipped topping and festive garnishes. Each step is simple, no baking required—just a little chilling time to let those layers set perfectly.
1. In a mixing bowl, combine the crushed Oreo cookies and melted butter, stirring until the crumbs are evenly coated and resemble wet sand.
2. Press the cookie mixture into the bottom of a 9×13-inch baking dish to form a firm crust. Use the back of a measuring cup or your hands to tightly pack it.
3. In another bowl, beat the softened cream cheese and powdered sugar together until smooth and creamy.
4. Gently fold in 1 cup of the thawed whipped topping into the cream cheese mixture until no streaks remain.
5. Spread the cream cheese mixture evenly over the Oreo crust in the baking dish.
6. In a large bowl, whisk together the milk and instant vanilla pudding mix for about 2 minutes, or until it is thickened.
7. Stir in the vanilla extract and half of the remaining whipped topping into the pudding mixture until fully incorporated.
8. Pour the vanilla pudding evenly over the cream cheese layer in the baking dish.
9. Next, whisk together the milk and instant chocolate pudding mix for about 2 minutes until it’s thickened.
10. Layer the chocolate pudding mixture evenly over the vanilla pudding layer.
11. Finally, top the dessert with the remaining whipped topping, spreading it out with a spatula.
12. Garnish the top with sprinkles or crushed candy canes for a festive flair.
13. Cover the baking dish with plastic wrap and refrigerate for at least 4 hours or overnight to let the layers set.
14. Before serving, slice into squares and enjoy your delicious, festive no-bake dessert.
Serving Suggestions
This lush dessert shines on its own, but these serving ideas will elevate its presentation and enjoyment.
- Serve chilled in glass dessert cups for individual portions, topped with extra sprinkles or a candy cane shard for a pretty touch.
- Arrange slices on a holiday-themed platter, and tuck in fresh mint leaves or holly berries around the edges for festive flair.
- Pair each square with a warm mug of hot cocoa or spiced coffee for a cozy winter pairing.
- Drizzle with melted white chocolate or caramel sauce right before serving to add extra indulgence.
Tips For Perfect Festive No Bake Christmas Cookie Lush Dessert
To get this holiday dessert just right, a few insider pointers will help you nail every layer and flavor combo without stress. Keep everything well-chilled, pay attention to consistency when mixing puddings, and don’t rush the setting time—those layers need a bit of patience to stay neat. Whether you’re a beginner or a seasoned pro, these simple tweaks and swaps let you put your own spin on the recipe.
- You can substitute the Oreos for any type of chocolate cookie for a different flavor profile.
- Feel free to add layers like crushed peppermint or nuts for additional texture and flavor.
- This dessert can be made a day in advance, making it perfect for holiday gatherings.
- The layers can be customized; try using different pudding flavors like white chocolate or butterscotch for variety.
How To Store It
Once your Lush Dessert is assembled, storing it properly keeps every bite tasting fresh and vibrant. Whether you have leftovers or want to prep ahead, follow these methods to maintain texture and flavor.
- Refrigerate: Cover the baking dish tightly with plastic wrap or a snug lid to lock in moisture, storing in the fridge for up to 3–4 days.
- Individual Portions: Transfer slices into airtight containers for easy grab-and-go servings, keeping them fresh and mess-free.
- Freeze for Later: Wrap each square in plastic wrap, then place in a freezer-safe container; thaw overnight in the refrigerator before serving.
- Garnish Storage: Keep extra sprinkles or crushed candy canes in small airtight jars to preserve their color and crunch for topping fresh slices.
Frequently Asked Questions
Here are some quick answers to common questions to make your dessert prep smooth and stress-free:
- How long does it take to prepare and chill this Festive No Bake Christmas Cookie Lush Dessert?
Active prep takes about 20–30 minutes, which includes crushing the cookies, mixing layers, and assembling. After assembly, you need to refrigerate for at least 4 hours or preferably overnight so the layers set properly.
- What’s the best way to crush the Oreo cookies for the crust?
Place the cookies in a sealed plastic bag and crush them with a rolling pin until they resemble fine crumbs. Alternatively, pulse them in a food processor for 10–15 seconds. Aim for “wet sand” consistency when combined with melted butter.
- Can I substitute the whipped topping with homemade whipped cream?
Yes. Chill 2 cups of heavy whipping cream and beat with 2 tablespoons of powdered sugar and ½ teaspoon vanilla extract until stiff peaks form. Use the same amount called for in the recipe, folding 1 cup into the cream cheese layer and topping with the rest.
- How can I customize the pudding layers for different flavors?
Swap the vanilla or chocolate instant pudding mix with flavors like white chocolate, butterscotch, or peppermint. Prepare each according to package directions with 1 cup milk per pouch, then layer in the same order. For extra texture, stir in crushed peppermint or chopped nuts.
- What’s the best way to layer the dessert cleanly?
Spread each layer gently with an offset spatula. After pressing the Oreo crust, chill 10–15 minutes before adding the cream cheese layer to help it stay crisp. Let each pudding layer set slightly (about 5 minutes) in the dish before adding the next.
- How should I store leftovers and how long will they last?
Cover the baking dish tightly with plastic wrap or transfer portions to airtight containers. Store in the refrigerator for up to 3–4 days. The dessert may soften over time, so consume within this window for best texture.
- Can I make this dessert gluten-free or dairy-free?
For gluten-free, use gluten-free chocolate sandwich cookies. For dairy-free, substitute cream cheese with dairy-free cream cheese, use coconut whipped topping, and choose dairy-free pudding mixes or make pudding from scratch using cornstarch, dairy-free milk, and sweetener.
- What garnish options work besides sprinkles or crushed candy canes?
Try mini chocolate chips, shaved dark or white chocolate, chopped peppermint bark, chopped nuts (like pistachios or pecans), or a dusting of cocoa powder or edible glitter for extra holiday flair.
What Makes This Special
This no-bake Christmas Cookie Lush Dessert hits all the right notes: a crunchy Oreo foundation, dreamy cheesecake layer, and a gorgeous duo of vanilla and chocolate puddings crowned with billowy whipped topping and festive sprinkles. It’s delightfully easy, endlessly customizable, and a stress-free crowd-pleaser when holiday chaos strikes. Feel free to print this article and tuck it into your holiday recipe binder. Give it a try, then drop a comment with your tweaks, questions, or just to share how much your family loved every layered bite!

Festive No Bake Christmas Cookie Lush Dessert
Description
This no-bake dessert layers crunchy Oreo, silky cream cheese, and luscious vanilla and chocolate pudding, finished with clouds of whipped topping and peppermint sprinkles for a cool, festive crunch.
Ingredients
Instructions
-
In a mixing bowl, combine the crushed Oreo cookies and melted butter. Stir until the mixture is well combined and resembles wet sand.
-
Press the cookie mixture into the bottom of a 9x13 inch baking dish to form a crust. Use the back of a measuring cup or your hands to tightly pack the crust.
-
In another bowl, beat the softened cream cheese and powdered sugar together until smooth and creamy.
-
Gently fold in 1 cup of the thawed whipped topping into the cream cheese mixture until well combined.
-
Spread the cream cheese mixture evenly over the Oreo crust in the baking dish.
-
In a large bowl, whisk together the milk and instant vanilla pudding mix for about 2 minutes, or until it is thickened.
-
Stir in the vanilla extract and half of the remaining whipped topping into the pudding mixture until it is fully incorporated.
-
Pour the vanilla pudding evenly over the cream cheese layer in the baking dish.
-
Next, whisk together the milk and instant chocolate pudding mix for about 2 minutes until thickened.
-
Layer the chocolate pudding mixture over the vanilla pudding layer evenly.
-
Finally, top the dessert with the remaining whipped topping, spreading it evenly across the top.
-
Garnish the dessert with sprinkles or crushed candy canes for a festive touch.
-
Cover the baking dish with plastic wrap and refrigerate for at least 4 hours or overnight to allow the layers to set properly.
-
Before serving, slice into squares and enjoy your delicious, festive no-bake dessert.
Note
- You can substitute the Oreos for any type of chocolate cookie for a different flavor profile.
- Feel free to add layers like crushed peppermint or nuts for additional texture and flavor.
- This dessert can be made a day in advance, making it perfect for holiday gatherings.
- The layers can be customized; try using different pudding flavors like white chocolate or butterscotch for variety.

