

A slice of white chocolate cheesecake isn’t just dessert; it’s a little moment of pure joy you can whip up at home. This luxuriously creamy cheesecake infused with white chocolate and crowned with fresh berries blends silky sweetness with tangy cream cheese, offering a melt-in-your-mouth texture that’ll have you coming back for seconds. Whether you’re celebrating a special occasion or simply craving something sweet, this recipe is your ticket to indulgence. Let’s dive in and turn simple ingredients into a show-stopping treat!
Key Ingredients
Start by gathering these essentials—each component plays a crucial role in building that dreamy texture and flavor:
- 1 ½ cups graham cracker crumbs: Crisp crumbs that form a sturdy, buttery base for the cheesecake crust.
- ½ cup unsalted butter, melted: Binds the crumbs together and adds rich, creamy flavor to the crust.
- 1 cup white chocolate chips: Melted into the batter for a smooth, sweet infusion of creamy white chocolate.
- 16 oz cream cheese, softened: The creamy backbone of the filling, delivering that signature tang and velvety mouthfeel.
- ¾ cup granulated sugar: Sweetens the filling and helps achieve a silky, lump-free texture.
- ½ cup sour cream: Adds a subtle tang and ensures the cheesecake remains moist and smooth.
- 4 large eggs: Provide structure and help the filling set without becoming rubbery.
- 1 tsp vanilla extract: Enhances overall flavor with warm, aromatic notes.
- 1 cup heavy cream: Whipped into soft peaks for a light, airy topping that contrasts the dense filling.
- Additional white chocolate shavings and berries for garnish (optional): Adds an elegant touch and pops of fresh flavor.
How To Make White Chocolate Cheesecake
Ready to transform those ingredients into a stunning dessert? This step-by-step guide walks you through creating a velvety filling, a crisp crust, and that perfect chill time. Follow these instructions carefully for a crack-free, dreamy cheesecake.
1. Preheat the oven to 325°F (160°C). Place a rack in the center, then grease a 9-inch springform pan with a thin layer of butter or nonstick spray.
2. In a medium bowl, combine the graham cracker crumbs and melted butter. Stir until the crumbs are evenly coated and resemble wet sand, ensuring a cohesive crust.
3. Press the mixture firmly into the bottom of the prepared pan, creating an even layer. Bake for 10 minutes until set, then remove and let cool completely.
4. While the crust cools, melt the white chocolate chips in a microwave-safe bowl. Heat in 30-second intervals, stirring after each, until smooth. Allow the melted chocolate to cool slightly.
5. In a large mixing bowl, use an electric mixer to beat the softened cream cheese on medium speed until smooth and creamy, about 2 minutes.
6. Gradually add the granulated sugar and keep mixing until fully incorporated and the mixture is silky.
7. Add the sour cream, then crack in the eggs one at a time, and pour in the vanilla extract. Mix on low speed after each addition until just combined.
8. Slowly pour the cooled white chocolate into the cream cheese mixture. Fold gently until no streaks remain.
9. Pour the batter over the cooled crust and use a spatula to smooth the top evenly.
10. Bake for 50–60 minutes, or until the edges are set and the center still has a slight jiggle when you gently shake the pan.
11. Turn off the oven and crack the door open. Let the cheesecake cool slowly inside for 1 hour—this gradual temperature change prevents cracks.
12. Once cooled, cover the pan with plastic wrap and refrigerate for at least 4 hours, preferably overnight, to allow the filling to fully set.
13. Before serving, whip the heavy cream on high speed until it forms soft peaks. Spread or pipe the whipped cream over the cheesecake and garnish with white chocolate shavings and fresh berries if desired.
Serving Suggestions
Once your cheesecake is perfectly chilled and adorned, it’s time to plate like a pro. Whether you’re hosting guests or enjoying a solo treat, these ideas will elevate every forkful:
- Classic Berry Plate: Arrange slices on white dessert plates with a handful of fresh berries on the side, balancing the sweet filling with bright, tart notes.
- Whipped Cream Swirls: Use a piping bag with a star tip to create elegant rosettes of whipped cream on each slice for a bakery-style presentation.
- Drizzled Caramel or Chocolate: Warm a bit of caramel or dark chocolate and drizzle over the cheesecake in a zigzag pattern for extra richness.
- Festive Nut Crunch: Sprinkle toasted chopped nuts—like almonds or pistachios—over each slice just before serving to add a satisfying crunch and pop of color.
Tips For Perfect White Chocolate Cheesecake
Creating a flawless cheesecake can feel intimidating, but with a few insider tricks, you’ll nail that silky texture and crack-free surface every time. Keep these tips in mind as you bake:
- This cheesecake can be made a day in advance, as it tastes even better after sitting in the refrigerator overnight.
- For a richer flavor, try adding a tablespoon of lemon juice to the cheesecake batter.
- To make a chocolate cookie crust, substitute the graham cracker crumbs with crushed Oreo cookies.
- You can use a water bath to bake the cheesecake, which helps maintain moisture and creates a creamier texture.
- Experiment with different toppings, such as fruit compote, nuts, or a drizzle of caramel sauce for added flair.
How To Store It
Proper storage keeps every slice tasting as fresh as the first. Follow these simple methods to preserve texture and flavor:
- Refrigerate in an Airtight Container
Once fully set, transfer leftover slices to an airtight container or keep the whole cheesecake in the springform pan wrapped in plastic wrap. Store in the fridge for up to five days.
- Cover Tightly with Plastic Wrap
Press plastic wrap directly on the surface of the cheesecake before sealing with foil or a lid to prevent a dry top and absorption of other fridge odors.
- Freeze for Longer Preservation
For extended storage, wrap individual slices or the entire cheesecake tightly in plastic wrap, then in aluminum foil. Freeze for up to one month without sacrificing creaminess.
- Thaw Gradually in Refrigerator
When ready to enjoy frozen cheesecake, move it to the fridge and let it thaw overnight. This gentle thaw ensures the texture remains smooth and velvety.
Frequently Asked Questions
Got questions? Here are some quick answers to common cheesecake concerns:
- How do I ensure my cheesecake has a smooth, creamy texture?
Start with fully softened cream cheese at room temperature and beat it until airy before adding sugar. Melted white chocolate should be cooled to just warm to avoid cooking the filling. Add eggs one at a time on low speed and mix only until combined. Avoid overmixing to maintain a velvety texture.
- Why do I need to cool the cheesecake in the oven with the door cracked?
Gradually cooling in the turned-off oven prevents sudden temperature changes that cause the surface to crack. Leaving the door ajar allows moisture to escape slowly and helps the cake settle uniformly.
- Can I substitute any ingredients to suit dietary needs?
You can use gluten-free graham cracker crumbs or a gluten-free cookie crust to make it gluten-free. Swap sour cream for Greek yogurt for a tangy profile, and use dairy-free white chocolate and vegan cream cheese if needed. Keep ratios similar for best results.
- How do I know when the cheesecake is fully baked?
The edges should appear set and slightly puffed, while the center remains slightly jiggly when you gently shake the pan. The residual heat will finish cooking the center as it cools.
- Why is a water bath recommended and how do I set it up?
A water bath adds gentle, even heat and moisture, preventing cracks and soggy crust. Wrap the springform pan’s base in foil, place it in a larger pan, and pour hot water halfway up the side of the springform. Bake as directed.
- How long can I store the cheesecake, and can I freeze it?
When refrigerated in an airtight container, the cheesecake stays fresh for up to five days. To freeze, wrap it tightly in plastic wrap and foil. It can be frozen for up to one month. Thaw overnight in the refrigerator before serving.
- What are some creative topping variations?
Beyond whipped cream, try a fruit compote made of simmered berries and sugar for a bright contrast. Toasted nuts, a salted caramel drizzle, or shaved dark chocolate can also add texture and complementary flavors.
What Makes This Special
This white chocolate cheesecake works its magic by combining a buttery graham cracker crust with a silky, melt-in-your-mouth filling that’s elevated by the sweet richness of melted white chocolate. Topped with airy whipped cream and vibrant berries, each bite balances creamy and tangy notes for a truly luxurious dessert experience. Keep this article handy—print it out or bookmark it for your next baking session—and feel free to share your comments, questions, or feedback if you give this recipe a whirl!
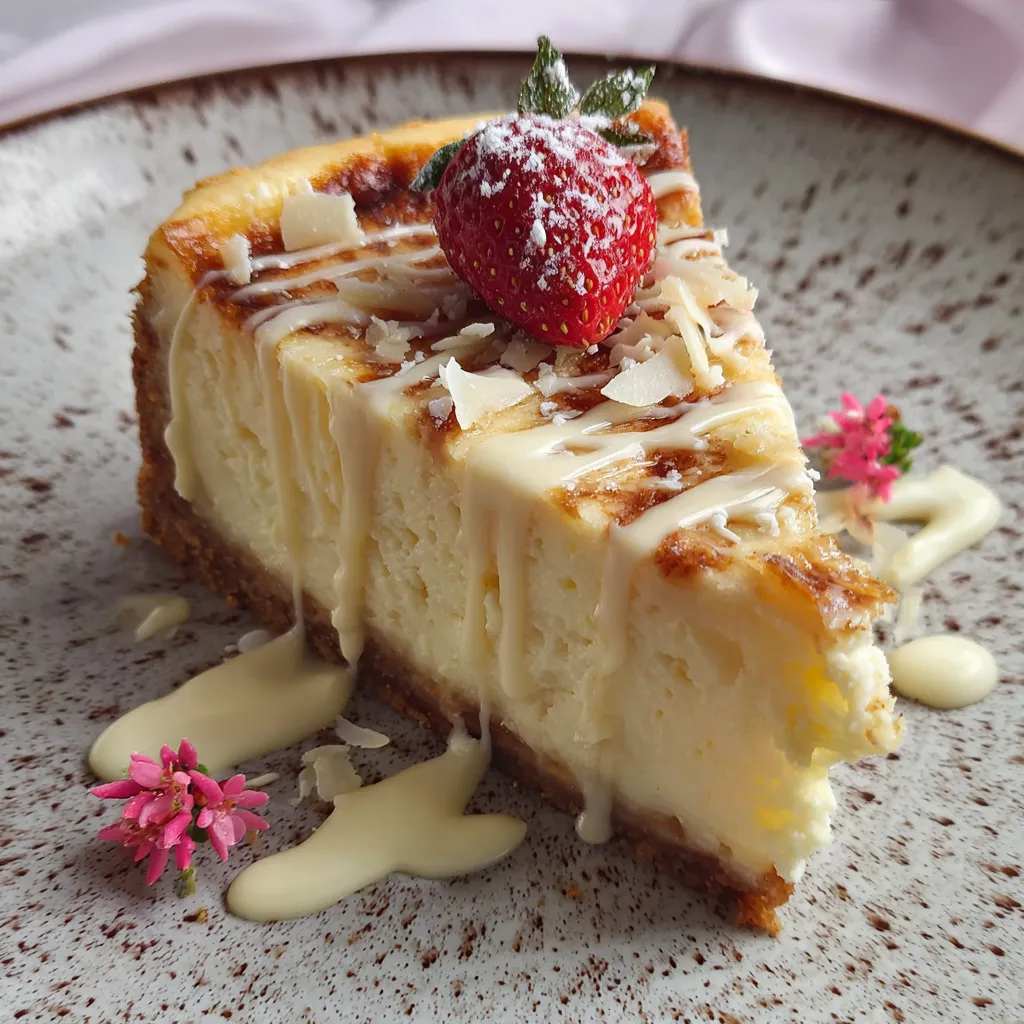

White Chocolate Cheesecake
Description
This cheesecake blends silky white chocolate with tangy cream cheese, offering a smooth, melt-in-your-mouth texture enhanced by a buttery graham cracker crust.
Ingredients
Instructions
-
Preheat the oven to 325°F (160°C). Grease a 9-inch springform pan and set aside.
-
In a medium bowl, combine the graham cracker crumbs and melted butter. Mix until the crumbs are evenly coated and resemble wet sand.
-
Press the crumb mixture firmly into the bottom of the prepared springform pan to create an even crust. Bake in the preheated oven for 10 minutes, then remove and let cool.
-
While the crust is cooling, melt the white chocolate chips in a microwave-safe bowl, heating in 30-second intervals and stirring until smooth. Set aside to cool slightly.
-
In a large mixing bowl, beat the softened cream cheese with an electric mixer until smooth and creamy.
-
Gradually add in the granulated sugar and continue to mix until fully incorporated.
-
Add the sour cream, eggs one at a time, and the vanilla extract, mixing after each addition until smooth.
-
Slowly pour the melted white chocolate into the cream cheese mixture, and mix until combined.
-
Pour the cheesecake batter over the cooled crust in the springform pan, smoothing the top with a spatula.
-
Bake in the oven for 50-60 minutes or until the edges are set but the center still has a slight jiggle.
-
Once baked, turn off the oven, crack the door, and let the cheesecake cool slowly for 1 hour to prevent cracks.
-
After cooling, cover with plastic wrap and refrigerate for at least 4 hours or overnight to set completely.
-
Before serving, whip the heavy cream until it forms soft peaks. Spread or pipe it on top of the chilled cheesecake. Garnish with white chocolate shavings and berries if desired.
Note
- This cheesecake can be made a day in advance, as it tastes even better after sitting in the refrigerator overnight.
- For a richer flavor, try adding a tablespoon of lemon juice to the cheesecake batter.
- To make a chocolate cookie crust, substitute the graham cracker crumbs with crushed Oreo cookies.
- You can use a water bath to bake the cheesecake, which helps maintain moisture and creates a creamier texture.
- Experiment with different toppings, such as fruit compote, nuts, or a drizzle of caramel sauce for added flair.

