

Decadent No-Bake Creamy Cheesecake Tacos offer a playful spin on classic desserts: creamy cheesecake filling nestled in crisp, graham-dusted taco shells, topped with tangy berries and bright lemon zest. These cheesecake tacos combine velvety filling with nutty, buttery shells and bursts of fresh berry flavor for a delightful contrast of textures. Whether you’re looking for a fun weeknight treat or a show-stopping party dessert, this no-bake recipe is easy, impressive, and guaranteed to become a new favorite.
Key Ingredients
Before we dive into assembling these fun tacos, let’s gather the simple ingredients that bring together creamy, crunchy, and bright flavors.
- 8 ounce cream cheese, softened: Rich, tangy base that becomes velvety when whipped into a smooth cheesecake filling.
- 1 cup heavy whipping cream: Provides light, airy texture when whipped to stiff peaks, ensuring stability.
- 1/2 cup powdered sugar: Sweetens the filling without graininess, helping create a silky-cheese core.
- 1 teaspoon vanilla extract: Adds aromatic warmth and classic dessert flavor.
- 6 small flour tortillas: Flexible shells that fold neatly and crisp to hold the creamy filling.
- 2 tablespoons melted butter: Coats tortillas so graham crumbs stick and build a buttery shell.
- 1/4 cup graham cracker crumbs: Offer nutty, crunchy contrast to the soft filling.
- 1/2 cup mixed berries: Adds bursts of tangy-sweet freshness and vibrant color.
- 1 tablespoon lemon zest: Brightens each bite with a citrusy kick that balances the richness.
How To Make Decadent No-Bake Creamy Cheesecake Tacos
With simple steps like whipping up the cheesecake filling, crafting graham-dusted shells, and assembling toppings, this recipe is beginner-friendly and oh-so-delicious. Just follow the detailed instructions below to ensure perfect texture and flavor in every bite.
1. In a large bowl beat the softened cream cheese using an electric mixer until completely smooth and free of lumps, creating a silky base for your cheesecake filling.
2. Add the powdered sugar and vanilla extract to the bowl and mix on medium speed until the sugar is fully incorporated and the mixture is fragrant.
3. In a separate chilled bowl, whip the heavy cream on medium-high speed until it forms stiff peaks, then gently fold it into the cream cheese mixture with a spatula to maintain that airy texture.
4. Brush each flour tortilla lightly with melted butter on one side, then sprinkle graham cracker crumbs evenly over the buttery surface to ensure a crunchy shell.
5. Fold each tortilla in half over the graham layer and press gently along the fold to form a taco-shaped shell that will hold the creamy filling.
6. Spoon the cheesecake mixture into each taco shell, dividing it evenly to fill all six shells without overstuffing.
7. Top each taco with a handful of mixed berries and a light sprinkle of lemon zest to add bright pops of flavor and color.
8. Chill the assembled tacos in the refrigerator for at least two hours—this resting time allows the filling to set and the flavors to meld perfectly before serving.
Serving Suggestions
These cheesecake tacos aren’t just adorable—they also shine when dressed up for any occasion. Whether you’re hosting a brunch, planning a festive dessert table, or need a quick after-dinner crowd-pleaser, presentation can elevate every bite. From stylish platter arrangements to playful garnishes and dipping sauces, these serving ideas will help showcase the creamy filling, crunchy crust, and vibrant berries. Trust me, once you decorate them right, people will be asking for seconds!
- Decorative Platter Display: Arrange tacos on a large white platter to make the colors pop and give a clean, modern look.
- Dust with Powdered Sugar: Lightly sift extra powdered sugar over the tacos just before serving for a snow-kissed finish and added sweetness.
- Add Mint Leaves: Garnish with fresh mint sprigs alongside the tacos to introduce aromatic contrast and visual freshness.
- Serve with Dipping Sauces: Offer small bowls of chocolate or caramel sauce on the side for guests to drizzle over each taco for extra decadence.
Tips For Perfect Decadent No-Bake Creamy Cheesecake Tacos
Mastering these cheesecake tacos is all about temperature control, shell crispiness, and thoughtful garnishes. Keep your ingredients chilled for the fluffiest filling, handle the taco shells gently to avoid cracks, and choose toppings that complement without weighing things down. You can make components ahead of time—store shells and filling separately—then assemble at the last minute for effortless entertaining. Whether you’re feeding a crowd or treating yourself, these insider tricks will ensure your tacos look gorgeous and taste amazing every single time.
- Refrigerate tacos for optimal creamy texture and stability.
- Crisp shells can be achieved by briefly heating folded tortillas in a dry skillet.
- Substitute graham cracker crumbs with finely chopped nuts for added crunch.
- Garnish with chocolate or caramel drizzle for an extra layer of flavor.
How To Store It
Whether you’re prepping ahead for a party or saving leftovers for later, proper storage is key to preserving the creamy filling and crunchy shells. These methods will help maintain texture, prevent sogginess, and keep your tacos tasting fresh, even if you make them in advance or enjoy them over the next couple of days.
- Refrigerator Storage: Place assembled tacos in a single layer inside an airtight container and refrigerate for up to two days to keep filling creamy and shells firm.
- Separate Components: Store graham-dusted shells in a sealed bag at room temperature and keep cheesecake filling chilled in the fridge; assemble just before serving.
- Freezing Option: Wrap each filled taco tightly in plastic wrap, place in a freezer-safe bag, and freeze up to one month; thaw overnight in the refrigerator.
- Moisture Control: Line the storage container with a paper towel to absorb excess condensation and help shells stay crisp.
Frequently Asked Questions
Here are answers to questions you might have while making—or planning to make—these cheesecake tacos.
- How long does it take to prepare this recipe and chill the tacos?
It takes approximately 15 minutes to prepare the filling, assemble the shells, and spoon in the cream. After assembly, the tacos must chill in the refrigerator for at least two hours for optimal texture and stability, bringing the total time to around two hours and 15 minutes.
- What is the best way to achieve crisp taco shells?
To achieve crisp shells, fold the butter-brushed and crumb-covered tortillas in half and press them gently. Then heat a dry skillet over medium heat and cook each folded tortilla for about 1-2 minutes per side until lightly golden and crisp. Allow them to cool before filling to maintain crunch.
- How can I ensure the whipped cream reaches stiff peaks for a stable filling?
For stable stiff peaks, use a chilled mixing bowl and cold heavy whipping cream. Beat the cream on medium-high speed until it begins to thicken, then increase to high speed until the peaks hold their shape when you lift the whisk. Avoid over-beating to prevent the mixture from becoming grainy.
- Can I make substitutions for the graham cracker crumbs?
Yes, you can substitute graham cracker crumbs with finely chopped nuts such as almonds or pecans for added crunch and flavor. You may also use crushed cookies or gluten-free crumbs if you need a gluten-free alternative. Simply sprinkle your chosen substitute over the buttered tortilla before folding.
- Is it possible to make these cheesecake tacos in advance?
You can assemble the shells up to one day in advance and store them in an airtight container at room temperature. Keep the filling chilled separately. When ready to serve, whip up or take out the filling, spoon it into the shells, add toppings, and chill for the final two hours.
- How should I store leftover cheesecake tacos and how long do they last?
Store assembled and chilled cheesecake tacos covered in an airtight container in the refrigerator. They will maintain their best texture and flavor for up to two days. After that, the shells may soften and the filling may lose some of its fresh creaminess.
- Are there any dairy-free or vegan alternatives for this recipe?
To make a dairy-free version, replace the cream cheese with a vegan cream cheese alternative and use chilled coconut cream or a soy-based whipping cream substitute. Ensure the vegan cream is whipped to stiff peaks before folding it into the dairy-free cream cheese base, and proceed with the recipe as written.
- What topping variations can I try besides mixed berries and lemon zest?
You can drizzle melted chocolate or caramel sauce over the filled tacos, sprinkle chopped nuts, add fresh fruit slices such as kiwi or mango, or dust with cocoa powder or cinnamon for extra flavor layers. Choose toppings that complement the creamy filling without adding too much moisture.
What Makes This Special
These Decadent No-Bake Creamy Cheesecake Tacos are a playful twist on two beloved classics—tacos and cheesecake—making dessert time unexpectedly fun. The velvety cheesecake filling meets a crisp, graham-dusted tortilla in harmony, while fresh berries and zesty lemon bring brightness to each bite. It’s a no-bake wonder that’s perfect for busy days, spontaneous get-togethers, or whenever you need a dessert that’s as easy as it is impressive. And let’s be honest, everything in taco form makes life more fun! Feel free to print this article and save it for later, and leave a comment or question below if you give them a try or need any help.
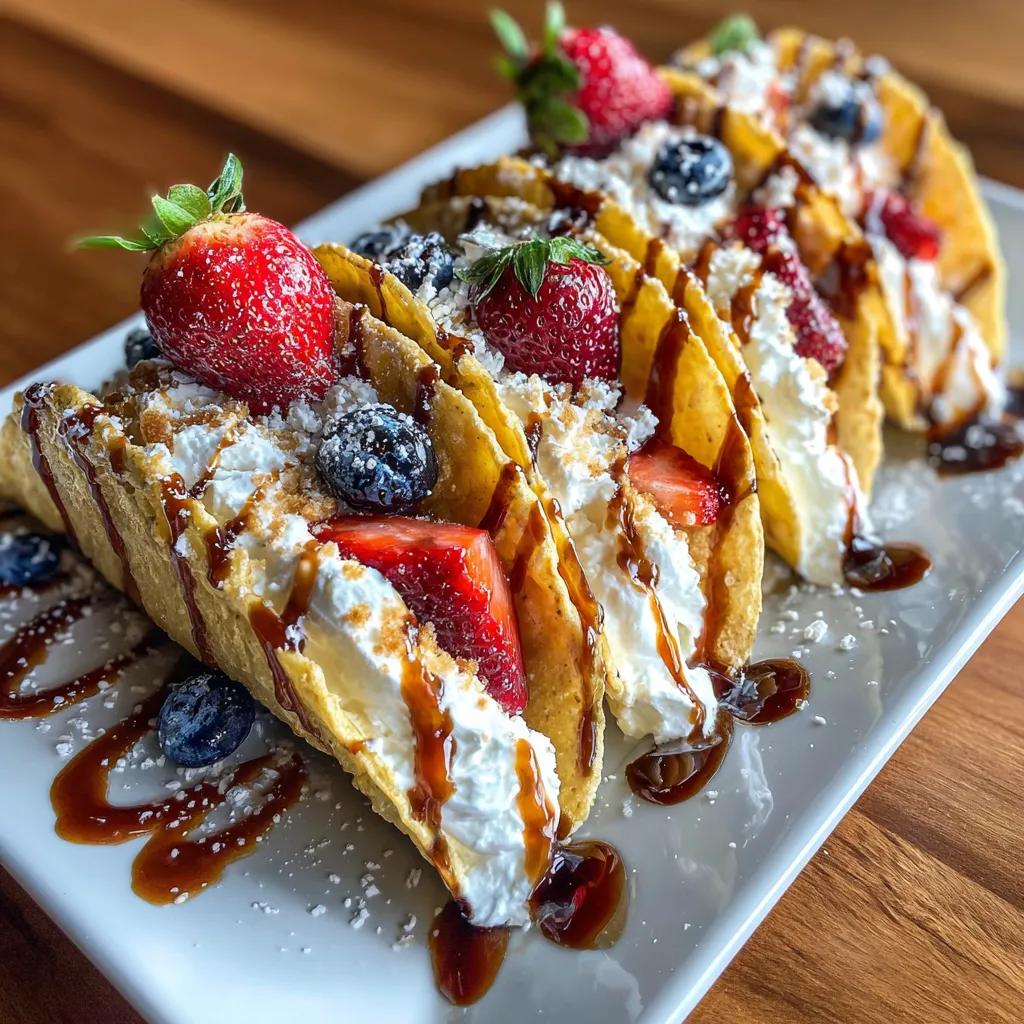

Decadent No-Bake Creamy Cheesecake Tacos
Description
These cheesecake tacos combine velvety filling with nutty, buttery shells and bursts of fresh berry flavor. Each bite crackles with graham crumbs and bright lemon aroma for a playful dessert twist.
Ingredients
Instructions
-
In a large bowl beat cream cheese until smooth and creamy.
-
Add powdered sugar and vanilla extract and mix until well combined.
-
In a separate bowl whip heavy cream to stiff peaks then gently fold into the cream cheese mixture.
-
Brush tortillas lightly with melted butter and sprinkle graham cracker crumbs evenly over one side of each tortilla.
-
Gently fold each tortilla in half over the crumbs and press to form taco shells.
-
Spoon the cheesecake filling into the shells, dividing evenly.
-
Top each taco with mixed berries and a sprinkle of lemon zest.
-
Chill tacos in the refrigerator for at least two hours before serving.
Note
- Refrigerate tacos for optimal creamy texture and stability.
- Crisp shells can be achieved by briefly heating folded tortillas in a dry skillet.
- Substitute graham cracker crumbs with finely chopped nuts for added crunch.
- Garnish with chocolate or caramel drizzle for an extra layer of flavor.

