

If you’re looking for a weeknight hero that’s both sweet and savory, Honey Garlic Chicken has your back. Tender thighs sizzle to golden perfection before getting a glossy, caramelized coating of honey, soy, and garlic. Finished with a sprinkle of sesame seeds and vibrant green onions, this dish hits all the right notes—juicy, flavorful, and fast enough for any busy evening. Give it a try and watch it become your new family favorite!
Key Ingredients
Before diving in, let’s meet the stars of this recipe and see how each one plays its part.
- 1.5 lbs boneless skinless chicken thighs: Succulent, juicy protein that soaks up the sweet-and-salty honey-garlic glaze.
- 2 tbsp vegetable oil: Neutral oil with a high smoke point for perfect searing without burning.
- 4 cloves garlic: Freshly minced garlic brings punchy aromatics and depth to the sauce.
- 1/4 cup honey: Natural sweetener that caramelizes beautifully and balances the soy’s saltiness.
- 3 tbsp soy sauce: Brings a rich, savory umami foundation to the glaze.
- 2 tbsp rice vinegar: Adds a gentle tang to cut through the sweetness.
- 1 tbsp ketchup: Provides a hint of tomato acidity and helps bind the sauce.
- 1 tsp cornstarch: Thickens the sauce into a luxurious glaze.
- 2 tbsp water: Used to create a smooth slurry with cornstarch.
- Salt to taste: Seasoning that enhances all the flavors.
- Pepper to taste: Adds a mild spiciness and depth.
- 1 tbsp sesame seeds: Toasted seeds give a nutty crunch on top.
- 2 green onions: Thinly sliced for a fresh, bright finish.
How To Make Honey Garlic Chicken
This recipe is all about layering simple steps: sear juicy chicken thighs, whip up a quick honey-garlic sauce, and let them reunite in a perfectly glazed skillet. In under 30 minutes, you’ll go from prep to plating with minimal fuss and maximum flavor.
1. Pat the chicken thighs dry and season both sides with salt and pepper to ensure even browning.
2. Heat the vegetable oil in a large skillet over medium-high heat until shimmering.
3. Add the chicken to the hot skillet and cook until golden brown and cooked through, about 5–7 minutes per side. Transfer the thighs to a plate and set aside.
4. Reduce heat to medium and add the minced garlic to the skillet, sautéing until fragrant, about 30 seconds—watch carefully to prevent burning.
5. In a small bowl, whisk together honey, soy sauce, rice vinegar, ketchup, cornstarch, and water until completely smooth.
6. Pour the sauce mixture into the skillet and bring to a gentle simmer, stirring constantly until the sauce thickens, around 2–3 minutes.
7. Return the chicken to the skillet, turning each piece to coat thoroughly in the sauce. Cook for another 2 minutes to heat through and let flavors meld.
8. Remove from heat and garnish with sesame seeds and sliced green onions before serving.
Serving Suggestions
This luscious Honey Garlic Chicken is versatile and pairs beautifully with simple sides that soak up every drop of glaze. Whether you’re hosting friends or craving a cozy meal, these ideas will elevate your plate and keep you coming back for seconds.
- Serve over steamed jasmine rice to catch every last bit of sticky sauce.
- Pair with stir-fried vegetables (broccoli, bell peppers, snap peas) for crunch and color.
- Spoon onto a bed of quinoa or cauliflower rice for a lighter, nutrient-packed twist.
- Wrap in buttery lettuce leaves with extra green onions for a fun, handheld appetizer.
Tips For Perfect Honey Garlic Chicken
Let’s make sure your Honey Garlic Chicken turns out flawlessly every time. These friendly pointers will help you tweak flavors, choose the best cuts, and keep that sauce just right.
- You can substitute chicken breasts for thighs if you prefer leaner meat—just watch cooking times.
- Adjust the honey and garlic amounts to suit your personal sweet-to-savory balance.
- Remember that the sauce will thicken further as it cools, so serve immediately for optimal texture.
- Pair with steamed rice or vegetables to create a complete, satisfying meal.
How To Store It
Got leftovers? No problem! Proper storage will keep your Honey Garlic Chicken juicy and flavorful for days, so you can enjoy a quick reheat without sacrificing taste.
- Refrigerate in an airtight container within two hours of cooking to maintain freshness for up to 3 days.
- Reheat gently in a skillet over low–medium heat, stirring occasionally and adding a splash of water if the sauce has thickened too much.
- Freeze portions in freezer-safe bags for up to 2 months; thaw overnight in the fridge before reheating.
- Store sauce separately from the chicken if possible to prevent the meat from becoming overly soft.
Frequently Asked Questions
Here are some quick answers to common queries about making the best Honey Garlic Chicken at home:
- Q: How long does it take to prepare this recipe?
It takes about 10 minutes to prep and 15–18 minutes to cook, for a total of roughly 25–28 minutes. Prep time includes patting the chicken dry, seasoning, mincing garlic, and measuring the sauce ingredients. Cooking time covers searing the chicken on both sides, sautéing garlic, simmering the sauce, and briefly reheating the chicken in the sauce.
- Q: Can I use chicken breasts instead of thighs?
Yes. Chicken breasts can be substituted but tend to be leaner and may dry out more quickly. Slice each breast into uniform pieces about 1-inch thick, season with salt and pepper, and reduce searing time to 4–5 minutes per side. Always check that the internal temperature reaches 165°F before proceeding to the sauce step.
- Q: How do I store and reheat leftovers?
Allow the chicken and sauce to cool to room temperature, then transfer to an airtight container. Store in the refrigerator for up to 3 days. To reheat, place contents in a skillet over low-medium heat, stirring gently and adding a tablespoon of water if the sauce has thickened too much. Heat until warmed through, about 3–4 minutes.
- Q: My sauce isn’t thickening. What can I do?
First ensure you whisked the cornstarch and water thoroughly into a slurry before adding to the skillet. If it’s still thin after simmering for 3 minutes, mix another ½ teaspoon cornstarch with 1 tablespoon water and stir into the sauce. Simmer another 1–2 minutes until the desired consistency is reached.
- Q: How can I adjust sweetness or acidity in the sauce?
To reduce sweetness, cut the honey by 1–2 tablespoons or add an extra teaspoon of rice vinegar. To boost acidity, add up to 1 teaspoon more rice vinegar or a few drops of fresh lemon juice. For more garlic flavor, add an extra clove or two during the sauté step, but watch closely to avoid burning.
- Q: Can I make this recipe gluten-free?
Yes. Substitute tamari or a gluten-free soy sauce for the regular soy sauce. Confirm the ketchup brand is gluten-free, and ensure your rice vinegar doesn’t contain any malt additives. All other ingredients—chicken, honey, garlic, and cornstarch—are naturally gluten-free.
- Q: What are some recommended side dishes or serving suggestions?
Steamed jasmine or brown rice soaks up the sauce perfectly. You can also serve over quinoa, cauliflower rice, or whole-wheat noodles. Steamed or stir-fried vegetables—such as broccoli, snap peas, bell peppers, or bok choy—add color and nutrition. Garnish with extra sliced green onions and serve immediately for the best texture.
What Makes This Special
Honey Garlic Chicken works like a charm because it balances sticky-sweet honey with savory soy and bright rice vinegar, all wrapped around juicy chicken thighs. It’s fast, forgiving, and crowd-pleasing—perfect for weeknight dinners or casual gatherings. Don’t forget to print this recipe and save it for your next culinary adventure. If you give it a whirl, drop a comment below with your tweaks or questions—I’d love to hear how yours turned out!
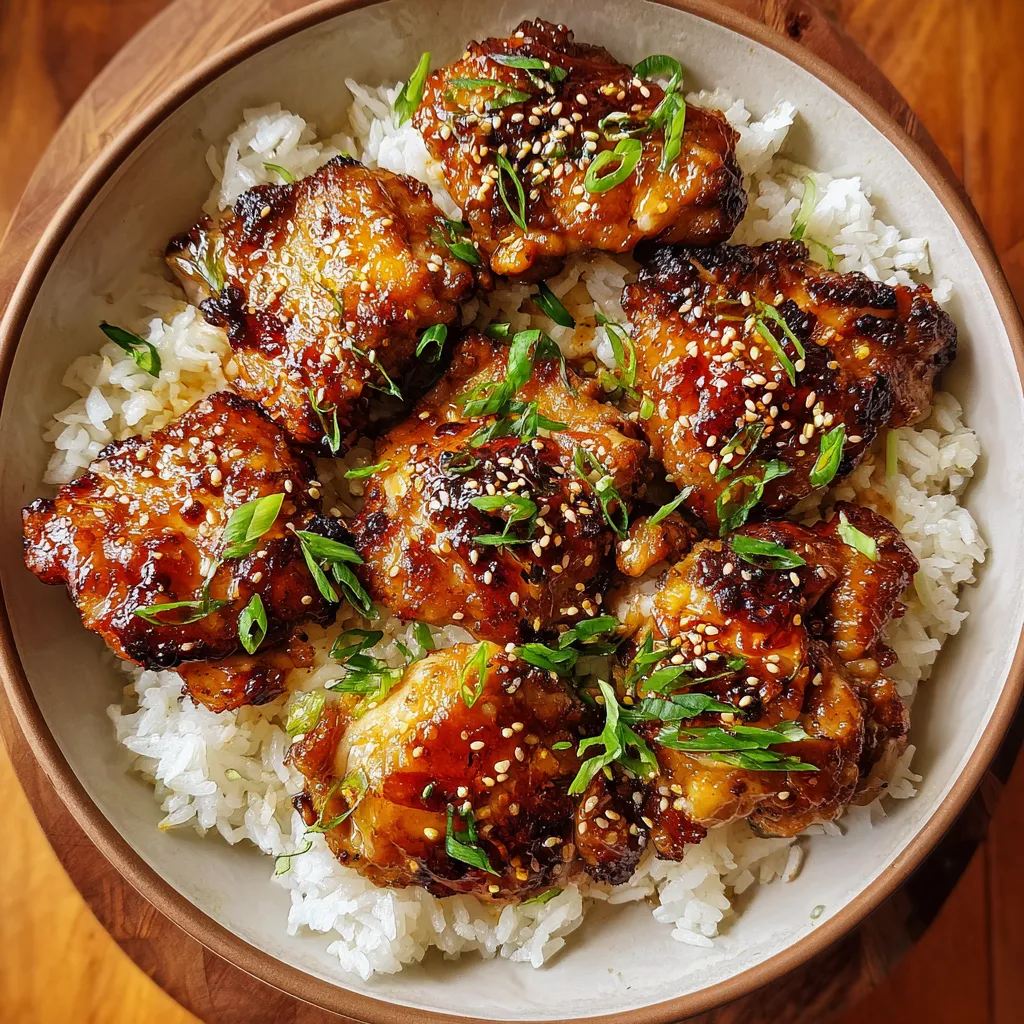

Honey Garlic Chicken
Description
This honey garlic chicken combines tender, golden-brown chicken thighs with a sticky, caramelized sauce bursting with garlicky aroma and a hint of tang. Finish with toasted sesame seeds and crisp scallions for contrast.
Ingredients
Instructions
-
Pat the chicken thighs dry and season both sides with salt and pepper.
-
Heat vegetable oil in a large skillet over medium-high heat.
-
Add the chicken to the skillet and cook until golden brown and cooked through, about 5–7 minutes per side. Remove chicken and set aside.
-
Reduce heat to medium and add garlic to the skillet, sautéing until fragrant, about 30 seconds.
-
In a small bowl, whisk together honey, soy sauce, rice vinegar, ketchup, cornstarch, and water until smooth.
-
Pour the sauce mixture into the skillet and bring to a gentle simmer, stirring until the sauce thickens, about 2–3 minutes.
-
Return the chicken to the skillet, coating each piece in the sauce. Cook for another 2 minutes to heat through.
-
Remove from heat and garnish with sesame seeds and sliced green onions before serving.
Note
- You can substitute chicken breasts for thighs if preferred.
- Adjust the honey and garlic amounts to suit your taste.
- The sauce will thicken further as it cools, so serve immediately.
- Pair with steamed rice or vegetables for a complete meal.

