
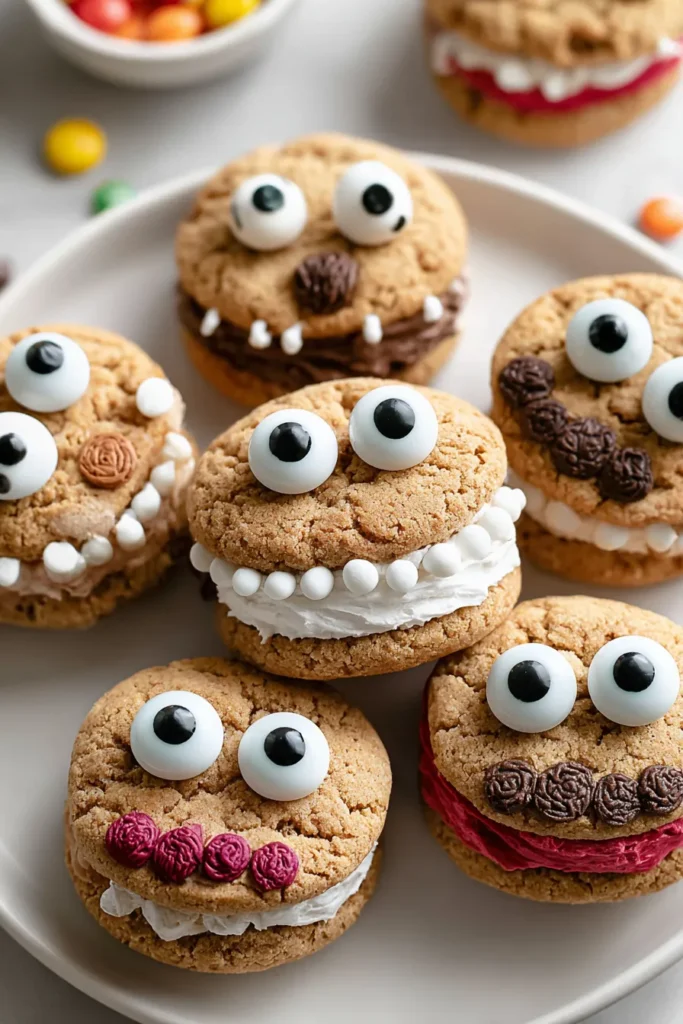
There’s something utterly magical about transforming a simple batch of cookies into a parade of colorful, giggle-inducing Monster Cookie Sandwiches. When I first stumbled upon this recipe, I couldn’t believe how effortlessly it combined chewy, buttery cookies with vibrant swirls of frosting and the silliest candy googly eyes. These treats aren’t just desserts; they’re little edible characters ready to join your next gathering. Whether you’re hosting a Halloween bash, planning a birthday party, or simply craving a whimsical afternoon pick-me-up, these sandwich cookies promise to bring smiles and sticky fingers in equal measure. Best of all, the journey takes just 20 minutes of prep, 12 minutes in the oven, and a 30-minute cool-down period—perfect for busy home bakers or enthusiastic beginners looking for a fun, rewarding bake.
Over time, I’ve experimented with all sorts of variations: minty green frosting with oversized eyes for a friendly swamp monster, neon pink swirls paired with sprinkle-studded fillings for a glittery dream creature, and even chocolate-on-chocolate monster mash-ups that disappeared almost as quickly as I finished decorating them. These Cute Monster Cookie Sandwiches are wonderfully customizable, and their beginner-friendly formula makes it easy to tweak quantities, swap flavors, or add little surprises—like a hidden Oreo crunch or a dash of cinnamon. Plus, at around 200 calories per sandwich, you can enjoy one (or two) without too much guilt. Get ready to dive into a playful baking adventure that doubles as a creative outlet; after all, nothing beats presenting a platter of charming little monsters to family and friends!
In this section, we’ll talk about the star players that make these monster cookie sandwiches so irresistible. Each ingredient brings its own magic—whether it’s fluffiness, sweetness, texture, or that cheeky pop of candy eyes—and by understanding their roles, you’ll breeze through the baking process with confidence.
Brings a rich, creamy foundation and helps the cookies spread evenly. Softened butter whips up with sugar to create a light, fluffy base that yields tender, melt-in-your-mouth cookie layers.
Adds crispness and sweetness while helping the cookies achieve a golden-brown edge. It works alongside brown sugar to enhance texture.
Contributes chewiness and a hint of caramel depth. Its moisture-retaining qualities keep the cookies soft and satisfyingly tender.
Provide structure and moisture. They bind the dough together, ensuring the cookies hold their shape as you sandwich them.
Infuses warm, aromatic notes that elevate the flavor profile. A splash of vanilla ties the sweetness of the sugars and richness of the butter into one cohesive bite.
Forms the cookie’s sturdy framework. It’s the backbone that supports mix-ins and frosting, yielding a dependable crumb.
Acts as a leavening agent to help the cookies rise just enough for a slightly puffed texture without losing their chewy center.
Offers mild lift and extra tenderness, ensuring the cookies aren’t too dense.
Balances sweetness and enhances overall flavor, making every bite more pronounced and satisfying.
Melt into gooey pockets of chocolatey goodness. They add bursts of texture and flavor throughout the cookie.
Transform ordinary sandwich cookies into whimsical monsters. Their playful appearance is key to the recipe’s charm.
Serves as the “glue” that sandwiches the cookies. It’s sweet, smooth, and perfect for sticking on those googly eyes.
Optional but highly encouraged! Use it to tint your frosting in vibrant shades that match your party theme or personal style.
Ready to bring these adorable creatures to life? Follow these steps in order, and you’ll have a batch of charming cookie sandwiches in no time.
1. Preheat your oven to 350°F (175°C) and line a baking sheet with parchment paper. This ensures even baking and easy cleanup.
2. In a large bowl, use a hand mixer or stand mixer to cream the softened butter, granulated sugar, and brown sugar together until the mixture is light and fluffy, about 2–3 minutes.
3. Beat in the eggs one at a time, ensuring each is fully incorporated before adding the next. Then stir in the vanilla extract to infuse that sweet, aromatic kick.
4. In a separate bowl, whisk together the all-purpose flour, baking soda, baking powder, and salt until everything is evenly distributed.
5. Gradually add the dry ingredients to the butter-sugar-e gg mixture, mixing on low speed until just combined. Be careful not to overmix to keep your cookies tender.
6. Gently fold in the mini chocolate chips, ensuring they’re evenly dispersed throughout the dough without deflating it.
7. Scoop tablespoon-sized mounds of dough onto the prepared baking sheet, spacing them about 2 inches apart to allow for slight spreading.
8. Bake for 10–12 minutes, or until the edges turn a light golden brown. Remove from the oven and let the cookies cool completely on a wire rack.
9. Once cool, portion your frosting into separate bowls if you’d like multiple colors. Stir in food coloring until you reach your desired shades.
10. Pick up one cookie, spread a generous layer of frosting on the flat side, and top with a second cookie to form a sandwich.
11. Press candy googly eyes into the frosting side, arranging them to create unique monster faces.
12. Repeat the assembly for all remaining cookies and admire your army of cute little monsters!
Serving these Cute Monster Cookie Sandwiches is half the fun! Whether you’re setting up a spooky spread or a colorful dessert table, the way you present them can take your baking from delightful to unforgettable. Think about the event’s theme and your guests’ ages—kids will adore a rainbow-hued monster party, while a grown-up gathering might appreciate a pastel palette or a chocolate-on-chocolate mash-up. You can arrange them on tiered stands, scatter them on decorative platters lined with shredded paper grass, or even set up a DIY decorating station where everyone gets to add their own edible flair. Don’t be afraid to mix and match eye sizes, experiment with frosting flavors, or tuck a few extra sprinkles between the sandwiches for a confetti surprise. Thoughtful presentation turns each cookie into a special treat and sparks compliments before the first bite is even taken.
Once your Cute Monster Cookie Sandwiches are assembled, you’ll want to keep them as fresh and flavorful as possible until they vanish. Proper storage ensures the cookies stay soft, the frosting maintains its vibrant color, and those googly eyes stay perfectly perched. If you’ve packed an entire army for a party, consider which method best suits your timeline—whether you need to prep them hours in advance or store leftovers for the next day. Airtight containers are your best friend here, but you can also freeze them for longer-term enjoyment. Remember to separate layers with parchment paper to prevent sticking, and keep them at room temperature or in the fridge depending on your frosting choice. That way, each monster arrives at the party just as adorable and delicious as when you first created it.
What began as a simple experiment quickly became one of my all-time favorite ways to bake with family and friends. From the first moment you cream the butter and sugars together to the final step of placing googly eyes on your frosted creations, these Cute Monster Cookie Sandwiches deliver endless joy—and plenty of deliciousness. We’ve covered everything from essential ingredients and step-by-step instructions to creative serving ideas and practical storage tips. Whether you’re a novice baker or a seasoned cookie connoisseur, this recipe strikes the perfect balance between simplicity and whimsy. Don’t forget: with just 20 minutes of active prep time, 12 minutes in the oven, and a short rest period, these sandwich cookies are as quick as they are captivating.
Feel free to print this article and tuck it into your recipe binder or bookmark it for the next time you need a show-stopping dessert. You can save it for later use and revisit these instructions anytime you’re craving a dash of fun in the kitchen. Below, you’ll even find a handy FAQ section to answer common questions and troubleshoot any hiccups—so you can bake with total confidence. If you give this recipe a whirl, I would love to hear how your own monster crew turned out. Leave a comment, ask questions, or share feedback about your experience. Happy baking, and may your kitchen be stocked with frosting, laughter, and plenty of googly-eyed smiles!
These playful cookie sandwiches are a delightful mix of chewy cookies, sweet frosting, and candy googly eyes. Perfect for parties, they’ll bring smiles to everyone’s faces!

Hey there ! I'm Julia Martinez, and welcome to my kitchen where tradition meets innovation. Growing up in a multigenerational household, I learned that the best recipes aren't just about ingredients – they're about the stories, memories, and love that get passed down through each carefully prepared dish.