
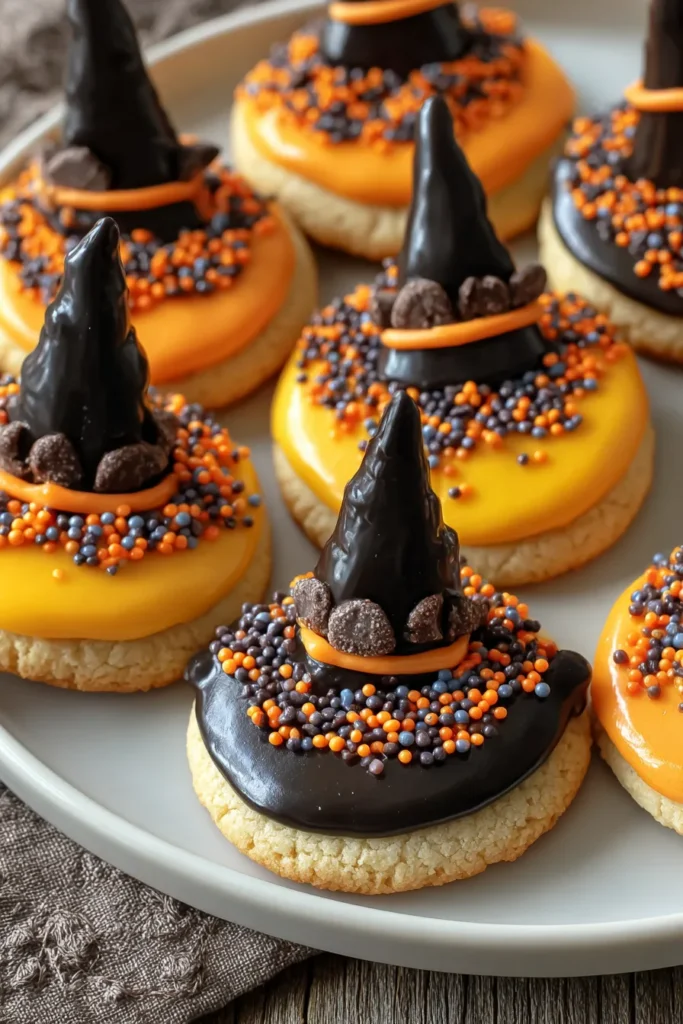
There’s something truly bewitching about slipping on an apron, preheating the oven, and diving into a Halloween baking project that’s as enchanting as it is delicious. These Sweet Witch Hat Halloween Cookies are the perfect blend of cozy chocolatey warmth and bright, festive flair—each cookie crowned by a perfectly dipped sugar cone that instantly transforms a simple treat into a mini work of art. From the moment the sugar dough goes into the oven to the satisfying snap as you bite into the chocolate-dipped cone, this recipe weaves together fun and flavor in equal measure. You’ll find yourself grinning at how easy it is to create professional-looking witch hats with minimal effort, making them a showstopper for classroom parties, neighborhood gatherings, or a family movie night featuring your favorite spooky film.
What makes these cookies so special is the balance of textures and tastes. The chocolate sugar cookie base is tender and slightly chewy, providing a sturdy platform for the pointed sugar cone “hat.” When that cone is dipped in smooth semi-sweet chocolate and decorated with a band of vibrant orange candy melts, it’s like giving each cookie its own little costume. Decorating becomes a delightful craft session—pipe on a tiny buckle with black icing, add twinkling dots of yellow icing, or sprinkle on some sparkle to capture the Halloween spirit. Even beginners will feel like the most creative witches and wizards in the kitchen, and the best part is watching faces light up when these charming cookies make their grand debut.
Before you conjure up these festive treats, let’s gather the key ingredients that make the magic happen. Each component plays a special role, from the rich, chocolatey base to the vibrant decorations that bring these witch hats to life. Here’s what you’ll need:
This forms the foundation of your witch hat cookies. Whether you choose a store-bought variety or whip up your own, this dough bakes into firm, chocolate-infused rounds that hold the weight of sugar cones without cracking or sagging.
When melted, this chocolate acts like edible glue to secure each sugar cone to its cookie base. It also adds a deep, bittersweet note that contrasts beautifully with the sweetness of the dough and candy melts.
These vibrant melts are perfect for piping or drizzling around the base of each cone to create that signature witch hat band. Their creamy texture ensures smooth lines and bright pops of color, turning simple cookies into festive decorations.
Used to pipe delicate buckles on the orange bands, black icing adds the finishing touch that makes each hat instantly recognizable. Its firm consistency lets you draw sharp lines for crisp, neat details.
This sunny icing is ideal for adding stars, dots, or whimsical accents that make your cookies truly one-of-a-kind. It’s a simple way to introduce extra flair and contrast against the orange and black.
If you’re in the mood for sparkle or extra crunch, decorative sprinkles can be scattered over the icing or candy melts. Choose Halloween-themed shapes or classic nonpareils for added charm.
These form the iconic pointed “witch hat” shape. Their crisp texture holds up well when dipped in melted chocolate, and they sit snugly atop the cookie rounds for a playful, three-dimensional effect.
Essential for lining your baking sheet, parchment paper prevents sticking and makes cleanup a breeze. It also helps ensure even baking by allowing hot air to circulate beneath each cookie.
Let’s dive into the step-by-step magic of transforming simple ingredients into adorable witch hat cookies. Follow these instructions closely, and you’ll have a batch of festive treats ready to enchant any Halloween celebration.
1. Preheat your oven to 350°F (175°C) and line a baking sheet with parchment paper. Ensuring the oven is fully heated and the sheet is properly prepared helps the cookies bake evenly and prevents sticking.
2. Roll out the chocolate sugar cookie dough to about ¼ inch thickness on a lightly floured surface. Use a 3-inch round cookie cutter to stamp out circles. Arrange the cut-outs on the prepared baking sheet with a little space between each for spreading.
3. Bake the cookies in the preheated oven for 8–10 minutes, or until the edges appear set and just firm to the touch. Remove from the oven and transfer to a wire rack to cool completely before decorating.
4. Melt the semi-sweet chocolate chips or melting chocolate in a microwave-safe bowl, heating in 30-second bursts and stirring in between until the chocolate is smooth and free of lumps.
5. Dip the rim of each sugar cone into the melted chocolate so that the cone’s opening is evenly coated. Place the chocolate-dipped cone immediately in the center of a cooled cookie, pressing gently. Let the chocolate harden completely to secure the cone.
6. Melt the orange candy melts in a separate bowl, following the manufacturer’s instructions (usually in 30-second increments in the microwave). Stir until the candy melts are silky and pourable.
7. Drizzle or pipe the melted orange candy around the base of each cone to form a decorative band. You can also use the candy melts to draw vertical lines, swirls, or any pattern you like on the cone’s surface.
8. Use the black icing to pipe a small buckle on the orange band around the cone. A simple rectangle with a tiny inner square instantly transforms the band into a classic witch hat buckle. Allow it to set.
9. Add extra flair by using yellow icing to pipe stars, dots, or spider-web motifs on the cookies and cones. The bright yellow pops against the orange and black for a playful contrast.
10. Sprinkle on decorative sprinkles or press a few extra chocolate chips into the wet candy melts for additional texture and festive detail.
11. Allow all icing and candy decorations to harden completely before serving or packaging. This ensures each witch hat stands tall and the decorations stay in place.
These charming witch hat cookies are already adorable on their own, but serving them in creative ways takes the fun (and the fright!) to the next level. Whether you’re hosting a full-blown Halloween bash, packing up party favors, or simply sharing treats with loved ones, presentation matters almost as much as flavor. Below are a few enchanting ideas to showcase your cookies:
Arrange the witch hat cookies on a matte black or deep purple platter. Tuck in sprigs of fresh rosemary (to mimic miniature broomsticks) and scatter candy corn or gummy spiders around the base. This dark, moody display highlights the orange and black details and creates a dramatic, Instagram-worthy centerpiece.
Place two or three cookies into clear cellophane bags, then tie the tops with ribbon in orange and black. For an extra touch, attach a small, decorative tag that says “Witch’s Brew Inside” or “Caution: Magic Within.” These individually wrapped treats make perfect favors for classroom exchanges or neighborhood trick-or-treaters.
Serve your witch hat cookies alongside steaming mugs of hot apple cider, chai tea, or dark roast coffee. The sweet, spiced notes of the drinks contrast beautifully with the rich chocolate and orange frosting, turning your cookie plate into a cozy autumn tasting experience.
Build a show-stopping tower using a tiered cake stand or stack of decorative boxes. Layer in additional props like mini pumpkins, dried leaves, and flickering LED candles. Position the witch hats at varying heights so each cone stands out, creating an eye-catching display for any haunted gathering.
After all that baking and decorating, you’ll want to keep your witch hat cookies fresh, crisp, and ready for spooking at a moment’s notice. Proper storage ensures they maintain their crunchy cone, tender cookie, and colorful decorations without wilting or sticking together. Here are some tried-and-true methods to preserve your bewitching treats:
Once fully cooled and the chocolate and icing have hardened, arrange the cookies in a single layer inside a sealed container. Keep at room temperature away from direct sunlight or heat sources. They’ll stay fresh for up to three days with minimal change in texture.
If you need to stack the cookies to save space, place a piece of parchment paper between each layer. This prevents the icing and candy melts from sticking and keeps your decorations intact.
In warmer or more humid environments, storing the cookies in the refrigerator can help maintain the crispness of the sugar cone. Seal them in an airtight container and allow them to come to room temperature for about 15 minutes before serving to regain their optimal texture.
To keep your witch hats longer than a week, carefully place them in a single layer on a baking sheet and freeze until firm. Then transfer them to a zip-top bag, using parchment sheets between layers. Thaw at room temperature when ready to enjoy; the crisp cone may be even more refreshing after a chilly rest.
Baking these Sweet Witch Hat Halloween Cookies is a delightful way to celebrate the spookiest season of the year while bringing a dash of creativity and whimsy to your kitchen. From rolling out the rich chocolate sugar cookie dough to piping tiny buckles with black icing, every step turns simple ingredients into charismatic treats that double as edible decorations. You’ll love how the combination of tender cookie rounds, crisp sugar cones, and vibrant orange candy melts captures both the flavors and the festive spirit of Halloween. With prep time of just 30 minutes, a quick 10-minute bake, and some decorating fun, you can whip up a batch that looks like it was crafted by seasoned pastry witches and wizards.
Feel free to print out this article or save it for later reference—these cookies make an enchanting addition to any Halloween party, bake sale, or family gathering. Below you’ll find a handy FAQ section to answer any last-minute questions about substitutions, troubleshooting, or flavor variations. If you give this recipe a try, I’d love to hear how your witch hats turned out: leave a comment, share your decorating tips, or ask any baking questions you might have. Happy haunting in the kitchen, and here’s to sweet, spooky success!
These witch hat cookies combine the rich flavors of chocolate and creamy orange candy for a festive treat that's as delightful to make as they are to eat. Perfect for any Halloween celebration!

Hey there ! I'm Julia Martinez, and welcome to my kitchen where tradition meets innovation. Growing up in a multigenerational household, I learned that the best recipes aren't just about ingredients – they're about the stories, memories, and love that get passed down through each carefully prepared dish.