

Every bite of these Cheesy Garlic Bombs feels like a little party in your mouth—fluffy pockets of biscuit dough give way to molten mozzarella that oozes out with every tear. Warm, gooey cheese bursts with a splash of garlic in every bite of these irresistibly fluffy bites! They’re brushed with savory garlic butter and crowned with crunchy Parmesan, creating a perfect contrast of textures and flavors. Whether you’re diving in straight from the oven or sneaking one while they cool, these savory spheres are pure comfort food at its finest. The first time I made them, I couldn’t help but watch as friends grabbed one after another, laughing at the cheese stretch and exclaiming how simple yet genius the recipe was.
These Cheesy Garlic Bombs are so beginner-friendly that you’ll wonder why you haven’t been stuffing cheese into biscuit dough forever. With a total cook time of just 12 minutes and a prep time of 10 minutes, you’ll have these golden nuggets ready before your favorite show even hits its first commercial break. A brief 5-minute rest lets them firm up just enough to handle without losing that fresh-from-the-oven crispness. At about 250 calories per serving, they make a guilt-free appetizer or side dish perfect for game nights, impromptu gatherings, or a cheesy snack attack. Whether you’re hosting a party or just need a quick treat, these bombs deliver on taste without demanding advanced skills—total beginner level!
KEY INGREDIENTS IN CHEESY GARLIC BOMBS
Before you dive into mixing and rolling, let’s get to know the heroes of this recipe. Each ingredient plays a vital role in delivering that crave-worthy combo of flaky dough, molten cheese, and garlicky goodness. Here’s what you’ll need:
- Biscuit Dough
Provides the fluffy, golden exterior that becomes tender and slightly crisp when baked. It’s the perfect vessel to cradle all that melty cheese.
- Mozzarella Cheese
Delivers the gooey, stringy center everyone loves. Its mild flavor pairs beautifully with garlic, and it melts into a luscious, stretchy filling.
- Unsalted Butter
Creates the base of the garlic butter brush that adds richness and helps the garlic flavors really shine without overpowering the cheese.
- Garlic
Infuses every bite with its sharp, aromatic punch. Freshly minced garlic ensures maximum flavor and a little zing.
- Fresh Parsley
Adds a pop of color and a hint of herbal freshness that lightens up the rich, buttery coating.
- Salt
Balances the flavors and enhances the natural taste of the biscuit dough and cheese.
- Black Pepper
Gives a gentle heat and complementary spice, rounding out the savory profile.
- Parmesan Cheese
Offers a savory, nutty crunch on top, creating an irresistible golden crust.

HOW TO MAKE CHEESY GARLIC BOMBS
Let’s walk through the simple, step-by-step process of turning these pantry staples into irresistible bites. From prepping the dough to brushing on that flavorful garlic butter, each technique is easy enough for a beginner yet delivers a bakery-quality snack right at home.
1. Preheat your oven to 375°F (190°C). Make sure your oven rack is in the middle position for even heating. Line a baking sheet with parchment paper or lightly grease it to prevent sticking.
2. Open the can of biscuit dough and carefully separate the dough into individual biscuits, handling them gently so they keep their airy texture.
3. Flatten each biscuit with your palm into a small disc, about half an inch thick, and place one mozzarella cube in the center of each disc.
4. Gather the edges of the biscuit dough around the cheese cube and pinch them tightly together to seal, forming a neat little ball. Place each ball seam-side down on your prepared baking sheet.
5. In a small bowl, combine the melted butter, minced garlic, parsley, salt, and pepper. Stir well to create a vibrant garlic butter mixture.
6. Brush the tops of the dough balls generously with the garlic butter, ensuring every spot is coated for maximum flavor.
7. Sprinkle the grated Parmesan cheese evenly over the tops of each bomb, creating a crunchy, golden topping.
8. Bake in the preheated oven for 10–12 minutes, or until the tops turn a rich golden brown and the cheese inside is completely melted.
9. Remove from the oven and let the Cheesy Garlic Bombs cool slightly (about 5 minutes) before serving warm so the cheese settles and you don’t burn your fingers!
SERVING SUGGESTIONS FOR CHEESY GARLIC BOMBS
When these bombs come out of the oven, you’ll want to showcase them in all their gooey glory. Here are some fun, crowd-pleasing ways to serve them and elevate your snacking game:
- Pair with a zesty marinara sauce in a small dipping bowl at the center of your platter. The tanginess of the tomato sauce cuts through the richness, making each bite more balanced and flavorful.
- Arrange on a board alongside fresh vegetable sticks like celery and carrot for a pop of color and a crisp contrast to the soft, cheesy dough—perfect for balancing textures.
- Serve with a side of creamy ranch dip flecked with chives. The cool, herby ranch pairs beautifully with the warm garlic butter coating and adds a hint of freshness.
- Add a drizzle of balsamic glaze over the top just before serving to introduce a subtle sweetness and tang. It not only looks stunning against the golden Parmesan but also heightens the flavor complexity.
HOW TO STORE CHEESY GARLIC BOMBS
If you find yourself with leftovers (though that’s rare!), you’ll want to keep these garlic bombs tasting almost as good as the moment they came out of the oven. Proper storage is key to maintaining their tender dough and gooey cheese centers:
- Room Temperature (Short Term): Let cooled bombs sit in a covered container or airtight bag for up to 2 hours. This helps maintain their crisp exterior without condensation buildup.
- Refrigeration: Place completely cooled bombs in an airtight container or a resealable bag and store in the fridge for up to 2 days. To prevent sogginess, layer parchment paper between stacks.
- Freezing: Flash-freeze individual bombs on a tray for 1 hour, then transfer them to a freezer-safe bag. They’ll keep for up to one month. Thaw overnight in the refrigerator before reheating.
- Reheating: For best results, reheat in a preheated oven at 350°F (175°C) or in an air fryer for 5–7 minutes. This brings back the crisp crust and warms the cheese without making the dough chewy.
CONCLUSION
Cheesy Garlic Bombs really check all the boxes for a simple, shareable appetizer or snack that’s guaranteed to wow any crowd. We started with a brief introduction to these fluffy, cheese-stuffed treats, explored the key ingredients—from biscuit dough to cheesy toppings—and walked through each step in detail to achieve perfect, golden spheres of savory delight. The serving suggestions bring an extra layer of fun, whether you’re dipping them in tangy marinara or pairing them with fresh veggies, while the storage tips ensure you can enjoy those last few bombs just as much as the first. This recipe is a total beginner win: 10 minutes of prep, 12 minutes of baking, and a quick 5-minute rest turn humble ingredients into something truly special. With approximately 250 calories per serving, it’s an indulgent yet easy-to-manage treat for any occasion.
Feel free to print this article and save it for later use—whether you’re planning a potluck, a casual dinner, or just a cozy night in, these Cheesy Garlic Bombs are ready to shine. You’ll also find a FAQ section below to help troubleshoot any questions you might have. If you try out the recipe or need a hand with any step, please drop a comment, send your thoughts, or share any feedback. Your kitchen stories and tasting triumphs make this whole cooking adventure even more rewarding!
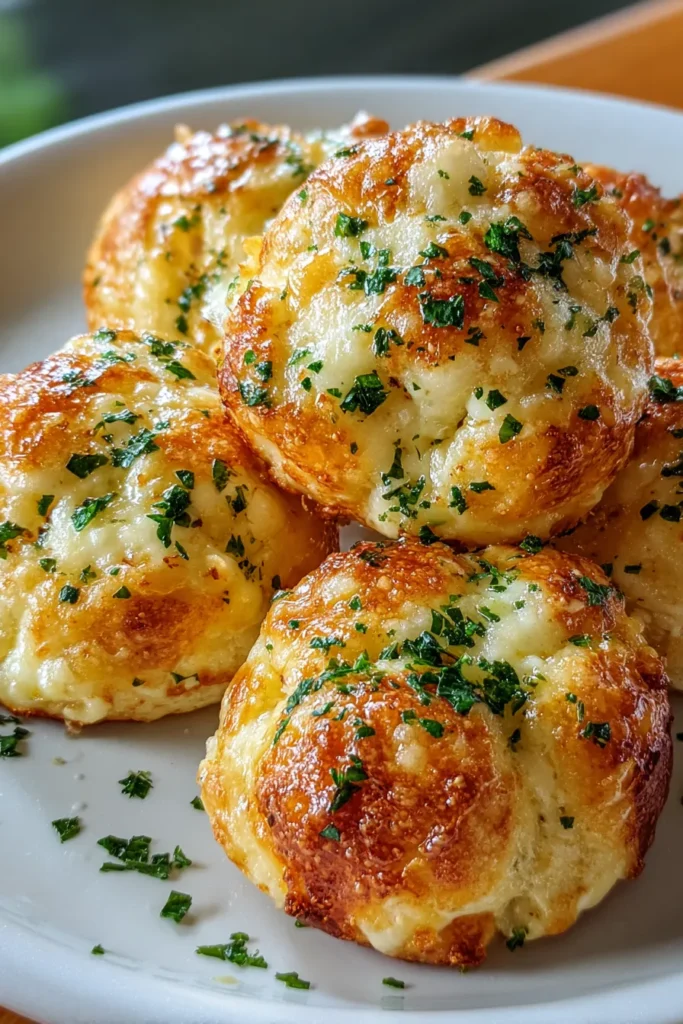

Cheesy Garlic Bombs
Description
These cheesy garlic bombs are a delightful mix of flaky biscuit dough and melted mozzarella, brushed with savory garlic butter and topped with crunchy Parmesan. Perfectly shareable and utterly scrumptious!
Ingredients
Instructions
-
Preheat your oven to 375°F (190°C). Line a baking sheet with parchment paper or grease lightly.
-
Open the can of biscuit dough and separate the dough into individual biscuits.
-
Flatten each biscuit with your palm and place a cube of mozzarella cheese in the center of each flattened biscuit.
-
Gather the edges of the biscuit dough around the cheese cube and pinch together to seal, forming a small ball. Place seam-side down on the prepared baking sheet.
-
In a small bowl, combine the melted butter, minced garlic, parsley, salt, and pepper. Mix well.
-
Brush the tops of the prepared dough balls with the garlic butter mixture.
-
Sprinkle the grated Parmesan cheese evenly over the tops of the dough balls.
-
Bake in the preheated oven for 10-12 minutes, or until the tops are golden brown and the cheese inside is melted.
-
Remove from the oven and allow to cool slightly before serving warm.
Note
- These cheesy garlic bombs can be served as an appetizer or a side dish.
- For a spicier version, add a pinch of crushed red pepper flakes to the garlic butter.
- These bombs are best enjoyed fresh but can be reheated in an oven or air fryer to regain crispiness.
- Experiment with different cheeses like cheddar or pepper jack for variation.
- Adding a sprinkling of Italian seasoning can enhance the flavor of these bombs.

