

Red Velvet Cheesecake Layer Cake brings together a moist crimson sponge encasing a velvety cheesecake center, all cloaked in billows of cream cheese frosting and garnished with ruby crumbs and fresh berries. With its rich texture symphony—tender cake, smooth cheesecake, and cloudlike frosting—this dessert is a showstopper for celebrations or cozy weekend baking. Dive into each step, gather your ingredients, and let’s create a layered masterpiece that’s as delicious as it is beautiful!
Key Ingredients
Before we start baking this stunning dessert, let’s gather every ingredient you’ll need to create that tender red velvet crumb and smooth cheesecake core:
- 450 g cream cheese, softened (full-fat, brick style): Creates the luxuriously smooth base for the cheesecake layer.
- 100 g granulated sugar: Sweetens the cheesecake and helps achieve a creamy, tender texture.
- 2 large eggs, room temperature: Provides structure and richness, binding the cheesecake ingredients.
- 120 g sour cream, room temperature: Adds tang and silkiness to the cheesecake filling.
- 1 tsp pure vanilla extract: Enhances the cheesecake’s flavor with warm, aromatic notes.
- 1 tbsp lemon juice (optional, for slight tang): Brightens the cheesecake with a gentle citrus lift.
- 1 tbsp all-purpose flour: Stabilizes the cheesecake, preventing cracks and creating a smooth finish.
- Pinch of salt: Balances sweetness and deepens overall flavor.
- 260 g all-purpose flour: Forms the tender crumb of the red velvet cake.
- 20 g unsweetened cocoa powder (natural, not Dutch-processed): Gives a hint of chocolate flavor without darkening the bright red hue.
- 1 tsp baking soda: Leavens the cake for a light, airy texture.
- 1 tsp baking powder: Provides additional lift and a tender crumb.
- 1/2 tsp fine salt: Enhances the cake’s flavors and balances sweetness.
- 300 g granulated sugar: Sweetens and helps achieve a soft, delicate crumb.
- 120 g unsalted butter, softened: Adds richness and moisture to the cake layers.
- 60 ml neutral oil (canola or vegetable): Keeps the crumb moist and tender.
- 2 large eggs, room temperature: Binds the cake batter and enriches the texture.
- 1 tsp pure vanilla extract: Contributes warm, aromatic flavor.
- 240 ml buttermilk, room temperature: Reacts with baking soda to create a tender, moist crumb.
- 2 tsp white vinegar: Activates the baking soda and boosts the cake’s signature tang.
- 1 to 1 1/2 tbsp red liquid food coloring (or gel, adjusted to desired color): Gives that classic vibrant crimson hue.
- 450 g cream cheese, softened: Base for the silky, tangy frosting.
- 170 g unsalted butter, softened: Contributes richness and structure to the frosting.
- 480 g powdered sugar, sifted: Sweetens and thickens the frosting to a spreadable consistency.
- 2 tsp pure vanilla extract: Adds depth of flavor and a sweet aroma.
- Pinch of salt: Balances sweetness for a well-rounded taste.
- 30–60 ml heavy cream or milk, as needed for consistency: Adjusts the frosting to a perfectly smooth and fluffy texture.
- Cake crumbs from trimmings of a red velvet layer (optional, for decoration): Adds a playful visual contrast around the cake’s edges.
- White chocolate curls or shavings (optional): Provides an elegant, sweet garnish and texture contrast.
- Fresh berries (optional, for serving): Brings a pop of color and bright, fruity flavor to each slice.
How To Make Red Velvet Cheesecake Layer Cake
Let’s walk through every step—from the rich cheesecake base to the tender red velvet layers, silky frosting, and the final decorative touches—so you can assemble a flawless showstopper cake.
1. Preheat your oven to 160°C and line the bottom of a 20 cm (8-inch) springform pan with baking parchment, then lightly grease the sides to ensure easy cake release.
2. In a mixing bowl, beat the cream cheese on medium speed with a hand mixer or stand mixer for about 2 minutes until completely smooth and creamy, scraping down the sides to avoid lumps.
3. Add the granulated sugar and beat on medium speed for 1–2 minutes until fully incorporated and slightly fluffy, ensuring a tender cheesecake texture.
4. Crack in the eggs, adding them one at a time and beating on low speed after each until just combined—do not overmix to keep the filling silky.
5. Mix in the sour cream, vanilla extract, lemon juice (if using), flour, and salt on low speed until the batter is smooth and homogenous, creating a velvety cheesecake mixture.
6. Pour the cheesecake batter into the prepared pan and tap it gently on the counter to release any trapped air bubbles for an even bake.
7. Bake the cheesecake layer for 35–45 minutes, or until the edges are set and the center remains slightly wobbly—it will firm up as it cools.
8. Turn off the oven, crack the door slightly, and allow the cheesecake to cool inside for 30 minutes; this gradual cooking helps prevent cracks.
9. Remove the pan from the oven, cool the cake to room temperature, then cover and chill in the refrigerator for at least 4 hours (ideally overnight) to ensure it sets firmly.
10. Preheat your oven to 175°C, grease and line two 20 cm (8-inch) round cake pans with baking parchment, and lightly flour the sides for easy cake removal.
11. In a medium bowl, whisk together the flour, cocoa powder, baking soda, baking powder, and salt, mixing until well combined and set aside.
12. In a large bowl or stand mixer, beat the butter and granulated sugar on medium-high speed for 3–4 minutes until light, fluffy, and pale in color.
13. Add the oil and mix on medium speed until fully incorporated, ensuring a moist crumb in your red velvet layers.
14. Incorporate the eggs one at a time, beating well after each addition, then stir in the vanilla extract for a fragrant cake batter.
15. In a small bowl, combine the buttermilk, vinegar, and red food coloring, adjusting the color to your preference and ensuring even dispersal.
16. With the mixer on low, add the dry ingredients in three additions, alternating with the colored buttermilk mixture in two additions (dry–wet–dry–wet–dry), mixing just until combined—avoid overmixing.
17. Divide the batter evenly between the prepared pans and smooth the tops with a spatula, creating even layers for stacking.
18. Bake the cakes for 22–28 minutes, or until a toothpick inserted into the center comes out with a few moist crumbs but no wet batter.
19. Let the cake pans rest for 10–15 minutes, then turn the layers out onto wire racks, remove the parchment, and cool completely to room temperature.
20. Level the tops of each cake with a long serrated knife if needed, reserving any trimmings for decorative crumbs later.
21. In a large bowl, beat the cream cheese and butter for the frosting on medium speed for 2–3 minutes until smooth and creamy.
22. Add the vanilla extract and salt to the frosting and mix briefly to combine the flavors.
23. Gradually add the powdered sugar, about 120 g at a time, mixing on low speed until each addition is fully incorporated before adding more.
24. Once all the sugar is added, increase the mixer speed to medium-high and beat for 2–3 minutes until the frosting is light and fluffy.
25. Add heavy cream or milk, one tablespoon at a time, until you achieve a smooth, spreadable consistency that holds soft peaks.
26. Ensure all cake layers and the chilled cheesecake are completely cool and firm before assembling to prevent slipping.
27. Place one red velvet cake layer, cut-side up (if leveled), onto a serving plate or cake board and secure it with a small dab of frosting underneath.
28. Spread a thin layer of frosting over the top of this layer to act as “glue” for the cheesecake and to keep all layers stable.
29. Gently remove the cheesecake from its pan, using a warm knife around the edge if needed, then peel off the parchment from the bottom.
30. Place the chilled cheesecake layer on top of the frosted red velvet layer, trimming the edges slightly if necessary for an even stack.
31. Spread another thin layer of frosting over the cheesecake to create a flat surface for the top cake layer.
32. Add the second red velvet layer on top, cut-side down, pressing gently to secure and ensure all layers align.
33. Apply a thin crumb coat of frosting over the top and sides of the cake, catching any loose crumbs, then chill for 20–30 minutes to set.
34. Once the crumb coat is firm, apply a final, thicker layer of frosting, smoothing the surface with an offset spatula or bench scraper for a clean finish.
35. Decorate the cake by pressing reserved red velvet crumbs along the bottom edge or sprinkling in a ring around the top, then add white chocolate curls or fresh berries as desired.
36. Chill the fully assembled cake for at least 1–2 hours before slicing to allow the layers to firm up for cleaner cuts.
37. To slice, dip a long, sharp knife in hot water, wipe it dry, and make smooth cuts for neat, professional-looking slices.
38. Serve the cake slightly chilled or at a cool room temperature to enjoy the perfect contrast between the tender cake, silky cheesecake, and cream cheese frosting.
Serving Suggestions
Now that your Red Velvet Cheesecake Layer Cake is complete, let it shine on the dessert table by pairing it with complementary flavors, contrasting textures, and thoughtful plating to elevate every slice:
- Serve each slice with a drizzle of fresh berry coulis, spooning the tart sauce around the plate for a vibrant and tangy accent.
- Garnish individual servings with a few fresh berries and a sprig of mint to add freshness and visual appeal.
- Plate slices on a chilled dessert plate to keep the cheesecake layer firm longer and make each bite more refreshing.
- Pair your cake with a cup of hot coffee or spiced chai tea for a delightful balance of flavors and a cozy touch.
Tips For Perfect Red Velvet Cheesecake Layer Cake
To make sure every layer of your cake turns out flawless, follow these friendly insider tips that guarantee a show-stopping result every time:
- Make the cheesecake layer a day ahead so it has time to fully set and is easier to handle.
- If you prefer a taller cake, double the red velvet batter and bake three thinner layers around the cheesecake for extra height and drama.
- Substitute Greek yogurt for sour cream in both the cheesecake and frosting if you’d like a slightly tangier profile.
- Use gel food coloring for a more vibrant red hue with less liquid, which helps maintain the cake’s delicate structure.
- This cake keeps well, covered in the refrigerator, for up to 4 days; let it sit out for 20–30 minutes before serving for best flavor.
How To Store It
Proper storage is key to maintaining the cake’s moist crumb, creamy center, and fluffy frosting. Follow these methods to keep your creation fresh and delicious:
- Refrigerate the cake, tightly covered with plastic wrap or in an airtight cake carrier, to maintain moisture and prevent odors from seeping in.
- For longer storage, freeze individual slices wrapped in plastic and placed in a freezer bag; thaw in the fridge overnight before serving for best texture.
- Keep frosting smooth and prevent drying by brushing exposed cake edges lightly with a simple syrup (equal parts sugar and water) before wrapping.
- Always allow chilled cake to rest at cool room temperature for 20–30 minutes before slicing to achieve clean cuts and optimal texture.
Frequently Asked Questions
Here are answers to your most common queries about baking and assembling this layered delight:
- How can I prevent cracks from forming on the cheesecake layer?
Bake the cheesecake slowly at 160 °C and resist opening the oven door during baking. When it’s done, turn off the oven, crack the door slightly, and let the cheesecake cool inside for 30 minutes to minimize temperature shock. After that, cool it to room temperature, then chill it in the refrigerator for at least four hours (preferably overnight). The gradual cooling and thorough chilling help the cheesecake set without cracking.
- What’s the best way to achieve and maintain a vibrant red color in the cake layers?
Use a concentrated gel or paste food coloring rather than liquid to avoid thinning the batter. Mix the coloring into the buttermilk–vinegar mixture so it disperses evenly and intensifies the hue. Adjust the amount (1 to 1½ tablespoons) based on your desired shade. Natural cocoa powder and the acidity from vinegar will also help the red stand out.
- How do I ensure that the layers don’t slide or become uneven during assembly?
First, level each cake layer after cooling so they stack evenly. Place the bottom red velvet layer cut-side up on a cake board and secure it with a small dab of frosting. Use a thin layer of frosting as “glue” under the cheesecake layer and again between the cheesecake and the top layer. Chill for 20–30 minutes after the crumb coat to firm up the frosting before applying the final coat. This chilling step stabilizes each layer and prevents slipping.
- My cream cheese frosting is too thin or too stiff—how can I fix the consistency?
If the frosting is too thin, add more sifted powdered sugar in 30 g increments while mixing on low until it thickens. If it’s too stiff, add heavy cream or milk one tablespoon at a time on medium‐low speed until it becomes smooth and spreadable. Avoid overbeating once you reach the desired consistency to prevent the frosting from becoming too loose.
- How should I store the assembled cake, and how long will it keep?
Store the cake covered in the refrigerator to maintain its structure and freshness. It will keep well for up to four days. Before serving, let the cake sit at cool room temperature for 20–30 minutes so the frosting softens slightly and the flavors become more pronounced. Always use a clean knife dipped in hot water and wiped dry between slices for neat cuts.
- Can I make ingredient substitutions for dietary preferences or allergies?
Yes. You can substitute Greek yogurt for sour cream in both the cheesecake and frosting for extra tanginess. For a dairy-free version, use a vegan cream cheese and a nondairy yogurt alternative, and replace butter with a vegan butter substitute. If you need gluten-free, swap the all-purpose flour for a 1:1 gluten-free baking blend. Keep in mind that substitutions may slightly alter texture and flavor, so it’s best to test small batches first.
What Makes This Special
There’s a reason this Red Velvet Cheesecake Layer Cake steals the show: the contrast of tender crimson sponge, a smooth cheesecake core, and cloudlike cream cheese frosting creates a texture symphony you’ll crave again and again. Bright red crumbs and fresh berries add playful pops of color, while the balanced tang from sour cream and buttermilk keeps every bite interesting. Feel free to print and save this recipe for your next celebration, and don’t forget to leave a comment or ask questions if you give it a try—I’m here to help you nail every delicious layer!
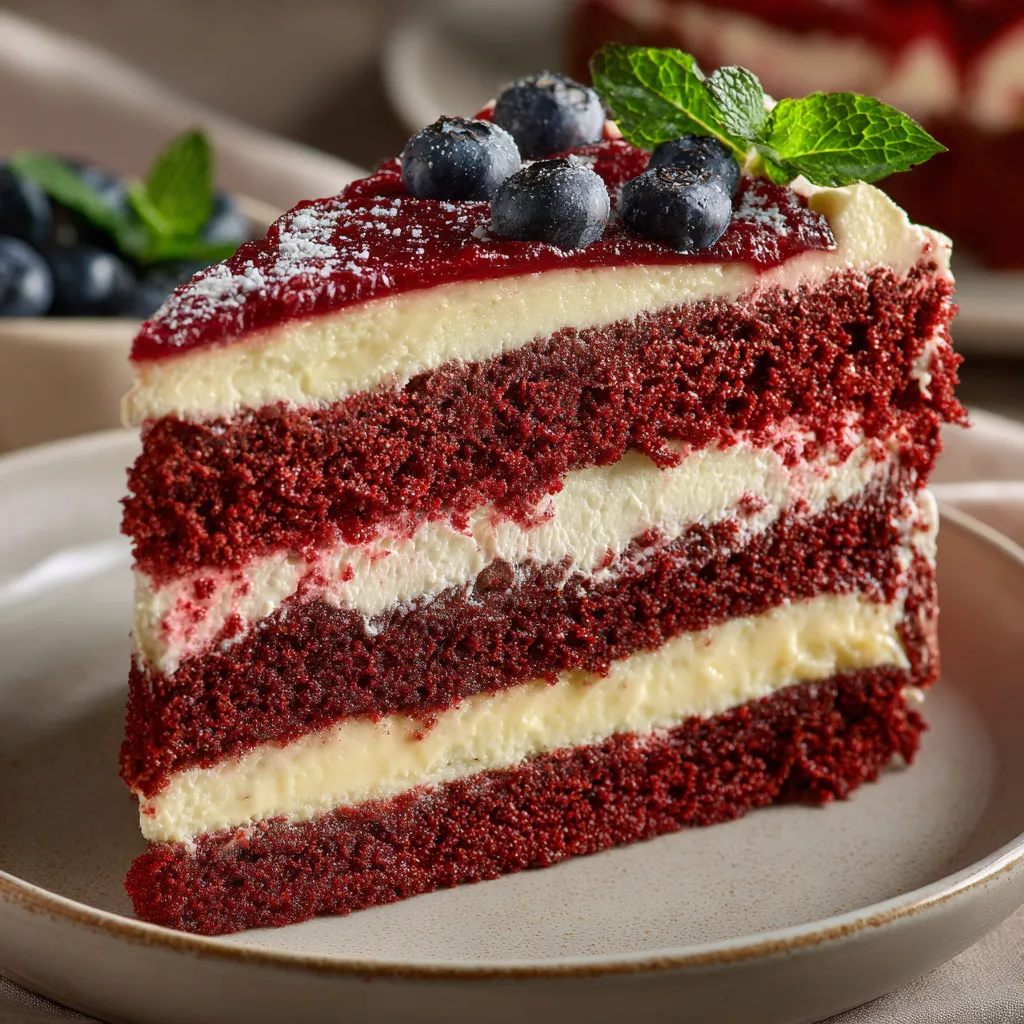

Red Velvet Cheesecake Layer Cake
Description
The contrast of tender red velvet sponge, smooth cheesecake core, and cloudlike cream cheese frosting creates a texture symphony. Bright red crumbs and fresh berries add a playful pop of color and flavor.
Ingredients
Instructions
-
Prepare the cheesecake layer:
-
1. Preheat your oven to 160°C. Line the bottom of a 20 cm (8-inch) round springform pan with baking parchment and lightly grease the sides.
-
2. In a mixing bowl, beat the cream cheese with a hand mixer or stand mixer on medium speed until completely smooth and creamy, about 2 minutes. Scrape down the sides.
-
3. Add the granulated sugar and beat again until well combined and slightly fluffy, 1–2 minutes.
-
4. Add the eggs one at a time, beating on low speed after each just until incorporated. Do not overmix.
-
5. Mix in the sour cream, vanilla, lemon juice (if using), flour, and salt on low speed until the batter is smooth and homogenous.
-
6. Pour the cheesecake batter into the prepared pan. Tap gently on the counter to release any air bubbles.
-
7. Bake for 35–45 minutes, or until the edges are set and the center is just slightly wobbly (it will continue to set as it cools).
-
8. Turn off the oven, crack the oven door slightly, and let the cheesecake cool inside for 30 minutes to reduce cracking.
-
9. Remove from the oven, cool to room temperature, then cover and chill in the refrigerator for at least 4 hours, preferably overnight, until very firm.
-
Prepare the red velvet cake layers:
-
1. Preheat your oven to 175°C. Grease and line two 20 cm (8-inch) round cake pans with baking parchment, then lightly flour the sides.
-
2. In a medium bowl, whisk together the flour, cocoa powder, baking soda, baking powder, and salt. Set aside.
-
3. In a large bowl or the bowl of a stand mixer, beat the softened butter and granulated sugar on medium-high speed until light and fluffy, 3–4 minutes.
-
4. Add the oil and mix until fully combined.
-
5. Add the eggs one at a time, beating well after each addition, then mix in the vanilla extract.
-
6. In a small bowl or cup, combine the buttermilk, vinegar, and red food coloring. Adjust the amount of food coloring according to how intense you want the red color.
-
7. With the mixer on low speed, add the dry ingredients to the butter mixture in three additions, alternating with the red buttermilk mixture in two additions (dry–wet–dry–wet–dry). Begin and end with the dry ingredients. Mix just until combined; do not overmix.
-
8. Divide the batter evenly between the two prepared pans and smooth the tops with a spatula.
-
9. Bake for 22–28 minutes, or until a toothpick inserted in the center comes out mostly clean with a few moist crumbs.
-
10. Let the cakes cool in the pans for 10–15 minutes, then turn them out onto wire racks, peel off the parchment, and cool completely.
-
11. Once cool, level the tops of the cakes with a long serrated knife if needed. Reserve any cake trimmings for crumbs to decorate the outside of the cake.
-
Prepare the cream cheese frosting:
-
1. In a large bowl, beat the softened cream cheese and butter together on medium speed until completely smooth and creamy, about 2–3 minutes.
-
2. Add the vanilla extract and salt and mix to combine.
-
3. Gradually add the sifted powdered sugar, about 120 g at a time, mixing on low speed until incorporated before adding more.
-
4. Once all the sugar is added, increase the speed to medium-high and beat until fluffy, 2–3 minutes.
-
5. Add heavy cream or milk, 1 tablespoon at a time, until you reach a smooth, spreadable consistency that can hold soft peaks.
-
Assemble the red velvet cheesecake layer cake:
-
1. Ensure all components are completely cool and the cheesecake is very firm from chilling.
-
2. Place one red velvet cake layer, cut-side up (if leveled), onto a serving plate or cake board. Secure it with a small dab of frosting underneath so it doesn’t slide.
-
3. Spread a thin layer of cream cheese frosting over the top of this cake layer to act as “glue” for the cheesecake.
-
4. Carefully remove the chilled cheesecake from the springform pan. Run a warm knife around the edge if needed. Gently peel off the parchment from the bottom.
-
5. Place the cheesecake layer on top of the frosted red velvet layer. If there is size mismatch, carefully trim the cheesecake around the edges to align with the cake.
-
6. Spread another thin layer of frosting over the top of the cheesecake.
-
7. Place the second red velvet cake layer on top, cut-side down, pressing gently to secure and create an even stack.
-
8. Apply a thin “crumb coat” of frosting over the entire cake: spread a light layer of cream cheese frosting over the top and sides, catching any loose crumbs. Chill the cake for 20–30 minutes to set the crumb coat.
-
9. Once chilled, apply a final thicker layer of frosting over the top and sides, smoothing with an offset spatula or bench scraper for a clean finish.
-
10. For decoration, crumble the reserved red velvet cake trimmings into fine crumbs and press them gently along the bottom edge of the cake or sprinkle over the top in a ring. Add white chocolate curls or fresh berries if desired.
-
11. Chill the assembled cake for at least 1–2 hours before slicing. This helps the layers firm up and gives cleaner slices.
-
Serving:
-
1. To slice, use a long, sharp knife dipped in hot water and wiped dry between cuts for neat layers.
-
2. Serve slightly chilled or at cool room temperature for the best texture contrast between the cake, cheesecake, and frosting.
Note
- Make the cheesecake layer a day ahead so it has time to fully set and is easier to handle.
- If you prefer a taller cake, you can double the cake batter and bake three thinner red velvet layers around the cheesecake.
- Substitute Greek yogurt for sour cream in both the cheesecake and frosting for a slightly tangier profile.
- Gel food coloring gives a stronger red hue with less liquid, which helps maintain the cake’s structure.
- This cake keeps well, covered in the refrigerator, for up to 4 days; let it sit out 20–30 minutes before serving for best flavor.

