

When the leaves start turning golden and there’s a hint of crispness in the air, nothing feels cozier than biting into a perfectly baked Apple Crisp Bar. These bars strike a delightful balance of sweet and tart, marrying tender, cinnamon-spiced apples with a buttery oat crust that doubles as a crumbly topping. With just 20 minutes of prep, 35 minutes of bake time, and a brief 15-minute rest, you’ll end up with a dozen wholesome bars that are easy to slice, serve, and savor—each around 220 calories. Whether you’re hosting a fall gathering, need a comforting after-school snack, or simply crave a handheld dessert that reminds you of grandma’s kitchen, these bars rise to the occasion. Packed with warm spices like cinnamon and nutmeg, brightened by a squeeze of lemon juice, and enriched with melted butter and a beaten egg, they are beginner-friendly yet impressively flavorful.
Beyond their delicious taste, these bars are a breeze to customize. Feel free to mix apple varieties—tart Granny Smiths paired with sweet Honeycrisps offer the most dynamic flavor. Nuts like walnuts or pecans add a satisfying crunch, while raisins or dried cranberries lend a chewy surprise. You can even top each bar with a scoop of vanilla ice cream or a dollop of whipped cream for an extra-special treat. These Apple Crisp Bars are as versatile as they are comforting, making them the perfect dessert for casual weeknights, festive brunches, potlucks, or cozy coffee breaks. The combination of a sturdy oat base, juicy apple filling, and crisp topping delivers an unforgettable texture contrast that’s sure to become a seasonal favorite.
KEY INGREDIENTS IN APPLE CRISP BARS
Every ingredient brings its own magic to these bars, ensuring the perfect harmony of flavors and textures. From the foundation of hearty oats to the warm spice of cinnamon and nutmeg, here’s what you’ll need:
- Rolled oats
These hearty flakes form the backbone of both the crust and topping, providing a nutty flavor and chewy texture that perfectly balances the soft apple filling.
- All-purpose flour
Offers structure and lightness to the oat mixture, helping it bind together and achieve a tender, yet sturdy base and crumbly topping.
- Baking soda
Acts as a gentle leavening agent, lifting the oat layers ever so slightly so the crust isn’t too dense.
- Ground cinnamon
Introduces warm, aromatic spice into both the crust and topping, perfectly complementing the natural sweetness of the apples.
- Salt
Enhances all the flavors, cutting through sweetness and making each bite taste more layered and complex.
- Brown sugar
Adds deep, caramel-like sweetness to the oat mixture, while keeping the topping moist and flavorful.
- Granulated sugar
Contributes a clean sweetness to both layers, helping to caramelize slightly during baking for a golden finish.
- Unsalted butter
When melted and mixed in, it enriches the oat base and topping with a silky mouthfeel and promotes that desirable crispness.
- Egg
Binds the oat and flour mixture together, ensuring the crust holds its shape and the topping clumps just enough for a satisfying crumble.
- Apples
The star of the show—peeled, diced apples provide tender, juicy bites that release natural sweetness and tartness once baked.
- Lemon juice
Prevents the apples from browning and pumps in a bright citrus note that balances the richness of the oats and butter.
- Ground nutmeg
Offers a subtle, earthy spice that layers beautifully with cinnamon for that classic apple-pie flavor profile.
- Chopped walnuts or pecans (optional)
Adds a crunchy texture and nutty flavor to the topping, taking the bars from delicious to absolutely unforgettable.
- Granulated sugar (for topping)
Sprinkled on top for extra sweetness, it caramelizes slightly in the oven for a glistening finish.
- Cinnamon (for topping)
A final dusting of spice to round out each flavorful bite with a warm, fragrant note.
HOW TO MAKE APPLE CRISP BARS
Baking these bars is straightforward yet rewarding. You’ll move from mixing dry ingredients to layering juicy apples and finally sprinkling on that irresistible crumb topping. Follow each step carefully to achieve golden-brown perfection and a perfectly bubbling apple center.
1. Preheat your oven to 350°F (175°C). Generously grease a 9×13-inch baking dish with butter or nonstick spray, or line it with parchment paper to ensure easy bar removal once they’re baked.
2. In a large bowl, combine rolled oats, all-purpose flour, baking soda, ground cinnamon, salt, brown sugar, and granulated sugar. Stir thoroughly until all the dry ingredients are evenly distributed, and you have a uniform, sandy mixture.
3. Pour the melted butter and beaten egg into the dry mixture. Using a spatula or wooden spoon, stir gently until just combined—the mixture should begin to hold together in loose clumps. Reserve about one cup of this mixture to use as the crumbly topping later.
4. In a separate bowl, toss the peeled, diced apples with lemon juice. Sprinkle in the ground nutmeg and mix until every apple piece is coated with spice and citrus, preventing browning and adding bright flavor.
5. Spread the larger portion of the oat mixture evenly over the bottom of the prepared baking dish. Use the back of a spoon or your fingertips to press it firmly into a compact, even layer—this is your crust.
6. Layer the seasoned apple pieces over the pressed oat crust, arranging them in a single, even layer. Distribute them carefully so every bar gets a balanced amount of fruit.
7. Sprinkle the reserved oat mixture over the apples, breaking up any large chunks so that it creates a crumbly, even topping. If using, scatter the chopped walnuts or pecans over the top for added crunch.
8. In a small bowl, mix together 1 tablespoon of granulated sugar and ½ teaspoon of cinnamon. Sprinkle this sweet-spiced blend over the entire surface for a glistening, golden finish.
9. Bake in the preheated oven for 30–35 minutes, or until the top turns golden brown and the apple layer begins to bubble at the edges, releasing its sweet juices.
10. Once baked, remove the dish from the oven and let it cool in the pan for at least 15 minutes. This rest time helps the bars set, making slicing easier.
11. After the initial cooldown, transfer the bars to a wire rack and allow them to cool completely or serve warm. Enjoy your delicious Apple Crisp Bars!
SERVING SUGGESTIONS FOR APPLE CRISP BARS
Once your bars are perfectly baked and cooled slightly, it’s time to celebrate the flavors and textures you’ve created. Whether you’re serving guests or indulging solo, these suggestions will turn a simple dessert into a memorable experience:
- Serve with vanilla ice cream: Place a warm Apple Crisp Bar on a dessert plate and top with a generous scoop of ice cream. The contrast of hot, spiced apples and cold, creamy ice cream creates a dreamy dessert harmony.
- Pair with hot coffee or tea: Present the bars alongside freshly brewed coffee or a spiced chai tea. The warmth of the drink cuts through the sweetness, highlighting the cinnamon and nutmeg notes in every bite.
- Top with fresh seasonal fruit: Add a pop of color and freshness by garnishing each bar with sliced strawberries, raspberries, or a handful of pomegranate seeds. The tart fruit beautifully balances the sweetness of the oats and apples.
- Offer as mini dessert squares: Cut the bars into bite-sized pieces and arrange them on a platter for parties or potlucks. Guests can sample multiple desserts without feeling overwhelmed, and you’ll receive compliments on your bite-sized brilliance.
HOW TO STORE APPLE CRISP BARS
Keeping your Apple Crisp Bars fresh and flavorful is simple when you follow these storage tips. Proper storage ensures that each bite remains as delightful as the first:
- Room Temperature: Place cooled bars in an airtight container or a sealed zip-top bag. Store at room temperature for up to 5 days, making them a convenient grab-and-go snack.
- Refrigeration: For longer freshness, arrange bars in a single layer on a plate or in a container. Cover tightly with plastic wrap or an airtight lid. Refrigerate for up to 7 days, then bring to room temperature or gently reheat before serving.
- Freezing: Wrap individual bars in plastic wrap, then place them in a freezer-safe bag or container. Freeze for up to 3 months. Thaw overnight in the fridge or at room temperature for a few hours, then reheat if desired.
- Reheating: To recapture that fresh-from-the-oven crispness, warm bars in a 325°F (165°C) oven for 5–8 minutes, or microwave a single bar for 15–20 seconds. The topping will regain its delightful crunch.
CONCLUSION
These Apple Crisp Bars capture everything you love about a classic warm dessert—spiced apples, a buttery oat foundation, and a tempting crumb topping—while offering the convenience of a grab-and-go treat. With only 20 minutes of hands-on prep time, a 35-minute bake, and a 15-minute cooling period, you can quickly fill your kitchen with cozy fall aromas and transform simple pantry staples into a mouthwatering dessert. The combination of sweet brown sugar, bright lemon juice, warming cinnamon and nutmeg, and optional nuts makes every bite rich, complex, and completely irresistible. Whether you’re a novice baker or a seasoned pro, the straightforward steps guide you from mixing dry ingredients to layering that juicy apple filling and sprinkling on the final cinnamon-sugar flourish.
Feel free to print this article and keep it tucked into your recipe binder for all your autumn baking adventures. Below, you’ll find a handy FAQ section if any questions arise while you bake, but don’t hesitate to leave comments, questions, or feedback right here. I’d love to hear how your bars turned out, what apple varieties you tried, or any tips you discovered along the way. Enjoy sharing these comforting Apple Crisp Bars with family and friends, knowing you’ve created something both delicious and heartwarming—one bar at a time!
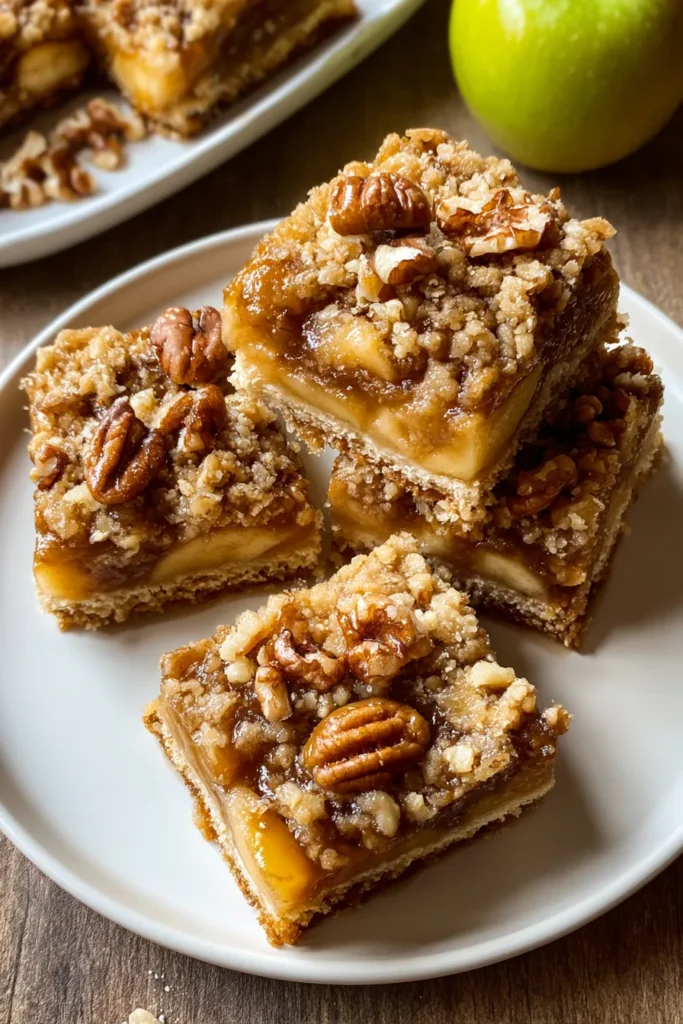

Apple Crisp Bars
Description
With a buttery oat crust, warm spiced apples, and a crunchy topping, these Apple Crisp Bars promise a comforting dessert that’s wonderfully satisfying and easy to make.
Ingredients
Instructions
-
Preheat your oven to 350°F (175°C) and grease a 9x13-inch baking dish or line it with parchment paper for easier removal.
-
In a large bowl, combine rolled oats, all-purpose flour, baking soda, ground cinnamon, salt, brown sugar, and granulated sugar. Mix well until all dry ingredients are evenly combined.
-
Pour in the melted butter and beaten egg into the dry mixture. Stir until just combined, and the mixture starts to clump together. Reserve about one cup of this mixture for topping later.
-
In a separate bowl, toss the diced apples with lemon juice. Add in the ground nutmeg and mix until evenly coated.
-
Spread the oat mixture evenly on the bottom of the prepared baking dish, pressing it down firmly.
-
Layer the seasoned apples on top of the pressed oat mixture, spreading them out evenly.
-
Sprinkle the reserved oat mixture over the apples, followed by the chopped walnuts or pecans if using.
-
In a small bowl, mix together 1 tablespoon of granulated sugar and ½ teaspoon of cinnamon. Sprinkle this mixture over the top of the bars.
-
Bake in the preheated oven for 30-35 minutes, or until the top is golden brown and the apple filling is bubbling.
-
Once baked, remove from the oven and let cool in the baking dish for at least 15 minutes before cutting into bars. Allow to cool completely on a wire rack.
-
Serve warm or at room temperature, and enjoy your delicious apple crisp bars!
Note
- This recipe works well with a mix of apples for added flavor and texture.
- For an extra touch, serve these bars with a scoop of vanilla ice cream or a dollop of whipped cream.
- These bars can be stored in an airtight container for up to 5 days at room temperature, or frozen for longer storage.
- You can customize the nuts or add raisins for a different twist.
- Using a combination of tart and sweet apples can elevate the flavor profile significantly.

