

There’s a wicked thrill in transforming a classic dessert into something delightfully eerie, and these Bloody Red Velvet Cupcakes do just that. They’re sinfully delicious and perfectly spooky for any Halloween bash! Each bite is moist, rich, and draped in a creamy cream cheese frosting, giving you that luxurious red velvet experience with a haunting twist. As home cooks, we often crave a recipe that’s both eye-catching and utterly indulgent, and this one ticks all those boxes. With their deep crimson crumb and splatters of “blood,” these cupcakes become the star of any spooky soirée or cozy autumn gathering.
Beyond the visual drama, these cupcakes bring a beautiful balance of flavors. The hint of cocoa lends a subtle chocolate note, while the tang from the buttermilk keeps every mouthful tender and moist. Then there’s that luscious cream cheese frosting, expertly whipped to fluffy perfection and enhanced by a touch of vanilla for extra depth. Whether you’re serving these as the grand finale to a haunted dinner party or just sneaking one slice when the house is quiet, they’re always a crowd-pleaser. With an intermediate difficulty level, about 20 minutes of prep, 18–22 minutes of baking, and a restful cooldown of 30 minutes, you’ll have twelve show-stopping cupcakes ready in under an hour. At approximately 320 calories per cupcake, they’re rich enough to satisfy any sweet tooth. So grab your apron and let’s bake up some deliciously spooky magic!
KEY INGREDIENTS IN BLOODY RED VELVET CUPCAKES
Every unforgettable dessert starts with the right lineup of ingredients, and these Bloody Red Velvet Cupcakes are no exception. From pantry staples to that essential pop of scarlet hue, each component plays a crucial role in building layers of flavor and texture. Below you’ll find the key players that make this recipe sing.
- All-purpose flour: Acts as the structural backbone, giving the cupcakes body and ensuring they rise properly without becoming too dense.
- Baking soda: Provides lift by creating tiny bubbles, resulting in a tender, airy crumb that feels light on the palate.
- Salt: Balances sweetness and enhances the depth of flavor, bringing out the subtle cocoa notes and tang of the buttermilk.
- Unsweetened cocoa powder: Delivers a gentle hint of chocolate, enriching the red velvet’s signature flavor without overpowering its vivid color.
- Unsalted butter: Adds moisture and richness. When creamed with sugar, it traps air for a beautifully light texture in both the batter and the frosting.
- Sugar: Sweetens and tenderizes the crumb, interacting perfectly with the butter to achieve that melt-in-your-mouth consistency.
- Eggs: Bind ingredients together and help with leavening, contributing to a moist, cohesive cupcake structure.
- Vanilla extract: Lends warm, floral undertones that elevate both the red velvet batter and the cream cheese frosting.
- Buttermilk: Imparts tanginess and acidity, ensuring a moist texture while reacting with baking soda for optimal rise.
- Red food coloring: Creates that blood-red hue that makes these cupcakes so visually striking and hauntingly beautiful.
- White vinegar: Intensifies the red color by reacting with the baking soda and adds a subtle zing to accentuate the chocolate notes.
- Cream cheese: Forms the silky base of the frosting, offering a luscious tang that contrasts perfectly with the sweet cake.
- Confectioners’ sugar: Whisked into the cream cheese, it thickens and sweetens the frosting, giving it body and stability.
- Red gel icing: Used for the final, chilling “blood spatter,” this vibrant gel adds dramatic flair without affecting texture.

HOW TO MAKE BLOODY RED VELVET CUPCAKES
Let’s dive into the fun steps that turn these ingredients into something spectacular. From mixing to splattering, each moment is part of the magical transformation.
1. Preheat your oven to 350°F (175°C) and line a 12-cup muffin tin with cupcake liners. This preheating ensures even baking, while the liners prevent sticking and make cleanup a breeze.
2. In a medium bowl, sift together the flour, baking soda, salt, and cocoa powder. Sifting removes lumps and fully aerates the dry mix for a lighter crumb—then set it aside.
3. In a large mixing bowl, cream together the butter and sugar until light and fluffy. Use an electric mixer on medium speed to trap air for that perfect rise.
4. Beat in the eggs one at a time, ensuring each is fully incorporated before adding the next, then stir in the vanilla extract for warm, aromatic depth.
5. In a separate bowl, whisk the buttermilk and red food coloring until evenly blended. Fold this vivid mixture into the butter-sugar base until smooth and uniform.
6. Gradually add the dry ingredients to the wet ingredients, stirring gently until just combined. Overmixing can toughen the cupcakes, so stop when you see no streaks of flour.
7. Stir in the white vinegar until the batter is silky and smooth, boosting both lift and tang.
8. Divide the batter evenly among the liners, filling each about two-thirds full so they have room to rise without spilling over.
9. Bake for 18–22 minutes, or until a toothpick inserted into the center comes out clean. Once done, let the cupcakes cool completely on a wire rack before frosting.
10. To make the frosting, beat the cream cheese and butter together until completely smooth and creamy—no lumps allowed!
11. Gradually add the confectioners’ sugar, beating on low speed until fluffy, then mix in the vanilla extract for a sweet, fragrant finish.
12. Once cooled, spread the cream cheese frosting over each cupcake, making sure every peak is covered in soft, velvety sweetness.
13. To create the signature “bloody” effect, use red gel icing and splatter it over the frosted cupcakes. A flick of the wrist gives you the perfect blood-spatter splendor.
SERVING SUGGESTIONS FOR BLOODY RED VELVET CUPCAKES
When it comes to presenting these chilling treats, the devil is in the details. Whether you’re hosting a full-blown haunted house party or a small autumn gathering, these serving ideas will amp up the spooky factor while showcasing those sinfully red interiors. Think about how your display and beverage pairings can heighten the experience, turning a simple dessert into an unforgettable spectacle.
- Showcase on a tiered stand decked with faux spider webs and plastic spiders. The vertical presentation draws attention to the cupcakes’ rich crimson hue and the dramatic “blood” drips, making your dessert table truly spine-tingling.
- Pair with a dark, robust coffee or an espresso shot. The bitter notes of coffee beautifully counterbalance the sweetness of the cream cheese frosting and the subtle cocoa in the cake, creating a harmonious flavor duet.
- Top with edible Halloween garnishes like candy eyes, mini chocolate bats, or black sugar sprinkles. These playful accents enhance the spooky aesthetic and let guests personalize their cupcakes for an interactive treat.
- Serve alongside creamy milk or a spiced latte in vintage glassware. The cool creaminess of milk or the warm spices in a latte complements the tangy frosting, making each bite feel like a comforting, ghostly embrace.
HOW TO STORE BLOODY RED VELVET CUPCAKES
Proper storage ensures these ghoulish goodies stay as fresh, moist, and vibrant as the moment they came out of the oven. Since both the cake and the cream cheese frosting are sensitive to temperature and humidity, using the right method will keep your cupcakes in peak condition, whether you’re planning to enjoy them the next day or stash a few for later.
For room-temperature storage, keep unfrosted cupcakes in an airtight container on the countertop for up to 24 hours. If they’re already frosted, store them in a cooler corner of the kitchen to prevent the frosting from softening too much.
- Refrigeration: Place frosted cupcakes in a single layer in an airtight container and refrigerate for up to 3–4 days. Chilling enhances the cream cheese flavor, but be sure to bring them to room temperature before serving to fully enjoy the texture.
- Freezing: Wrap individual unfrosted cupcakes tightly in plastic wrap, then freeze in a sealed container for up to two months. Thaw overnight in the refrigerator and frost just before serving. For frosted cupcakes, freeze on a baking sheet until firm, then wrap and store.
- Layer separation: When stacking cupcakes, place a piece of parchment paper between layers to prevent frosting smudges and maintain that pristine, bloody-splattered look.
CONCLUSION
Crafting these Bloody Red Velvet Cupcakes has been a thrilling adventure from start to finish. We’ve explored how to combine pantry staples like flour, sugar, and cocoa powder with tangy buttermilk, vibrant red food coloring, and a touch of vinegar to achieve that hauntingly beautiful hue and tender crumb. Then we whipped up a silky cream cheese frosting, gently spreading it over each cupcake before splattering on red gel icing for the ultimate gory effect. Along the way, we touched on creative serving suggestions—think tiered stands, spooky garnishes, and perfect beverage pairings—and shared foolproof storage tips to keep your cupcakes moist and delectable for days. Whether you’re an intermediate baker looking to impress at your next Halloween party or simply craving a festive dessert to satisfy your red velvet obsession, this recipe delivers on every level.
Feel free to print this article and save it in your favorite recipe binder—you never know when a craving for sinfully delicious, perfectly spooky cupcakes will strike! Below, you’ll find a handy FAQ section to answer any lingering questions or troubleshooting needs. If you give these Bloody Red Velvet Cupcakes a try, I’d love to hear how they turned out. Share your feedback, ask questions, or let me know if you experimented with any extra gooey details. Happy baking, and here’s to a hauntingly sweet Halloween celebration!
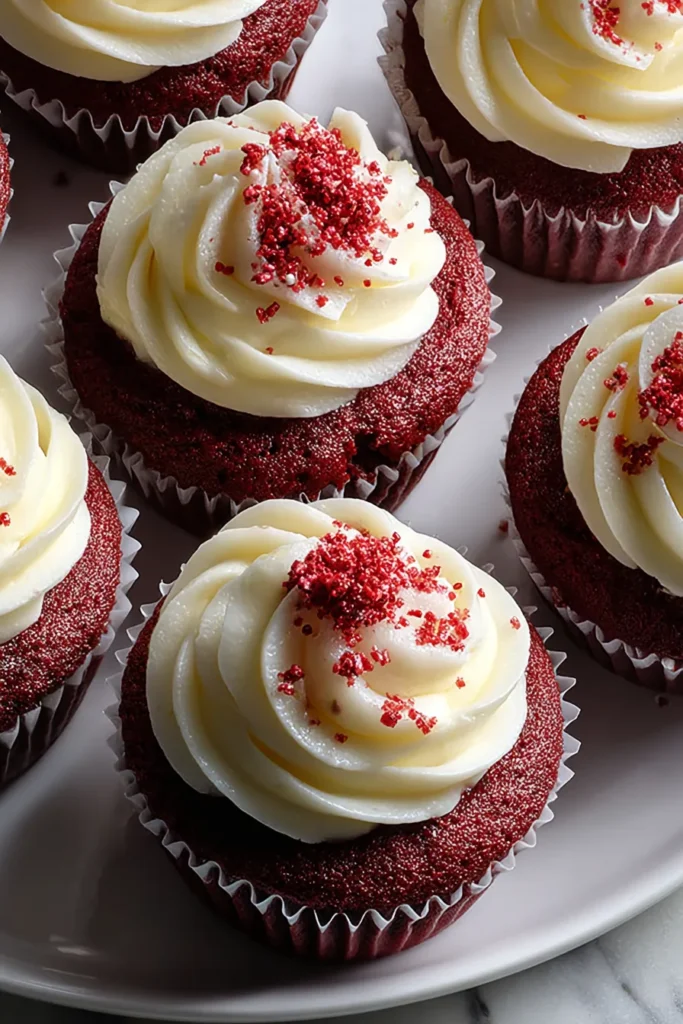

Bloody Red Velvet Cupcakes
Description
These Bloody Red Velvet Cupcakes are moist, rich, and draped in a creamy frosting, making them a spooky treat that’s to die for! Perfectly festive for any Halloween celebration.
Ingredients
Instructions
-
Preheat your oven to 350°F (175°C) and line a 12-cup muffin tin with cupcake liners.
-
In a medium bowl, sift together the flour, baking soda, salt, and cocoa powder. Set aside.
-
In a large mixing bowl, cream together the butter and sugar until light and fluffy.
-
Beat in the eggs, one at a time, mixing well after each addition. Stir in the vanilla extract.
-
Mix the buttermilk and red food coloring in a separate bowl until blended. Add this to the butter mixture and combine.
-
Gradually add the dry ingredients to the wet ingredients, stirring until just combined.
-
Stir in the white vinegar until the batter is smooth.
-
Divide the batter evenly among the cupcake liners, filling each about two-thirds full.
-
Bake for 18-22 minutes, or until a toothpick inserted into the center comes out clean. Allow the cupcakes to cool completely on a wire rack.
-
To make the frosting, beat the cream cheese and butter together until smooth.
-
Gradually add the confectioners' sugar, beating until fluffy, and then mix in the vanilla extract.
-
Once the cupcakes are cool, spread the cream cheese frosting over each cupcake.
-
To create the "bloody" effect, use red gel icing and splatter it over the frosted cupcakes to make them appear blood-spattered.
Note
- These cupcakes are perfect for Halloween or any spooky-themed event.
- You can adjust the intensity of the red color by altering the amount of food coloring.
- For extra chocolatey flavor, increase the amount of cocoa powder by a tablespoon.

