

Decadent No-Bake Creamy Oreo Balls is a dreamy mashup of crunchy Oreo bits, velvety cream cheese, and glossy white chocolate. These bite-size treats roll up in minutes, perfect for your next gathering or a cozy night in. With hints of chocolate crunch and rainbow sprinkles, every mouthful feels like a mini celebration. Whether you’re a beginner in the kitchen or a seasoned baker looking for an easy crowd-pleaser, this dessert promises big flavor with zero fuss.
Key Ingredients
These creamy Oreo balls rely on a handful of pantry staples that come together to create a perfect balance of texture and flavor.
- 36 Oreo cookies: Finely ground to form the crunchy, chocolatey base of each bite-sized ball.
- 8 oz softened cream cheese: Binds the Oreo crumbs into a smooth, tangy-sweet dough that’s easy to roll.
- 1 cup white chocolate chips: Provides a silky, sweet coating that hardens into a glossy shell.
- 4 oz dark chocolate chips: Adds rich contrast if melted for drizzling or double coating.
- 1 tbsp vegetable oil: Ensures the melted white chocolate has a shiny, pourable consistency.
- 1/4 cup sprinkles: Delivers a playful pop of color and extra crunch in every bite.
How To Make Decadent No-Bake Creamy Oreo Balls
Whipping up these Oreo balls is as simple as pulsing, mixing, shaping, freezing, and coating. In just a few steps, you’ll transform basic cookies and cream cheese into professional-looking truffles. The key is achieving a smooth, firm center before dunking in melted chocolate for that signature clean finish. Follow the detailed steps below to ensure each ball is perfectly round, evenly coated, and set to perfection.
1. Place Oreo cookies in a food processor and pulse until finely ground.
2. Transfer the crumbs to a mixing bowl and add the softened cream cheese, stirring until a smooth, uniform dough forms.
3. Portion the dough using a small cookie scoop or spoon, then roll into 1-inch balls between your palms for even shapes.
4. Arrange the balls on a parchment-lined tray and freeze for 15 minutes to firm up the centers.
5. Melt the white chocolate chips in a microwave-safe bowl in 30-second bursts, stirring after each interval until completely smooth.
6. Stir in vegetable oil until the coating is glossy and easy to dip.
7. Dip each frozen ball into the melted chocolate, letting excess drizzle back into the bowl for a clean finish.
8. Return the coated balls to the parchment, sprinkle immediately with colorful sprinkles, and refrigerate for at least 30 minutes before serving.
Serving Suggestions
These creamy Oreo balls shine when served with a few thoughtful touches. Their playful appearance—complete with rainbow sprinkles—makes them a hit at gatherings, but you can also customize how you present them to match any occasion. Whether you’re arranging them on a dessert platter lined with parchment, stacking them in mini cupcake liners for easy grabbing, or packaging them as edible gifts tied with ribbon, a simple garnish or pairing can take each treat from adorable to absolutely unforgettable in no time.
- Party Platter: Arrange the Oreo balls on a decorative serving tray lined with parchment for easy picking and a polished look.
- Cupcake Liners: Place each ball in mini cupcake liners to keep them separate and make them grab-and-go friendly.
- Coffee Pairing: Serve alongside a steaming cup of coffee or espresso to balance the sweet creaminess with a hint of bitterness.
- Edible Gifts: Package in a cellophane bag tied with ribbon and a gift tag for thoughtful homemade presents.
Tips For Perfect Decadent No-Bake Creamy Oreo Balls
Making undeniably creamy, perfectly shaped Oreo balls is easier than you think, but these little tips will help you nail the texture and flavor every time. Starting with full-fat cream cheese ensures a luxuriously smooth dough that holds its shape. After forming your chocolate-covered spheres, a quick chill solidifies the centers without over-hardening the coating. Remember to coat straight from the freezer for a clean dip, and feel free to play with chocolate varieties if white chocolate isn’t your jam. With these friendly pointers, you’ll be whipping up flawless Oreo balls that disappear as quickly as you make them!
- Use full-fat cream cheese for richer flavor and a smoother, firmer dough.
- Store the Oreo balls in an airtight container in the fridge to keep them fresh for up to 5 days.
- Freeze any leftovers in a single layer before transferring to a freezer-safe bag for up to 1 month.
- For a flavor twist, substitute dark or milk chocolate for the white chocolate coating as desired.
How To Store It
Proper storage keeps your creamy Oreo balls fresh and delicious long after you’ve made them. Refrigeration preserves the perfect balance of crunchy cookie and creamy center, while freezing offers a longer shelf life without sacrificing taste. Whether you’re stashing them for quick desserts or planning ahead for gatherings, following the right methods ensures each bite retains that signature velvety texture and glossy chocolate shell.
- Refrigerate: Place the coated balls in an airtight container and store in the fridge for up to 5 days, keeping them firm and fresh.
- Freeze: Arrange in a single layer on a baking sheet until solid, then transfer to a freezer-safe bag for up to 1 month.
- Layering: If stacking, separate layers with parchment paper to prevent sticking and preserve the candy coating.
- Thawing: When ready to enjoy frozen balls, move them to the refrigerator for 1–2 hours before serving to maintain their shape and texture.
Frequently Asked Questions
Got questions about these irresistible Oreo balls? Here are some quick answers to guide you.
- How long does it take to prepare and chill these Decadent No-Bake Creamy Oreo Balls before serving?
The active preparation takes about 15–20 minutes—5 minutes to pulse the Oreo cookies and mix with cream cheese, 10–15 minutes to scoop and roll the balls. Then you’ll freeze them for 15 minutes to firm up, spend another 10–15 minutes melting and dipping in chocolate, and refrigerate for at least 30 minutes to set the coating. In total, plan for about 70–80 minutes from start to finish.
- Why is it important to freeze the Oreo balls before dipping them in chocolate?
Freezing firms up the cream cheese–Oreo centers, preventing them from collapsing or melting when dipped in warm chocolate. A cold interior helps the coating set quickly, gives a smooth finish, and keeps the balls perfectly round rather than misshapen.
- Can I use different types of cookies or chocolates for this recipe?
Yes. You can substitute chocolate sandwich cookies or gluten-free sandwich cookies for the Oreos. For the coating, milk or dark chocolate chips work in place of white chocolate, though you may skip the added vegetable oil since those chocolates tend to be naturally more fluid when melted. Adjust your melt times and drizzle on additional toppings like crushed nuts if desired.
- How do I prevent the white chocolate from seizing or becoming too thick?
Melt the white chocolate chips in 30-second intervals at medium power, stirring thoroughly between each session. Adding the tablespoon of vegetable oil after the chips are fully melted makes the coating glossier and more fluid, ensuring it adheres smoothly without seizing. If the mixture becomes too thick, stir in another teaspoon of oil or warm slowly for a few more seconds.
- What’s the best way to store these Oreo balls and how long do they keep?
Store coated Oreo balls in an airtight container in the refrigerator for up to 5 days. If you want to keep them longer, freeze them in a single layer on a tray until firm, then transfer to a sealed freezer bag or container for up to 1 month. Thaw in the refrigerator for 1–2 hours before serving.
- My dough feels too soft and sticky to roll into balls. What can I do?
If the dough is too soft, chill it in the refrigerator for 10–15 minutes before rolling. Alternatively, add a tablespoon or two of extra finely crushed Oreo crumbs to absorb excess moisture. The dough should be smooth and slightly tacky but still hold its shape when scooped.
- Why does the recipe recommend using full-fat cream cheese?
Full-fat cream cheese has a higher fat content, which yields a richer flavor and smoother texture. Lower-fat varieties contain more moisture and less fat, which can make the dough too wet and prevent the balls from firming up properly. Full-fat cream cheese ensures a creamy, luxurious center.
What Makes This Special
These Decadent No-Bake Creamy Oreo Balls hit all the right notes: crunchy Oreo bits, tangy cream cheese silkiness, and a glossy white chocolate shell crowned with rainbow sprinkles. Their no-bake simplicity means you can whip them up in a flash—ideal for last-minute gatherings or sweet cravings. Plus, they’re endlessly customizable, whether you drizzle dark chocolate for contrast or swap in colorful toppings. Go ahead and save or print this recipe for easy reference, and let me know in the comments how yours turned out or if you have any questions!
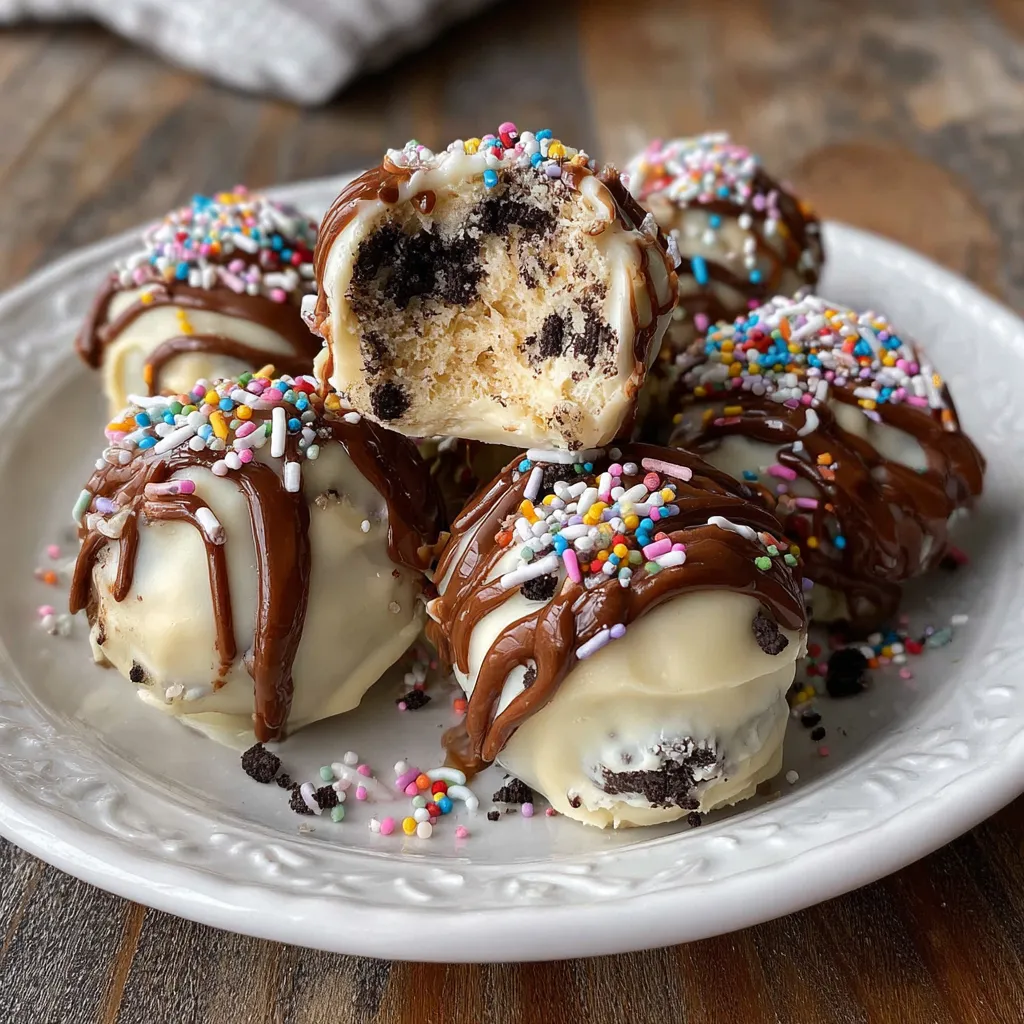

Decadent No-Bake Creamy Oreo Balls
Description
Crushed Oreo and cream cheese unite into velvety spheres, then cloaked in glossy white chocolate and dotted with rainbow sprinkles. Each bite offers crunchy cookie bits, creamy filling and sweet chocolate coating.
Ingredients
Instructions
-
Place Oreo cookies in a food processor and pulse until finely ground.
-
Transfer crumbs to a bowl and add softened cream cheese, mixing until a smooth dough forms.
-
Use a small cookie scoop or spoon to portion the mixture and roll into 1-inch balls.
-
Arrange balls on a parchment-lined tray and freeze for 15 minutes to firm up.
-
Meanwhile, melt white chocolate chips in a microwave-safe bowl in 30-second intervals, stirring until smooth.
-
Stir in vegetable oil until the coating is glossy.
-
Dip each frozen ball into the melted chocolate, allowing excess to drip back into the bowl.
-
Place coated balls back on the parchment, sprinkle with sprinkles, and refrigerate for at least 30 minutes before serving.
Note
- Use full-fat cream cheese for richer flavor and smoother texture.
- Store Oreo balls in an airtight container in the refrigerator for up to 5 days.
- Freeze leftover balls for up to 1 month and thaw in the refrigerator before serving.
- Substitute dark or milk chocolate for white chocolate coating as desired.

