

Stepping into my kitchen with visions of tropical breezes and playful roars, I set out to create what might be my most whimsical dessert yet: the Fruit Lion Cake. This cheerful masterpiece blends a tender, vanilla-kissed cake base with bursts of juicy fruits, transforming each slice into a vivid kaleidoscope of flavors. The fruit-laden batter breaks through a soft crumb, revealing pops of pineapple, strawberry, kiwi, and mango at every bite. As I whisk the batter and fold in those colorful morsels, my mind drifts to sunny afternoons spent picking berries, and I can’t help smiling at the thought of visitors lighting up over this fun, vibrant treat.
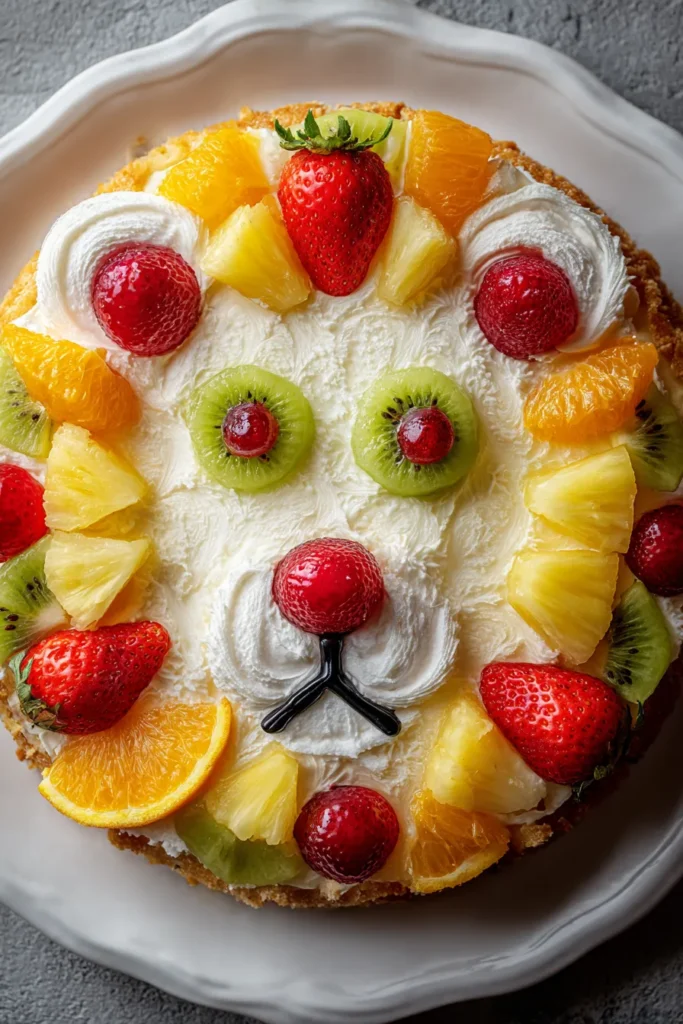
Baking for me is all about storytelling—infusing sweetness and color with a hearty side of joy. This cake does just that by dressing itself up like a proud lion: a ring of fruit slices forms a regal mane, while zest and edible berries bring its friendly face to life. Whether you’re planning a children’s party, hosting a summer brunch, or simply craving dessert that sparks conversation, this playful cake delivers. It’s a blend of classic baking techniques and carefree creativity, a reminder that joy often comes wrapped in bright hues and shared moments around the table.
KEY INGREDIENTS IN FRUIT LION CAKE
Every great recipe starts with pantry staples and a few special touches. The Fruit Lion Cake balances basic baking ingredients with fresh fruits and a drizzle of honeyed cream, ensuring both structure and delightful flavor bursts.
- All-purpose flour
Provides the sturdy yet tender structure for the cake, helping it rise evenly and hold its fruity treasures.
- Baking powder
Acts as the primary leavening agent, creating lightness and lift so each slice feels airy, not dense.
- Baking soda
Works with the buttermilk to deliver a gentle rise and tender crumb, while slightly balancing acidity.
- Salt
Enhances sweetness and intensifies the cake’s overall flavor, tying all ingredients together in harmony.
- Unsalted butter
Adds richness and moisture, ensuring a soft crumb that melts in your mouth with every bite.
- Granulated sugar
Sweetens the batter, aids in creaming with butter to trap air, and contributes to a beautiful golden hue.
- Eggs
Bind the ingredients, provide structure, and lend moisture. Beating them in one at a time helps maintain a smooth, even batter.
- Vanilla extract
Infuses a warm, familiar aroma and subtle sweetness, complementing the fruit without overpowering it.
- Buttermilk
Yields a tender texture thanks to its acidity, which also interacts with baking soda for extra fluffiness.
- Mixed fruits
Chopped pineapples, strawberries, kiwis, and mangos add vibrant color, natural sweetness, and a juicy pop in every forkful.
- Heavy cream
Whipped with honey to create a silky frosting that seals in freshness and complements the fruity layers.
- Honey
Sweetens the whipped cream naturally, lending a slight floral note that pairs beautifully with the fruits.
- Orange and lemon zest
Provides bright bursts of citrusy fragrance and color, elevating the cake’s visual appeal and flavor complexity.
- Edible eyes or berries
Bring the lion’s face to life, offering a friendly glance that will make guests of all ages smile.

HOW TO MAKE FRUIT LION CAKE
Ready to bring this playful dessert to life? In this section, we’ll walk through every essential step, from preheating your oven to adding those final decorative touches that transform a simple cake into a roaring masterpiece.
1. Preheat your oven to 350°F (175°C). Grease two 9-inch round cake pans thoroughly with butter or nonstick spray, then flour them lightly, tapping out any excess to prevent sticking.
2. In a medium bowl, whisk together the all-purpose flour, baking powder, baking soda, and salt until evenly distributed and free of lumps.
3. In a large bowl, cream the softened unsalted butter and granulated sugar together using an electric mixer. Beat on medium speed until the mixture turns pale and fluffy, about 3–4 minutes.
4. Beat in the eggs one at a time, scraping down the sides of the bowl after each addition. Once combined, stir in the vanilla extract and mix until fully incorporated.
5. Alternate adding the flour mixture and buttermilk to the butter mixture: start with a third of the flour blend, then half of the buttermilk, another third of the flour, the remaining buttermilk, and finish with the last of the flour. Mix gently after each addition to keep the batter light.
6. Fold in the mixed fruits using a spatula, stirring just enough to distribute them evenly without crushing their shape or color.
7. Divide the batter evenly between the two prepared cake pans, smoothing the tops so each layer bakes uniformly.
8. Bake in the preheated oven for 25–30 minutes, or until a toothpick inserted into the center of each cake layer comes out clean and the tops spring back when lightly pressed.
9. Allow the cakes to cool in their pans for 10 minutes. Then invert each layer onto a wire rack and cool completely before frosting.
10. In a chilled bowl, whip the heavy cream with the honey on high speed until soft peaks form. The frosting should hold its shape but remain light.
11. Once the cakes are fully cooled, spread a generous layer of whipped cream on top of one layer, gently press the second layer on top, and cover the entire cake with a thin crumb coat of whipped cream to seal in loose crumbs.
12. Create a lion’s face on the top surface by arranging fruit slices in a circular pattern for the mane, sprinkling orange and lemon zest for color accents, and placing edible eyes or berries where the lion’s eyes should be.
13. Refrigerate the decorated cake for at least 30 minutes before serving. This resting time helps the frosting set and ensures clean, neat slices.
SERVING SUGGESTIONS FOR FRUIT LION CAKE
Presenting the Fruit Lion Cake is almost as fun as baking it! As you slice through its colorful layers, each serving reveals a mosaic of juicy fruit and fluffy cake. This section offers creative ideas to elevate your presentation and make every bite as special as the occasion itself. Whether you’re hosting a backyard brunch, planning a children’s party, or simply indulging in a family treat, these tips will help you serve your cake with flair and confidence.
- Chilled slices: Cut the cake into generous wedges after a brief chill in the refrigerator. This keeps the whipped cream frosting firm, ensuring each slice holds its shape perfectly for a tidy presentation.
- Fruit garnishes: Arrange extra mixed fruit around the base of each plated slice. A few slices of fresh strawberry, kiwi, or a small sprig of mint can add a pop of color and texture, making each portion feel fresh and inviting.
- Festive platters: Serve on a bright or patterned platter that contrasts with the cake’s neutral tones. A colorful ceramic dish or a tropical leaf-shaped tray can enhance the cake’s playful vibes and complement the fruit mane.
- Kid-friendly touch: Pair each slice with a small cup of yogurt or fruit compote on the side. Children love a dipping station, and the tangy yogurt accentuates the cake’s fruity sweetness while keeping the dessert interactive.
HOW TO STORE FRUIT LION CAKE
Keeping your cake fresh and flavorful is key to enjoying it over several days. Because the Fruit Lion Cake includes whipped cream frosting and a bounty of fresh fruit, proper storage prevents sogginess, maintains texture, and preserves that vibrant look you worked so hard to create. Here’s how to stash your cake (or leftovers) so it stays moist and delightful, whether you plan to devour it tomorrow or over the next couple of days.
- Refrigerate covered: Place the cake in an airtight cake carrier or under a large glass dome. This blocks out strong odors in the fridge and keeps the whipped cream frosting firm. Store for up to 3 days.
- Use plastic wrap: If you don’t have a cake container, gently wrap the cake in plastic wrap, taking care not to press too firmly on the decorations. This method still locks in moisture and prevents exposure to air.
- Freeze portions: Slice the cake and place individual pieces on a parchment-lined tray. Freeze until firm, then wrap each slice in plastic wrap and tuck into a freezer bag. Thaw overnight in the refrigerator when you’re ready to enjoy a single portion.
- Bring to room temperature: Before serving leftovers, allow refrigerated or thawed slices to sit at room temperature for 15–20 minutes. This softens the cream and restores the cake’s tender crumb for optimal flavor.
CONCLUSION
I hope this detailed guide to baking and decorating a whimsical Fruit Lion Cake sparks as much joy in your kitchen as it did in mine. From whisking together the basic batter to arranging those bright fruit slices into a playful mane, every step of this recipe is an invitation to embrace creativity and share smiles around the table. You’ve learned how simple pantry staples—flour, sugar, eggs, and butter—combine with fresh fruits and a honeyed whipped cream frosting to create something truly extraordinary. The result is a dessert that’s both visually stunning and bursting with vibrant flavors, perfect for celebrations, gatherings, or any time you want to add a fun twist to your baking repertoire.
Feel free to print this article and save it for your recipe collection—your future self will thank you when party-planning season rolls around. Don’t forget, you can also find a FAQ below for quick answers to common questions about substitutions, troubleshooting, and creative variations. And of course, I’d love to hear how your Fruit Lion Cake turned out! If you have any comments, questions, or feedback—whether it’s about the decorating process, ingredient swaps, or ways to make things even more festive—drop a note. Happy baking, and may your cake table always roar with delight!

Fruit Lion Cake
Description
This colorful cake is a fun twist on dessert, featuring a moist base filled with mixed fruits and topped with a whimsical lion's face. It's sure to bring smiles all around!
Ingredients
Instructions
-
Preheat your oven to 350°F (175°C). Grease and flour two 9-inch round cake pans.
-
In a medium bowl, whisk together flour, baking powder, baking soda, and salt.
-
In a large bowl, cream the softened butter and sugar until light and fluffy.
-
Beat in the eggs one at a time, then add the vanilla extract and mix well.
-
Alternately add the flour mixture and buttermilk to the butter mixture, beginning and ending with the flour.
-
Fold in the mixed fruits gently into the batter to avoid breaking them.
-
Divide the batter evenly between the prepared cake pans.
-
Bake in preheated oven for 25-30 minutes, or until a toothpick inserted into the center comes out clean.
-
Let the cakes cool in their pans for 10 minutes, then turn them onto a wire rack to cool completely.
-
Whip the heavy cream with the honey until soft peaks form for the frosting.
-
Once the cakes have cooled, spread a layer of whipped cream on top of one cake, place the second cake on top, and cover the entire cake with a thin layer of whipped cream to seal.
-
Create a lion's face design on top of the cake using fruit slices for the mane, orange and lemon zest for added color, and the edible eyes or berries for eyes.
-
Refrigerate the cake for at least 30 minutes before serving to ensure it is set properly.
Note
- The cake can be stored in the refrigerator for up to 3 days.
- You can use canned fruits if fresh fruits are not available.
- Add a fun touch by shaping additional pieces of fruit to form the lion’s nose, mouth, and ears.
- Experiment with different fruit combinations for unique flavors.

