

Sink your teeth into these Grilled Mediterranean Veggie Quesadillas and embark on a flavor-packed journey where charred zucchini, sweet peppers, and crumbly feta mingle with gooey mozzarella. Golden tortillas crackle as you bite into smoky grilled veggies brightened with lemon-fresh parsley and tender spinach. Perfect for a laid-back lunch or an easy dinner, this fresh Mediterranean twist is sure to become a weeknight staple. Ready to fire up the grill and make some magic?
Key Ingredients
To recreate these vibrant quesadillas, gather the core Mediterranean staples below:
- 2 medium zucchinis: Tender base that chars to perfection, adding subtle sweetness.
- 1 red bell pepper: Bold color and smoky depth for a sweet, crisp bite.
- 1 yellow bell pepper: Bright, mellow sweetness that balances the veggies.
- 1 small red onion: Sharp, savory flavor that caramelizes slightly on the grill.
- 2 cloves garlic: Aromatic punch that infuses the mix with classic Mediterranean flair.
- 2 tablespoons olive oil: Coats vegetables evenly and prevents sticking on the grill.
- 1 teaspoon dried oregano: Earthy herb that layers in signature Mediterranean seasoning.
- 1 teaspoon salt: Enhances every ingredient’s natural flavor.
- 1/2 teaspoon black pepper: Gentle heat to round out the veggie medley.
- 1 tablespoon lemon juice: Bright, citrusy zing that lifts the filling.
- 1 cup baby spinach leaves: Fresh greenery adding color, nutrition, and a tender bite.
- 4 large flour tortillas: Crispy, golden shells that hold all the delicious filling.
- 1 cup crumbled feta cheese: Tangy, creamy contrast to the smoky veggies.
- 1 cup shredded mozzarella cheese: Melted, gooey binder that ties everything together.
- 1/4 cup chopped fresh parsley: Herbaceous finish that brightens each mouthful.
How To Make Grilled Mediterranean Veggie Quesadillas
Grilling these quesadillas brings out the best in every component—from the sweet, charred veggies to the bubbling cheese tucked inside golden tortillas. With just a few simple steps, you’ll go from fresh produce to irresistible handhelds that celebrate the flavors of the Mediterranean.
1. Preheat a grill pan or outdoor grill to medium-high heat, ensuring it’s hot enough to char the vegetables without burning.
2. Slice the zucchinis and bell peppers into 1/4-inch strips, halve and thinly slice the red onion, and mince the garlic for even distribution.
3. In a large bowl, toss the sliced vegetables and garlic with olive oil, dried oregano, salt, and black pepper until every piece is evenly coated.
4. Arrange the seasoned vegetable mixture on the hot grill pan. Cook for 6 to 8 minutes, stirring occasionally, until the veggies are tender and lightly charred all over.
5. Transfer the grilled vegetables to a cutting board, chop them coarsely, then stir in lemon juice and chopped fresh parsley for a bright finish.
6. Lay one flour tortilla flat and sprinkle 1/4 cup shredded mozzarella and 1/4 cup crumbled feta over half of it. Top with 1/4 of the grilled vegetable mix and a handful of spinach leaves, then fold the tortilla over to enclose the filling.
7. Brush both sides of the folded quesadilla with a little olive oil. Place it back on the grill pan and cook for 2 to 3 minutes per side, pressing gently, until the tortilla is golden brown and the cheese is melted.
8. Repeat steps 6 and 7 with the remaining tortillas, cheeses, and vegetable mixture, keeping cooked quesadillas warm on a plate.
9. Remove the finished quesadillas from the grill, cut each into wedges, and serve immediately for peak crispness and gooey filling.
Serving Suggestions
These quesadillas shine on their own, but adding the right accompaniments can take your meal to the next level. Whether you’re hosting friends or enjoying a solo feast, pair them thoughtfully for a balanced Mediterranean spread that highlights fresh, tangy, and creamy contrasts.
- Creamy tzatziki dip: Serve chilled tzatziki alongside for a cool, garlicky contrast that complements the smoky veggies.
- Hummus platter: Add a scoop of hummus dusted with paprika for extra protein and a velvety texture.
- Simple herb salad: Toss mixed greens with olive oil, lemon juice, and fresh mint for a bright, refreshing side.
- Olive and tomato salsa: Combine chopped olives, cherry tomatoes, red onion, and parsley with a splash of olive oil for a zesty topping.
Tips For Perfect Grilled Mediterranean Veggie Quesadillas
With just a few tricks up your sleeve, you can ensure each quesadilla turns out crispy on the outside and melty on the inside. From choosing the right grill temperature to prepping ahead of time, these tips will keep you stress-free and ready to impress.
- Pairing with dips: Offer tzatziki or hummus on the side to highlight the Mediterranean flavors and add a creamy balance.
- Gluten-free swap: Use corn or certified gluten-free tortillas instead of flour to accommodate dietary needs without sacrificing taste.
- Advance prep: Slice and season the vegetables up to a day ahead—store them in the fridge so grilling is a breeze.
- Leftover storage: Pack any extra quesadilla wedges in an airtight container and refrigerate for up to 2 days.
How To Store It
To keep your Grilled Mediterranean Veggie Quesadillas tasting just as fresh as the day you cooked them, proper storage is key. Whether you’re saving leftovers for a quick lunch or planning ahead for a busy week, these simple guidelines will maintain flavor and texture.
- Refrigerator storage: Place cooled quesadilla wedges in an airtight container. Store in the fridge for up to 2 days. Before serving, reheat on a hot grill pan or skillet for a minute per side to restore crispness.
Frequently Asked Questions
Here are some quick answers to common questions about these grilled veggie quesadillas:
- Q: How long does it take to make these grilled Mediterranean veggie quesadillas from start to finish?
A: From start to finish, expect about 30 to 35 minutes. That includes 5 minutes to prep and slice the vegetables, 6 to 8 minutes to grill them until tender and lightly charred, a few minutes to chop and toss them with lemon juice and parsley, and about 8 to 12 minutes to assemble and grill each batch of quesadillas until golden brown and the cheese is melted.
- Q: Can I prepare the vegetables ahead of time, and how should I store them?
A: Yes. You can slice and toss the zucchinis, bell peppers, onion, and garlic with olive oil, oregano, salt, and pepper up to a day in advance. Store them in an airtight container in the refrigerator. When ready, simply grill them as directed, then chop and mix with lemon juice and parsley before building the quesadillas.
- Q: What’s the best way to prevent the tortillas from becoming soggy or tearing?
A: Brush both sides of the folded tortilla lightly with olive oil before grilling to create a crisp exterior. Use medium-high heat and press gently with a spatula while cooking for 2 to 3 minutes per side. This helps seal the edges, prevents tearing, and ensures an evenly golden, crispy tortilla.
- Q: How can I adapt this recipe for a gluten-free diet?
A: Substitute the large flour tortillas with corn or your preferred gluten-free tortillas. Ensure any prepackaged tortillas are labeled gluten-free. All other ingredients—vegetables, cheeses, oil, and seasonings—are naturally gluten-free.
- Q: What are some recommended serving suggestions and accompaniments?
A: These quesadillas pair beautifully with Mediterranean-style dips such as tzatziki, hummus, or a simple yogurt-dill sauce. You can also serve a side salad of mixed greens tossed with olive oil, lemon juice, and fresh herbs for a refreshing contrast.
- Q: How should I store and reheat any leftover quesadillas?
A: Store leftovers in an airtight container in the refrigerator for up to 2 days. To reheat, place quesadilla wedges on a preheated grill pan or skillet over medium heat for 1 to 2 minutes per side until warmed through and crisp again. You can also reheat in a 350°F oven for about 5 minutes.
- Q: Can I swap out the cheeses or add other fillings?
A: Absolutely. The combination of crumbled feta and shredded mozzarella offers both tang and melt. You can swap mozzarella for provolone or pepper jack for a spicier kick, and add fillings like roasted eggplant, cherry tomatoes, or olives. Just adjust quantities to maintain a balanced filling and avoid overstuffing the tortilla.
What Makes This Special
These Grilled Mediterranean Veggie Quesadillas hit all the right notes—smoky char on fresh vegetables, tangy feta, and stretchy mozzarella wrapped in a crispy tortilla. The bright pops of lemon juice and parsley keep every bite lively and satisfying. It’s a fun, hands-on meal that’s perfect for summer grilling or a quick lunch, and it’s surprisingly easy once you have your veggies prepped. Go ahead, print this recipe, save it, and let me know in the comments if you tried it or have any questions—I’m always here to help you grill your best!
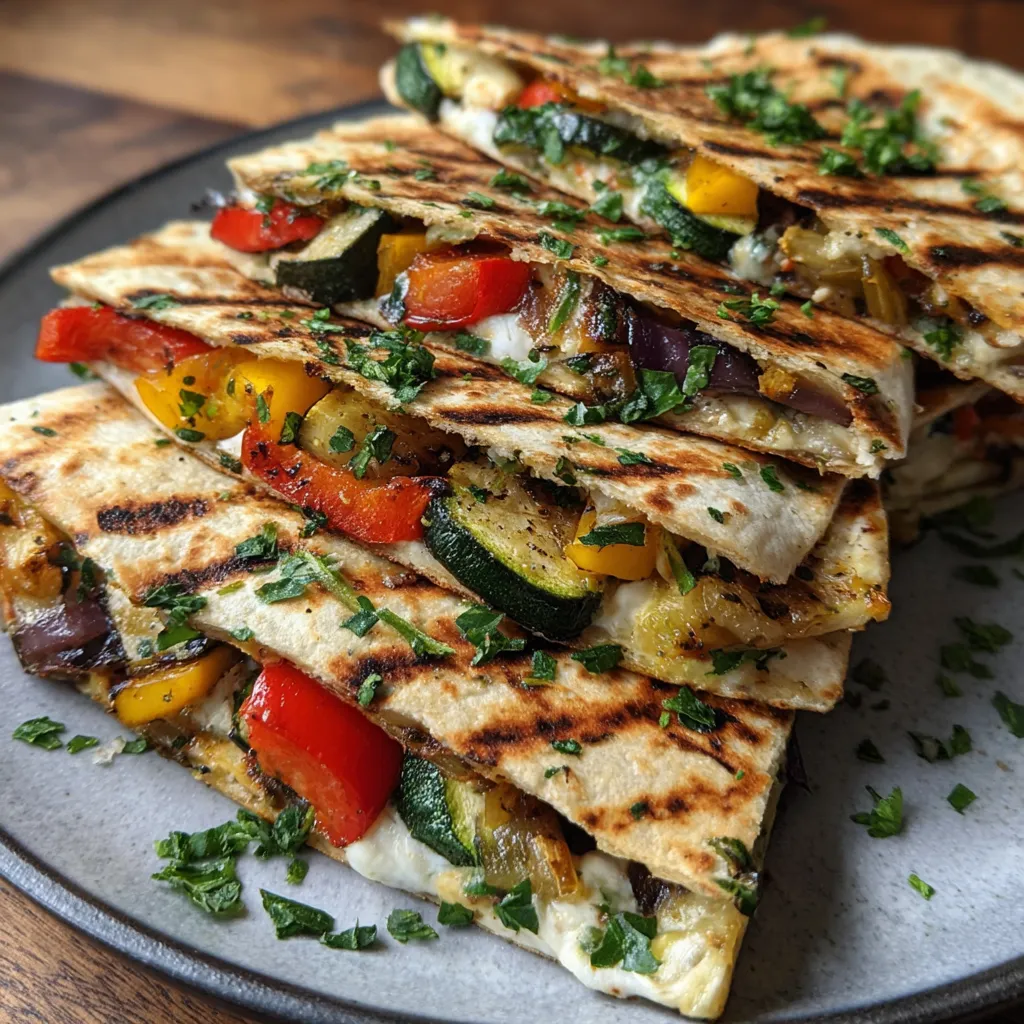

Grilled Mediterranean Veggie Quesadillas
Description
Golden tortillas crackle as you bite into a mix of smoky grilled zucchini, sweet peppers and melting cheese, brightened with lemon-fresh parsley and spinach.
Ingredients
Instructions
-
Preheat a grill pan or outdoor grill to medium-high heat.
-
Slice zucchinis, bell peppers, red onion and mince garlic.
-
In a large bowl toss zucchinis, bell peppers, onion and garlic with olive oil, dried oregano, salt and black pepper until evenly coated.
-
Place the vegetable mixture on the grill pan and cook for 6 to 8 minutes, stirring occasionally, until vegetables are tender and lightly charred.
-
Transfer the grilled vegetables to a cutting board, chop coarsely, then stir in lemon juice and chopped fresh parsley.
-
Lay one flour tortilla flat, sprinkle 1/4 cup shredded mozzarella and 1/4 cup crumbled feta over half of the tortilla, top with 1/4 of the grilled vegetable mixture and a handful of spinach leaves, then fold the tortilla over to enclose the filling.
-
Brush both sides of the folded quesadilla with a little olive oil and place on the grill pan. Cook for 2 to 3 minutes per side, pressing gently, until the tortilla is golden brown and the cheese is melted.
-
Repeat step 6 and 7 with the remaining tortillas, cheese and vegetable mixture.
-
Remove quesadillas from the grill, cut each into wedges and serve immediately.
Note
- These quesadillas pair well with tzatziki or hummus on the side.
- For a gluten-free version use corn or gluten-free tortillas.
- Prep the vegetables ahead of time and refrigerate until ready to grill.
- Store any leftovers in an airtight container in the refrigerator for up to 2 days.

