

There’s something endlessly charming about creating your own Halloween Royal Icing Cookies, especially when you’re eager to capture the spooky season’s spirit with these festive treats. These crisp, buttery cookies, decorated with colorful royal icing, are perfect for any haunt-themed party or a cozy night of baking. With an intermediate difficulty level, you’ll spend about 30 minutes preparing, 10 minutes baking, and one hour resting your dough—minutes well invested for cookies that deliver 150 calories each of pure seasonal delight. Whether you’re aiming for grinning jack-o’-lanterns, fluttering bats, or whimsical ghosts, these decorated cookies bring cheer to hauntings of all kinds.
As you tiptoe through this recipe, you’ll find the balance between rich, creamy butter and granulated sugar creates a tender crumb, while a hint of almond and vanilla lends a subtle warmth in every bite. The real magic arrives when you whip together royal icing—watch it bloom from runny sweetness into stiff peaks that hold every detail of your spooky designs. From the moment you pull the parchment-lined baking sheet from the oven to when your last spider-web–lined cookie is polished off, you’ll savor the interplay of flavor, texture, and color that makes these Halloween cookies a memorable highlight for any ghostly gathering.
KEY INGREDIENTS IN HALLOWEEN ROYAL ICING COOKIES
Before we dive into the step-by-step, let’s talk about the essential building blocks of these hauntingly good cookies. Each component plays its part in creating a dough that bakes up firm enough to hold intricate designs and a royal icing that dries smooth and glossy—ready for all your spooky embellishments.
- All-purpose flour
Provides the sturdy foundation and structure that allows your cookies to hold their shapes once they’re cut and baked. The right amount ensures a tender bite without spreading too thin.
- Baking powder
Adds just a whisper of lift, giving the cookies a slight rise and preventing them from becoming too dense. It also contributes to a light crumb.
- Salt
Balances the sweetness and enhances the overall flavor profile, preventing the dough from tasting flat or one-dimensional.
- Unsalted butter
Creamed until light and fluffy, it imparts richness and moisture. Softened to room temperature, it blends smoothly with sugar, creating the base for a melt-in-the-mouth texture.
- Granulated sugar
Sweetens the dough and helps with the tenderizing process when creamed with butter. It also contributes to a slight caramelization on the edges, adding depth of flavor.
- Egg
Acts as a binding agent, weaving the dough together and providing structure. It also adds moisture and richness.
- Vanilla extract
Infuses a warm, aromatic sweetness that’s signature to many classic cookie recipes, rounding out the buttery notes.
- Almond extract
Introduces a subtle nutty undertone, adding complexity and a hint of seasonal flair to each bite.
- Assorted food coloring gels
Used to tint your royal icing in vivid shades of orange, black, purple, and green. Gels provide deeper hues without thinning the icing.
- Powdered sugar (for royal icing)
Serves as the base for your icing, dissolving into the meringue powder and water to create a glossy, pipeable medium.
- Meringue powder
Stabilizes the icing and helps it set to a firm finish, enabling elaborate piping details and helping decorations hold their shape.
- Warm water
Activates the meringue powder and helps you achieve the right consistency—too thick, and it’s hard to pipe; too thin, and the icing won’t hold detail.
- Gel food coloring (for royal icing)
Ensures vibrant, true-to-life hues without compromising the icing’s set time or texture, perfect for striking Halloween motifs.

HOW TO MAKE HALLOWEEN ROYAL ICING COOKIES
Once you’ve gathered your ingredients, it’s time to transform them into festive, spook-tacular cookies. This section walks you through each stage—from dough to decorating tip—so you can achieve picture-perfect results.
1. In a large bowl, whisk together the flour, baking powder, and salt. This dry mix ensures even distribution of leavening and seasoning. Set the bowl aside to await the creamed butter mixture.
2. In a separate bowl, use an electric mixer to cream the softened butter and granulated sugar until light and fluffy, about 2–3 minutes. This step is essential for a tender, melt-in-your-mouth cookie.
3. Beat in the egg, vanilla extract, and almond extract until the mixture is smooth and uniform. The extracts infuse your dough with aromatic layers of flavor.
4. Gradually add the dry ingredients to the butter mixture, keeping the mixer on low speed. Stop as soon as a cohesive dough forms—overmixing can lead to tough cookies.
5. Divide the dough into two equal portions, wrap each in plastic wrap, and refrigerate for at least 1 hour. Chilling firms the butter and prevents excessive spreading in the oven.
6. Preheat your oven to 350°F (180°C) and line baking sheets with parchment paper. This ensures even baking and easy cleanup.
7. On a lightly floured surface, roll out one portion of dough to a 1/4-inch thickness. Use Halloween-themed cookie cutters—pumpkins, bats, witches—to cut out shapes.
8. Place the cut cookies onto the prepared baking sheets, leaving a bit of space between them so they can expand.
9. Bake for 8–10 minutes, or until the edges just start to turn golden. Remove the sheets and cool the cookies completely on a wire rack.
10. For the royal icing, beat the powdered sugar, meringue powder, and warm water on low speed to combine, then switch to high speed for 5–7 minutes until stiff peaks form.
11. Divide the icing into separate bowls and tint each batch with your desired gel food coloring, stirring until the color is even.
12. Transfer each colored icing to a piping bag fitted with small tips. Use outlining and flooding techniques to craft intricate designs—think spider webs, jack-o’-lantern grins, and creepy eyes.
13. Allow the icing to set completely—about 2 hours at room temperature—before stacking or serving. This ensures your decorations stay crisp and glossy.
SERVING SUGGESTIONS FOR HALLOWEEN ROYAL ICING COOKIES
Whether you’re hosting a haunted house party or just treating your family to a festive snack, presentation is everything. These serving ideas will help your ghoulish creations take center stage—and taste even better.
- Spooky Cookie Platter
Arrange your decorated cookies on a large platter layered with black lace doilies or orange parchment. Scatter plastic spiders and candy corns between the shapes to create a truly haunted display.
- Individual Treat Bags
Place one or two cookies in clear cellophane bags, tie with black and white twine, and add a mini tag labeled “Trick or Treat.” These make for fun party favors or neighborly gifts.
- Milk and Cookie Shots
Pair a ghost-shaped cookie with a small glass of chilled milk or a spooky-flavored latte. For extra flair, rim the glass with colorful sprinkles to echo your icing hues.
- Dessert Board Ensemble
Combine the cookies with candy apples, caramel popcorn, and mini cupcakes on a wooden board. Vary the heights and textures to offer guests a haunted-smorgasbord they won’t forget.
HOW TO STORE HALLOWEEN ROYAL ICING COOKIES
Once your masterpieces are iced and admired, you’ll want to keep them fresh and ready for snacking. Proper storage preserves their crisp edges and keeps the royal icing from becoming sticky or chalky.
Cookies with fully set icing are surprisingly sturdy, but humidity is their nemesis. Store them in a cool, dry spot away from direct sunlight. If you’re packing them for a bake sale or prepping early for a party, follow these tips:
- Airtight Container
Layer cookies with sheets of parchment or wax paper in a sealed container. This prevents air exposure, locking in the crisp texture and preventing icing from sticking together.
- Parchment Layering
Place parchment between each cookie layer to protect intricate details. It also makes it easy to remove single cookies without damaging your spooky designs.
- Room Temperature
Keep containers at room temperature—refrigerating can introduce moisture that softens the icing and cookie base. A pantry shelf or countertop away from heat sources is ideal.
- Freezing for Long-Term
For longer storage (up to one month), freeze undressed cookie shapes between sheets of parchment inside a freezer-safe bag. Thaw fully before decorating to avoid condensation on the surface.
CONCLUSION
We’ve journeyed from mixing the first whisked spoonful of flour to placing the final spider-web design on your royal icing masterpiece. These Halloween Royal Icing Cookies blend crisp, buttery dough with vibrant, glossy decorations—perfect for spooking up a dessert table or gifting to fellow Halloween enthusiasts. With an intermediate difficulty level, about 30 minutes of hands-on prep, 10 minutes in the oven, and an hour of resting time, you’ll find this recipe both satisfying and accessible. Each cookie clocks in at roughly 150 calories, making it easy to indulge responsibly. Feel free to print or save this article for your next festive baking session, and remember that the devil is in the details—so keep your piping bags handy and your creativity flowing.
Below, you’ll find a handy FAQ section to address any lingering questions about dough consistency, icing tips, and troubleshooting common decorating hiccups. If you try this recipe, I’d love to hear how your cookies turned out! Share your favorite shapes, color combos, or any spooky twists you invented. Drop a comment or question if you need clarifications, have feedback, or simply want to boast about your next-level Halloween treats. Happy baking, and may your autumn be filled with crisp cookies and candy-coated thrills!
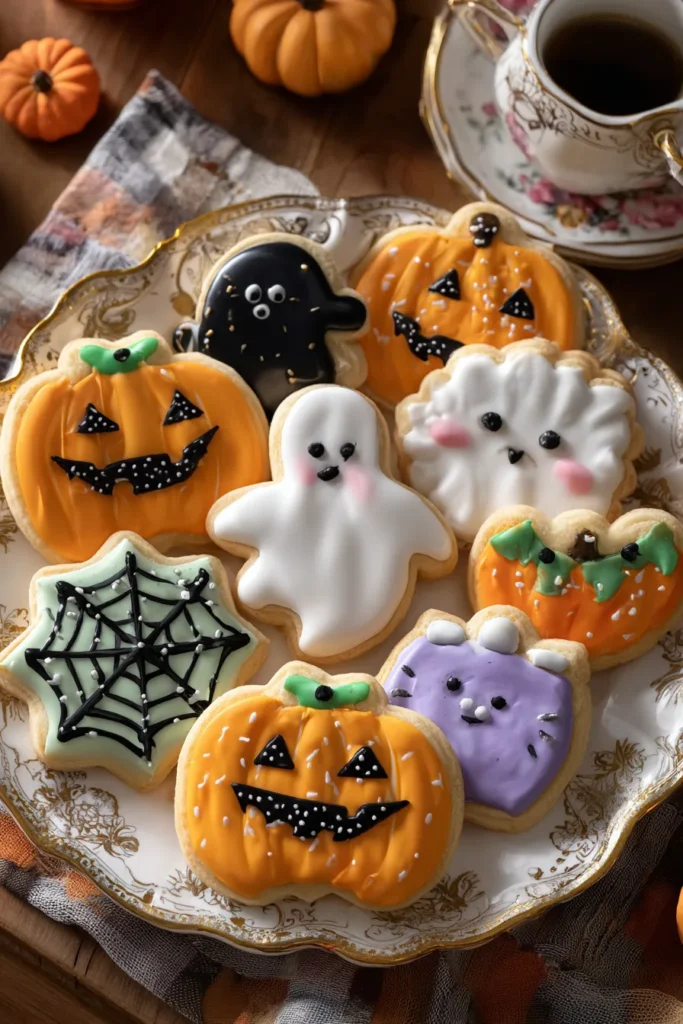

Halloween Royal Icing Cookies
Description
These cookies are crisp, and buttery, decorated with colorful royal icing that brings a fun twist to your Halloween treats. Perfect for parties or a festive baking session!
Ingredients
Instructions
-
In a large bowl, whisk together the flour, baking powder, and salt. Set aside.
-
In a separate bowl, cream the butter and sugar together using an electric mixer until light and fluffy, about 2-3 minutes.
-
Beat in the egg, vanilla extract, and almond extract until well combined.
-
Gradually add the dry ingredients to the wet mixture, mixing on low speed until a dough forms.
-
Divide the dough into two portions, wrap each in plastic wrap, and refrigerate for at least 1 hour.
-
Preheat your oven to 350°F (180°C) and line baking sheets with parchment paper.
-
Roll out the dough on a floured surface to 1/4-inch thickness. Use Halloween-themed cookie cutters to cut shapes.
-
Place the cookies onto the prepared baking sheets, leaving some space between them.
-
Bake for 8-10 minutes, or until the edges are slightly golden. Allow cookies to cool completely on a wire rack.
-
For the royal icing, beat the powdered sugar, meringue powder, and warm water using an electric mixer on low speed initially, then increase to high for 5-7 minutes until stiff peaks form.
-
Divide the icing into separate bowls and color each batch with desired food coloring.
-
Use a piping bag and small tips to decorate the cooled cookies. Allow the icing to set completely before serving.
Note
- Make sure the butter is softened to room temperature for smooth blending with sugar.
- Royal icing can dry out quickly; keep covered with a damp cloth when not in use.
- For more vibrant colors, use gel food coloring instead of liquid.
- Experiment with different cookie cutter shapes for diverse Halloween themes.
- Decorating can be a fun group activity for kids and adults alike.

