

Who doesn’t love a dinner that marries crunchy, golden pan-fried chicken with the bright aroma of fresh basil and nutty Parmesan? These Italian Basil Chicken Cutlets deliver a crispy crust that gives way to juicy chicken, all sizzled in olive oil and butter for maximum flavor. Whether you’re whipping up a weeknight meal or impressing friends, this recipe is pure comfort with a sunny Italian twist—let’s dive in!
Key Ingredients
Before diving into the kitchen action, let’s meet the heroes behind these cutlets. Each ingredient brings its own magic—seasoning, crunch, or freshness—to create the perfect bite.
- 4 pieces boneless skinless chicken breasts: The tender protein base that becomes irresistibly juicy once properly pounded and fried.
- 1 teaspoon salt: Enhances the natural flavor of the chicken and balances the crust seasoning.
- 1/2 teaspoon black pepper: Adds a gentle heat and aromatic kick to every bite.
- 1 teaspoon garlic powder: Brings savory depth and a subtle garlic note throughout the coating.
- 1 cup all-purpose flour: Creates the initial dry layer that helps the egg wash cling.
- 2 large eggs: Acts as the binding agent to secure the breadcrumb mixture.
- 1 tablespoon water: Thins out the egg wash for even coating coverage.
- 1 cup panko breadcrumbs: Delivers an extra-crispy, airy crust that stays crunchy.
- 1/4 cup grated Parmesan cheese: Infuses savory, umami-rich notes into the breadcrumb coating.
- 1/4 cup fresh basil leaves chopped: Offers bright, herbal freshness that cuts through the richness.
- 2 tablespoons olive oil: Provides the primary frying fat for a golden exterior.
- 1 tablespoon butter: Melts into a foaming finish for nutty flavor and extra browning.
How To Make Italian Basil Chicken Cutlets
Get ready to transform simple chicken breasts into a golden-crisp masterpiece! This process involves pounding the chicken thin, seasoning it, and using a classic three-station dredge—flour, egg wash, panko-Parmesan-basil mix—before pan-frying in olive oil and butter. Pay attention to even coating and oil temperature to ensure that iconic crunch and juicy interior.
1. Place chicken breasts between sheets of plastic wrap and pound to 1/4 inch thickness. Use a meat mallet or bottom of a heavy skillet to achieve an even thickness without tearing.
2. Season both sides of chicken with salt, pepper, and garlic powder. This dry rub ensures every bite is well-seasoned.
3. Prepare three shallow dishes: flour in the first, beaten eggs mixed with water in the second, and panko with Parmesan and basil in the third. Label each station to streamline the dredging process.
4. Dredge each cutlet in flour, shaking off excess, then dip into the egg mixture, and finally press into the breadcrumb mixture to coat evenly. Firmly press crumbs into the chicken for better adherence.
5. Heat olive oil and butter in a large skillet over medium-high heat until butter is melted and foaming. The foaming indicates the fats are hot enough but not smoking.
6. Cook chicken cutlets in batches for 3 to 4 minutes per side or until golden brown and cooked through. Avoid crowding the pan to maintain an even temperature and crispness.
7. Transfer cooked cutlets to a paper towel–lined plate to absorb excess oil. Let them rest briefly to lock in juices.
8. Serve cutlets hot, garnished with additional basil or lemon wedges if desired. The fresh garnish adds a final pop of color and brightness.
Serving Suggestions
Once your cutlets are beautifully golden, you’ve got endless serving possibilities that highlight their Italian flair and crunchy texture. Here are some crowd-pleasing ideas:
- Serve with a zesty arugula salad tossed in lemon vinaigrette to balance richness with peppery greens.
- Pair alongside garlic olive oil pasta for a hearty, carb-forward combo that soaks up every bit of pan drippings.
- Garnish with extra fresh basil leaves and a sprinkle of Parmesan for an elegant, restaurant-style presentation.
- Add a squeeze of fresh lemon juice just before serving to brighten each bite and cut through the richness.
Tips For Perfect Italian Basil Chicken Cutlets
Nailing these cutlets is all about timing, technique, and a couple of secret tweaks. Follow these friendly pointers to level up your crunch and flavor game.
- For extra flavor, add a pinch of red pepper flakes to the breadcrumb mixture.
- Fresh basil yields a brighter aromatic flavor compared to dried basil.
- Pork cutlets can be used as a substitute following the same preparation.
- Pair with a crisp arugula salad or pasta tossed in garlic olive oil for a complete meal.
How To Store It
Leftovers of these cutlets are almost as good as fresh—if you store them right. Keep that crust crisp and the inside juicy by following these simple methods.
- Refrigerate in an airtight container for up to 3 days; separate layers with parchment paper to prevent sticking.
- Freeze cooled cutlets in a single layer on a baking sheet, then transfer to a freezer bag for up to 1 month.
- Thaw overnight in the fridge before reheating to maintain texture.
- Reheat on a wire rack over a baking sheet in a 350°F oven for about 8–10 minutes to restore crispiness.
Frequently Asked Questions
These quick answers will keep you confidently breading and frying without a hitch:
- How long does it take to prepare and cook the Italian Basil Chicken Cutlets?
A: From start to finish, plan on about 35 to 40 minutes. This includes 10 minutes to pound and season the chicken, 5 minutes to set up your dredging stations, and 3 to 4 minutes per side in the skillet. Allow an extra few minutes to let the cutlets rest on a paper towel–lined plate before serving.
- What’s the best way to pound the chicken breasts evenly without tearing them?
A: Place each breast between two sheets of plastic wrap and use a meat mallet or the bottom of a heavy skillet. Start in the center and gently work toward the edges, maintaining an even 1/4-inch thickness. The plastic wrap prevents tearing and keeps your work surface clean.
- How can I ensure the breadcrumb coating stays intact during cooking?
A: After dusting each cutlet with flour and shaking off excess, immerse it fully in the egg wash and press both sides into the panko-Parmesan-basil mixture. Press firmly so the crumbs adhere. Let the cutlets rest for a minute before adding them to the hot pan, and avoid crowding the skillet to maintain proper oil temperature and crispiness.
- Can I use dried basil or substitute another protein for chicken?
A: You can substitute 1 teaspoon of dried basil if fresh isn’t available, though the flavor will be less bright. Pork cutlets can replace chicken breasts using the same prep and cooking method. Keep seasonings and cook time similar, adjusting slightly for thickness if needed.
- What oil temperature should I aim for, and how do I know when it’s ready for cooking?
A: Heat the olive oil and butter over medium-high heat until the butter melts and begins to foam. To test, drop a few panko crumbs into the pan—they should sizzle immediately and float to the surface. This indicates an oil temperature around 350–375°F, ideal for a golden-brown crust without burning.
- How should I store and reheat leftovers to maintain crispiness?
A: Cool the cutlets slightly, then store in an airtight container in the refrigerator for up to three days. To reheat, place them on a wire rack over a baking sheet and warm in a 350°F oven for about 8 to 10 minutes. This method restores crunch while heating evenly. Avoid the microwave, which can make the coating soggy.
- What are the best side dishes and garnishes to serve with these cutlets?
A: A crisp arugula salad dressed with lemon vinaigrette or a simple pasta tossed in garlic and olive oil complements the savory crust. Garnish each cutlet with extra chopped basil or a lemon wedge for brightness. A pinch of red pepper flakes in the breadcrumb mixture adds a subtle kick if you like a hint of heat.
What Makes This Special
These Italian Basil Chicken Cutlets strike the perfect balance between a golden-crisp crust and a juicy interior, all brightened by fresh basil and enriched with Parmesan. The blend of olive oil and butter in the pan creates that iconic sizzle and deep flavor you’ll crave again and again. This beginner-friendly recipe works every time, and it’s so fun to make you might want to print it and save it for later. Let me know in the comments if you try it out or need any help—your feedback always makes my day!
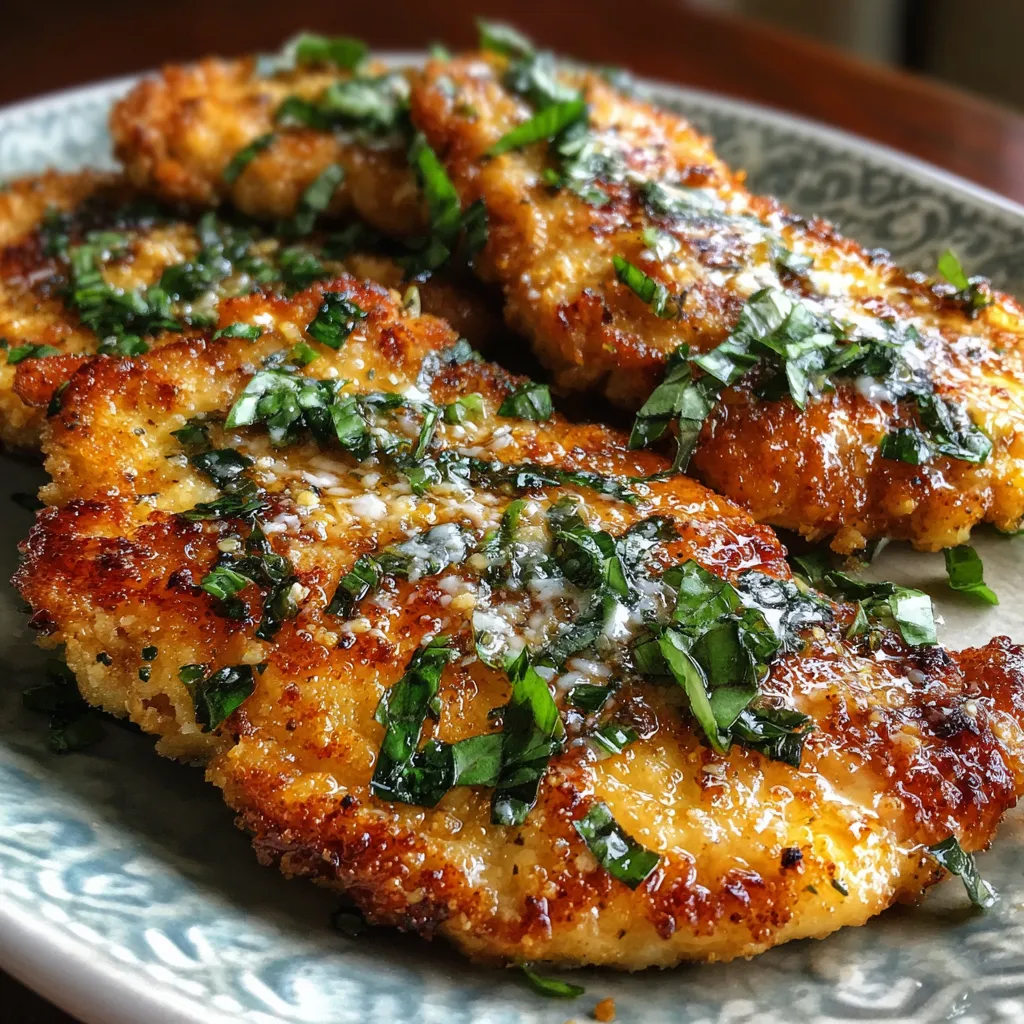

Italian Basil Chicken Cutlets
Description
Golden-crisp crust gives way to juicy chicken brightened by fragrant basil and savory Parmesan, all sizzled to perfection in olive oil and butter for irresistible crunch and aromatic warmth.
Ingredients
Instructions
-
Place chicken breasts between sheets of plastic wrap and pound to 1/4 inch thickness.
-
Season both sides of chicken with salt, pepper, and garlic powder.
-
Prepare three shallow dishes: flour in the first, beaten eggs mixed with water in the second, and panko with Parmesan and basil in the third.
-
Dredge each cutlet in flour, shaking off excess, then dip into the egg mixture, and finally press into the breadcrumb mixture to coat evenly.
-
Heat olive oil and butter in a large skillet over medium-high heat until butter is melted and foaming.
-
Cook chicken cutlets in batches for 3 to 4 minutes per side or until golden brown and cooked through.
-
Transfer cooked cutlets to a paper towel–lined plate to absorb excess oil.
-
Serve cutlets hot, garnished with additional basil or lemon wedges if desired.
Note
- For extra flavor, add a pinch of red pepper flakes to the breadcrumb mixture.
- Fresh basil yields a brighter aromatic flavor compared to dried basil.
- Pork cutlets can be used as a substitute following the same preparation.
- Pair with a crisp arugula salad or pasta tossed in garlic olive oil for a complete meal.

