

Mini Cheesecakes Topped with Chocolate Covered Strawberries bring together tiny creamy cheesecakes crowned with glossy chocolate-dipped berries, perfect for a sweet bite-sized finish. These beginner-friendly desserts pair a buttery graham cracker crust with a velvety cheesecake filling and tangy strawberries enrobed in rich semisweet chocolate. Whether you’re hosting a cozy get-together or looking for a fun at-home baking project, these dainty delights deliver big flavor in every mouthful. Ready to dive into dessert heaven? Let’s get started!
Key Ingredients
Here’s a quick look at the simple ingredients you’ll need to whip up these mini cheesecakes. Each component plays a vital role in crafting that buttery crust, creamy filling, and decadent chocolate shell.
- 1 cup graham cracker crumbs: Provides the buttery, crunchy base that holds the mini cheesecake together.
- 3 tbsp granulated sugar: Sweetens the crust and balances the tang of the cheesecake.
- 5 tbsp unsalted butter melted: Binds the graham crumbs and sugar into a firm, flavorful crust.
- 8 oz cream cheese softened: Delivers the silky, creamy body of the cheesecake filling.
- 1/3 cup granulated sugar: Sweetens the filling for a smooth, balanced taste.
- 1 tsp vanilla extract: Adds warm, aromatic depth to the cheesecake batter.
- 1 large egg: Binds the filling ingredients and gives structure to the custard.
- 2 tbsp sour cream: Introduces tang and extra creaminess for a velvety texture.
- 6 oz semisweet chocolate chips: Melts into a glossy coating for the strawberries.
- 1 tsp vegetable oil: Smooths and thins the melted chocolate for easy dipping.
- 12 medium strawberries hulled: Provide the fresh, fruity crown for each mini cheesecake.
How To Make Mini Cheesecakes Topped with Chocolate Covered Strawberries
Baking these mini cheesecakes is as straightforward as it sounds. You’ll start by crafting a crisp graham crust, whip up a luscious filling, then transform fresh strawberries into glossy chocolate toppers. Follow each step carefully, and by the end you’ll have a dozen perfectly portioned treats ready to chill and delight.
1. Preheat your oven to 325°F and line a 12-cup muffin tin with paper liners, ensuring easy removal and tidiness.
2. In a medium bowl, combine the graham cracker crumbs, 3 tablespoons granulated sugar, and melted unsalted butter, mixing until the crumbs are uniformly coated and resemble wet sand.
3. Press about 1 tablespoon of the crumb mixture firmly into the bottom of each paper-lined cup to form an even crust layer; bake for 5 minutes, then remove and let cool slightly.
4. In a clean mixing bowl, beat the softened cream cheese and 1/3 cup sugar using an electric mixer until smooth and creamy, scraping down the sides as needed.
5. Add the vanilla extract, egg, and sour cream to the cream cheese mixture, stirring on low speed until just incorporated to avoid over-mixing and ensure a tender texture.
6. Divide the cheesecake filling evenly among the 12 crusts, filling each about ¾ full, then bake for 15–18 minutes until the edges are set but the centers still jiggle slightly.
7. Allow the mini cheesecakes to cool to room temperature on a wire rack, then transfer to the refrigerator and chill for at least 2 hours to firm up completely.
8. While the cheesecakes chill, place the semisweet chocolate chips and vegetable oil in a heatproof bowl over simmering water or microwave in short bursts, stirring until the chocolate is smooth.
9. Holding each strawberry by the stem, dip it into the melted chocolate, letting any excess drip off, then set on a parchment-lined tray to allow the coating to set.
10. Once the chocolate on the strawberries is fully firm, top each chilled mini cheesecake with one chocolate-dipped berry just before serving for a stunning finish.
Serving Suggestions
Once your mini cheesecakes are chilled and set, it’s time to showcase them in style. These bite-sized delights look stunning on a dessert table, and a few thoughtful finishing touches will elevate their presentation and flavor. Whether you’re serving them at a party or enjoying them as an after-dinner treat, pairing these treats with complementary garnishes and accompaniments will make them shine. From fresh herbs to warm sauces, each suggestion below adds a unique twist to the classic mini cheesecake, turning a simple sweet into an indulgent centerpiece that guests will rave about.
- Chilled Platter: Arrange cheesecakes on a chilled tray to keep them cold, then garnish with mint leaves for a pop of color and freshness.
- Berry Medley Drizzle: Warm a mixed berry compote and drizzle lightly over each cheesecake for an extra layer of fruitiness.
- Espresso Shot Pairing: Serve alongside fresh espresso or a strong coffee to balance the sweetness with a bold, bitter contrast.
- Edible Flowers: Add a touch of elegance by placing small edible flower petals around the cheesecakes on the serving platter.
Tips For Perfect Mini Cheesecakes Topped with Chocolate Covered Strawberries
Getting these miniature treats just right is easier than you think, and a few smart tweaks will have you looking like a dessert pro. Starting with properly softened cream cheese ensures a truly silky filling free of lumps, so don’t rush room-temperature prep. Once baked, patience is your friend—chilling the mini cheesecakes completely locks in that signature creamy texture and gives you those picture-perfect edges. Want to mix things up? Swap the strawberries for juicy raspberries or a dollop of homemade blueberry compote for a colorful twist. Finally, leftover mini cheesecakes store beautifully when covered in an airtight container, staying fresh and flavorful for up to three days. Keep these tips in your back pocket, and you’ll nail perfect mini cheesecakes every time.
- Use room temperature cream cheese for a smoother filling.
- Chill cheesecakes fully for clean slices and best texture.
- Substitute raspberries or blueberry compote for a different topping.
- Store leftovers covered in the refrigerator for up to 3 days.
How To Store It
Because these mini cheesecakes are perfect for making in advance, knowing how to store them properly ensures they taste just as delightful later on. Whether you’re prepping for a special event or simply want to savor them over a few days, following the right storage methods will keep the crust crisp, the filling creamy, and the chocolate shell pristine. From refrigeration best practices to freezing techniques, these suggestions will help maintain the ideal texture and flavor so that every bite tastes freshly made, even if you whip them up days ahead of time.
- Refrigerate in an airtight container: Place the mini cheesecakes in a single layer or separated with parchment paper to avoid sticking, then seal tightly and chill.
- Store toppings separately: Keep chocolate-covered strawberries on a parchment-lined tray in the fridge and add them to each cheesecake just before serving to maintain crispness.
- Layer carefully: If stacking is necessary, use wax or parchment sheets between layers to protect the crust and filling from damage.
- Freeze for longer storage: Freeze un-topped cheesecakes on a baking sheet until firm, then transfer to a sealed freezer bag for up to one month; thaw overnight in the fridge and add fresh toppings before serving.
Frequently Asked Questions
Got a burning question? Here are answers to the most common queries about these mini cheesecake delights.
- How long does it take to prepare and chill the mini cheesecakes?
Total time is roughly three hours, including about fifteen minutes of mixing and crust prep, five minutes of prebaking the crumb base, fifteen to eighteen minutes of baking the filling, and at least two hours of chilling in the refrigerator.
- My cheesecakes came out with cracks on top. What caused this and how can I prevent it?
Cracks can result from over-mixing the batter, overbaking, or sudden temperature changes when removing them from the oven. To prevent cracks, beat the cream cheese and sugar just until smooth, mix in the egg and sour cream until barely combined, bake until the edges are set but the center still jiggles slightly, and allow them to cool gradually before chilling.
- Can I prepare the mini cheesecakes and chocolate-covered strawberries in advance?
Yes. You can bake and chill the cheesecakes up to three days ahead and store them in an airtight container in the refrigerator. Prepare the chocolate-covered strawberries a few hours before serving and keep them chilled on a parchment-lined tray until the chocolate sets, then top the cheesecakes just before serving.
- What can I use if I don’t have sour cream?
You can substitute full-fat Greek yogurt for the sour cream, which will still provide the tang and creaminess, although the texture may be slightly less rich. Ensure it is well-stirred and at room temperature to blend smoothly into the batter.
- Why is the cheesecake center supposed to jiggle, and is it fully baked?
A gently jiggling center indicates that the custard is set around the edges but still soft inside; it will firm up as it cools. Removing them at this stage prevents overbaking and ensures a creamy texture.
- My melted chocolate keeps seizing when I dip the strawberries. How do I fix it?
If the chocolate seizes, stir in a small amount of warm vegetable oil or a splash of neutral-tasting oil gradually until it becomes smooth and glossy. Use short bursts in the microwave or keep the bowl over simmering water, stirring constantly to maintain an even temperature.
What Makes This Special
These Mini Cheesecakes Topped with Chocolate Covered Strawberries truly hit the sweet spot between indulgence and elegance. A crisp graham crust supports that dreamy cheesecake filling, and when each is crowned with a glossy, chocolate-dipped strawberry, you’ve got a dessert that’s as playful as it is delicious. Perfect for impressing guests or treating yourself, they’re beginner-friendly and endlessly customizable. Don’t let their dainty size fool you—each bite bursts with layers of flavor that make you want to bake them again and again. Feel free to print this article and stash it in your recipe binder. Have questions, tweaks, or a success story to share? Drop a comment below—I’d love to hear how yours turned out!
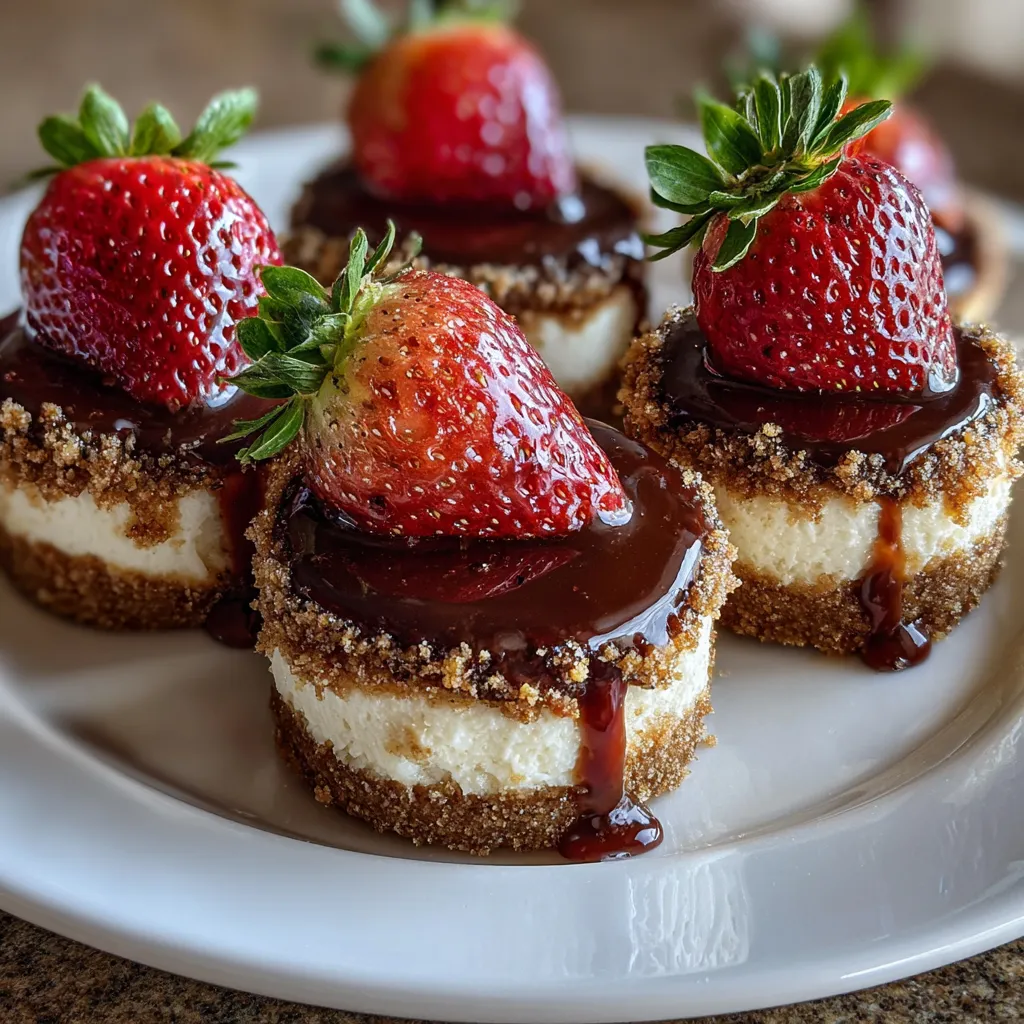

Mini Cheesecakes Topped with Chocolate Covered Strawberries
Description
Creamy cheesecake nestled in graham crumb crusts meets rich chocolate and fresh strawberry tang in every bite.
Ingredients
Instructions
-
Preheat oven to 325°F and line a 12-cup muffin tin with paper liners.
-
In a bowl combine graham cracker crumbs, 3 tablespoons sugar, and melted butter until evenly moistened.
-
Press about 1 tablespoon of the crumb mixture into the bottom of each liner and bake 5 minutes, then remove and let cool slightly.
-
In a mixing bowl beat cream cheese and 1/3 cup sugar until smooth and creamy.
-
Add vanilla extract, egg, and sour cream and mix until just incorporated, avoiding over-mixing.
-
Divide the filling evenly among the cups and bake for 15–18 minutes until the edges are set but centers still jiggle slightly.
-
Cool to room temperature, then chill the mini cheesecakes in the refrigerator for at least 2 hours.
-
Meanwhile, melt chocolate chips and vegetable oil in a heatproof bowl over simmering water or in short microwave bursts, stirring until smooth.
-
Dip each strawberry into the melted chocolate, allowing excess to drip off, then place on a parchment-lined tray to set.
-
When chocolate is firm, top each mini cheesecake with one chocolate covered strawberry before serving.
Note
- Use room temperature cream cheese for a smoother filling.
- Chill cheesecakes fully for clean slices and best texture.
- Substitute raspberries or blueberry compote for a different topping.
- Store leftovers covered in the refrigerator for up to 3 days.

