

Peanut Butter Spider Halloween Cookies are the kind of festive treat that transforms an ordinary afternoon into a spirited Halloween celebration. With a rich base of creamy or chunky peanut butter swirled with just the right amount of granulated sugar and vanilla, these cookies strike the perfect balance between sweet and nutty. As the dough bakes, your kitchen fills with tantalizing notes of roasted peanuts and warm vanilla, making it nearly impossible to resist sneaking a warm, fresh-baked morsel. And when the cookies emerge golden around the edges, topped with a generous drizzle of melted chocolate and playful candy eyes, they instantly become the star of any Halloween spread.
These delightful spider-inspired cookies aren’t just about looks—they deliver a satisfying bite that’s both chewy and tender. The gentle lift from baking soda and a whisper of salt elevate the flavors, ensuring each spider-shaped cookie is a soft, melt-in-your-mouth experience. Decorating them is half the fun: piping on a chocolate body, pressing candy eyes into gooey goodness, and tucking in crunchy pretzel legs brings out the kid in everyone. Whether you’re a beginner baker or an experienced treat architect, these 12 generously sized cookies (about 120 calories apiece) are ready in no time—15 minutes of prep, 12 minutes of baking, and a quick 5 minutes of rest before assembly. They’re beginner-friendly, irresistibly fun, and guaranteed to earn you applause at any Halloween gathering.
KEY INGREDIENTS IN PEANUT BUTTER SPIDER HALLOWEEN COOKIES
Before we dive into the baking and decorating magic, let’s get to know the stars of the show—our essential ingredients. Each one brings its own flair to these peanut butter spider cookies, ensuring they’re flavorful, sturdy enough for decorating, and absolutely delicious.
- Peanut Butter
A creamy or chunky foundation that provides rich, nutty flavor and moist texture. It also helps bind the dough together for easy rolling and shaping.
- Granulated Sugar
Adds sweetness and contributes to the cookie’s tender crumb. It also creates slight crisp edges when baked, offering contrast to the soft center.
- Egg
Acts as a binding agent to hold everything together and gives the cookies structure, while adding a subtle richness.
- Vanilla Extract
Enhances the overall flavor profile with aromatic notes that pair beautifully with peanut butter and chocolate.
- Baking Soda
Gently leavens the dough, making each cookie light and slightly puffed, so the spiders don’t look too flat!
- Salt
Balances the sweetness and intensifies the peanut butter’s natural flavors, ensuring the taste isn’t one-dimensional.
- Chocolate Chips
Semi-sweet morsels folded into the dough add bursts of melty chocolate goodness in every bite.
- Chocolate Frosting or Melted Chocolate
Used for decorating, this provides the spider’s glossy body and serves as “glue” for the candy eyes.
- Candy Eyes
Give each spider its playful personality—just press them into the still-wet chocolate for an instantly spooky expression.
- Pretzel Sticks
Provide sturdy, salty “legs” that contrast the sweet cookie and keep the spider theme delightfully realistic.
HOW TO MAKE PEANUT BUTTER SPIDER HALLOWEEN COOKIES
Baking these whimsical spiders is as straightforward as it gets, whether you’re a total novice or a seasoned home cook. Below is the step-by-step journey from mixing bowl to haunted cookie platter:
1. Preheat your oven to 350°F (175°C) and line a baking sheet with parchment paper to prevent sticking and ensure even baking.
2. In a large mixing bowl, combine the peanut butter, granulated sugar, egg, vanilla extract, baking soda, and salt. Stir until everything is fully incorporated and a smooth dough forms.
3. Scoop out rounded tablespoons of dough and roll them into uniform balls. Arrange the dough balls on the prepared sheet, keeping them about 2 inches apart for proper spreading.
4. Gently press each dough ball with a fork in a crisscross pattern—this iconic texture gives the cookies their classic peanut butter look.
5. Bake for 10–12 minutes, or until the edges turn a light golden hue. Remove the sheet from the oven and let the cookies rest on the tray for a few minutes before transferring them to a wire rack to cool completely.
6. When the cookies are completely cool, place the chocolate frosting or chopped chocolate in a microwave-safe bowl. Heat in 20-second bursts, stirring thoroughly each time until the chocolate is fully melted and silky smooth.
7. Using a small spoon or piping bag, drizzle the melted chocolate onto the center of each cookie, creating an oval or round “body” shape for the spider.
8. Immediately press two candy eyes into the still-wet chocolate to form the spider’s eerie gaze.
9. For the legs, insert four pretzel sticks on each side of the cookie, pushing them gently into the dough so they stay firmly in place.
10. Allow the chocolate to set completely at room temperature before serving or displaying your creepy-crawly creations.
SERVING SUGGESTIONS FOR PEANUT BUTTER SPIDER HALLOWEEN COOKIES
When it comes to presenting these spider cookies, a bit of creativity takes the experience up a notch. Think of how you can bring the Halloween theme alive on your table, making every bite feel festive and fun. Whether you’re hosting a spooky movie night, packing treats for school parties, or simply surprising your family after a ghoulishly fun night of trick-or-treating, these cookies adapt beautifully to any occasion. With 12 cookies per batch, each about 120 calories, you have plenty to mix and match with other bites or displays. Experiment with color-coordinated platters or layered trays to let your spiders crawl in style. Keep napkins on hand—these treats are perfectly messy in the best way, thanks to the rich peanut butter and melty chocolate. And if you really want to steal the show, pair them with a selection of fall-themed beverages or create a dessert table that tells a haunted story, complete with tiny witches’ hats, candy pumpkins, and flickering battery-operated candles.
- Serve on a festive platter lined with black tissue paper or a bright orange runner to make the dark chocolate bodies pop.
- Pair with iced milk or a spiced latte to balance the sweetness and enhance the peanut butter flavor.
- Sprinkle extra crushed pretzels or mini candy corn around the edges of your serving tray for an added crunch and burst of color.
- Arrange on a multi-tiered dessert stand alongside other Halloween-themed treats for an eye-catching, spooky display.
HOW TO STORE PEANUT BUTTER SPIDER HALLOWEEN COOKIES
Keeping your spooky spider cookies fresh and delicious is simple when you follow the right storage tricks. Whether you’re preparing a batch in advance for a party or saving leftovers for later snacking, maintaining their chewy texture and decorative appeal is key. The delicate chocolate drizzles and pretzel legs can become fragile, so proper containment and environment help preserve their shape and taste. These cookies don’t require refrigeration but will stay best at cool room temperature, especially if you want to preserve that signature crumbly-chewy balance. If you anticipate leftover cookies, consider layering them carefully to avoid smudged chocolate or broken pretzel legs. For longer storage, you can even freeze a portion of the baked, undecorated cookies and decorate them later—this is a lifesaver for busy party prep!
- Store in an airtight container at room temperature for up to one week. Place parchment or wax paper between layers to protect the chocolate decorations.
- Keep away from direct sunlight or heat sources to prevent the chocolate from melting or the pretzels from softening.
- For multi-week storage, freeze baked cookies (before decorating) in a sealed freezer bag. Thaw fully before adding chocolate and pretzel legs.
- If traveling or gifting, wrap cookies individual in cellophane bags with a twist tie to keep them intact and ready for sharing.
CONCLUSION
Wrapping up this guide on Peanut Butter Spider Halloween Cookies, I hope you feel inspired to bring these whimsical critters to life in your kitchen. From the simple combination of peanut butter, sugar, egg, and a hint of vanilla to the final flourish of chocolate drizzle and candy eyes, every step is designed for both beginners and seasoned bakers to enjoy. These cookies are perfect for Halloween parties, school events, or cozy fall gatherings—anywhere you want to add a dash of playful spookiness. With a total prep time of just 15 minutes, 12 minutes in the oven, and a quick 5-minute rest, you can have a batch of 12 delightfully creepy-cute spiders ready in under an hour. They boast around 120 calories each, making them an easy addition to any dessert spread without going overboard. Since they store beautifully in an airtight container for up to a week, you can bake them ahead, or even freeze unadorned cookies for later decoration.
Feel free to print this article and save it for Halloween baking season—tuck it into your recipe binder or pin it on your kitchen wall as a friendly reminder of how effortless and fun these treats can be. Below, you’ll also find a handy FAQ section to troubleshoot any baking questions or decorating dilemmas. I’d love to hear how your Peanut Butter Spider Cookies turn out: share your favorite decorating twists, ask questions if anything feels tricky, or drop a comment with feedback on the recipe. Your baking adventures make this community so special, and I can’t wait to see how you bring a little Halloween magic to your holiday table!
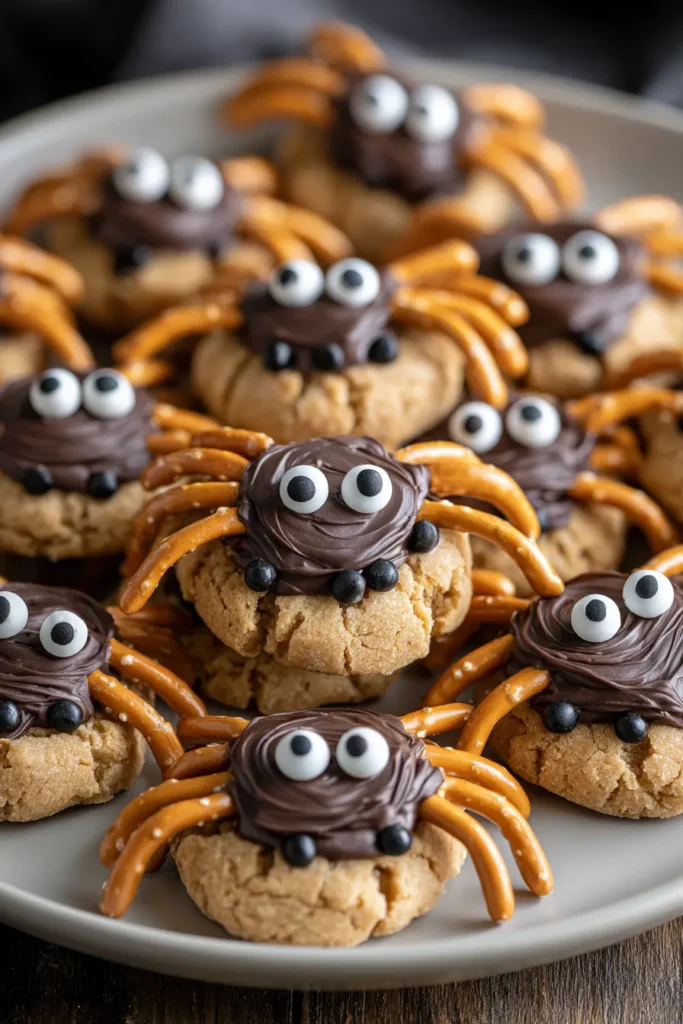

Peanut Butter Spider Halloween Cookies
Description
These fun and creepy peanut butter spider cookies are packed with flavor, topped with chocolate and candy eyes, making them a perfect Halloween treat!
Ingredients
Instructions
-
Preheat your oven to 350°F (175°C). Line a baking sheet with parchment paper.
-
In a mixing bowl, combine the peanut butter, granulated sugar, egg, vanilla extract, baking soda, and salt. Mix until well combined and a smooth dough forms.
-
Scoop out tablespoons of dough and roll them into balls. Place the dough balls on the prepared baking sheet, spacing them about 2 inches apart.
-
Using a fork, gently press down on each dough ball to create a crisscross pattern. This will give them a cookie-like appearance.
-
Bake in the preheated oven for 10-12 minutes, or until the edges are lightly golden. Remove from the oven and let cool for a few minutes on the baking sheet before transferring to a wire rack to cool completely.
-
Once the cookies are completely cool, melt chocolate frosting or chocolate in a microwave-safe bowl in 20-second intervals, stirring well until smooth.
-
Using a small spoon or piping bag, drizzle melted chocolate on top of each cookie to create the spider's body.
-
Immediately place two candy eyes on top of the melted chocolate to create the spider's face.
-
For the spider legs, insert four pretzel sticks on each side of the cookie to resemble spider legs.
-
Allow the chocolate to set completely before serving or displaying.
Note
- These cookies can be stored in an airtight container at room temperature for up to one week.
- You can customize the spider's appearance by using different colored frosting or candy for the eyes.
- For added fun, use mini candy corn or other themed candies to decorate the spiders further.
- This recipe is perfect for Halloween parties and can be made in advance to save time on the big night.

