

There’s something thrilling about transforming a simple chocolate pudding into a miniature haunted graveyard that feels like it’s come straight out of a ghost story. These Spooky Graveyard Pudding Cups are the perfect blend of creepy and delicious, with layers of velvety chocolate pudding, crumbly “dirt” made from crushed sandwich cookies, and colorful gummy worms wriggling through the soil. With just 15 minutes of prep time, zero cooking, and a 15-minute chill in the fridge, this beginner-level Halloween dessert delivers big on flair without requiring you to break out the cauldron. As the holiday approaches, friends and family will gather around, wide-eyed as you unveil these eerie cups, and trust me—they’ll be lining up for seconds.
Every spoonful offers a fun contrast of textures and flavors, from the smooth, rich chocolate to the crunchy cookie crumbs, all topped off with playful little tombstone cookies inscribed with “RIP” in jet-black gel. Whether you’re hosting a spooky soirée, a kid-friendly gathering, or just craving a frightfully delightful treat, these pudding cups check all the boxes. Best of all, they’re endlessly adaptable: sprinkle on some edible glitter for a moonlit effect, switch up the candy decorations to suit your spine-tingling theme, or serve them in transparent glasses so each layer pops. Grab your apron and let’s get cooking—or rather, chilling—in style this Halloween!
KEY INGREDIENTS IN SPOOKY GRAVEYARD PUDDING CUPS
Before you start assembling your creepy cups, let’s gather the magic components that bring this graveyard to life. Each ingredient plays a special role in creating the rich flavors, haunting textures, and playful decorations that make these pudding cups a showstopper at any Halloween gathering.
- Cold milk
Provides the liquid base to help the pudding mix set into a silky-smooth, chocolatey filling. Chilled milk ensures the pudding thickens properly and holds its shape under the cookie “soil.”
- Instant chocolate pudding mix
Delivers that deep, indulgent chocolate flavor with minimal effort. The instant mix sets quickly and creates a creamy consistency that contrasts beautifully with the crunchy cookie crumbs.
- Chocolate sandwich cookies
Crushed into fine crumbs, these cookies form the “dirt” layer of the graveyard. Their crunchy texture and rich cocoa taste mimic moist earth, setting the scene for your gummy worm actors.
- Gummy worms
These playful, chewy candies add a colorful pop and a sense of mischievous fun as they emerge from the cookie soil. They’re the perfect creepy crawlers to bring your dessert to life.
- Rectangular shaped chocolate cookies
Think Milano cookies or any firm, rectangular chocolate biscuit. These become the tombstones in your graveyard—sturdy enough to stand upright and provide a surface for spooky inscriptions.
- Black decorating gel
Used for writing eerie messages like “RIP” on your chocolate cookie tombstones. The gel’s deep color creates a dramatic, haunting effect that stands out against the cookie.
- Whipped topping
Adds a fluffy, cloud-like accent to your graveyard scene. A dollop of whipped topping gives contrast to the dark layers and can be flavored vanilla or chocolate for extra flair.
- Edible decorations
Optional candy bones, pumpkins, or glitter allow you to customize your graveyard. These finishing touches enhance the theme and make each cup uniquely eerie.
HOW TO MAKE SPOOKY GRAVEYARD PUDDING CUPS
Ready to assemble your chilling dessert? Follow these steps carefully to build each creepy-cute cup layer by layer and bring your spooky vision to life.
1. In a mixing bowl, whisk together the cold milk and instant chocolate pudding mix for about 2 minutes until the pudding sets and becomes luxuriously smooth. Vigorous whisking helps incorporate air for a lighter texture and ensures no lumps remain.
2. In a zip-top bag, place the chocolate sandwich cookies. Crush them into fine, uniform crumbs using a rolling pin or your hands. This creates the perfect “dirt” consistency—dry enough to stay crumbly but rich enough to taste like cocoa soil.
3. Fill 6 clear serving cups with a base layer of the crushed cookie crumbs, leaving a little bit aside for topping. Press the crumbs gently to form an even foundation that will support the pudding layer.
4. Spoon the prepared chocolate pudding evenly over the cookie base in each cup, ensuring a smooth, level surface. Use a small spatula or the back of your spoon to distribute the pudding without disturbing the crumb layer.
5. Sprinkle another layer of crushed cookies on top of the pudding, mimicking a fresh dusting of spooky dirt. This final crumb layer adds both texture and visual appeal.
6. Insert gummy worms partially into the crumb layer so they appear to be crawling out of the graveyard. Bend or twist the gummies slightly to make them look like they’re wriggling through the surface.
7. Using the black decorating gel, write spooky inscriptions like "RIP" on each rectangular chocolate cookie. Hold the gel tube steady and apply gentle pressure for crisp, clear letters.
8. Place one decorated chocolate cookie into each cup, pressing it gently so it stands upright like a tombstone. Angle it slightly for a weathered, spooky effect.
9. Add a generous dollop of whipped topping on one side of each cup for added contrast and a ghostly accent. Swirl it lightly or leave it smooth for a minimalist look.
10. For extra decoration, arrange candy bones or candy pumpkins around the tombstone cookie. Scatter them artfully in the crumb layer to enhance the haunted theme.
11. Refrigerate the pudding cups for at least 15 minutes before serving. Chilling them allows the pudding to firm up fully and the layers to meld together, ensuring the best texture and taste.
SERVING SUGGESTIONS FOR SPOOKY GRAVEYARD PUDDING CUPS
Serving these pudding cups is just as fun as making them. Whether you’re hosting a Halloween bash or a cozy family night, presentation can elevate the eerie atmosphere and delight your guests. Use dim lighting or flickering LED candles to cast dancing shadows on the “tombstones,” and consider pairing each cup with themed props—small spiders, faux moss, or miniature gravestones—to turn your dessert table into a miniature graveyard scene. Encourage guests to scoop through the layers to uncover hidden gummy worms, and watch their faces light up at each creepy discovery. You can even set up a “decorate your own tombstone” station for a DIY twist that keeps everyone engaged.
- Serve in transparent cups so each layer of pudding, cookie crumbs, and toppings is visible—this shows off the detailed graveyard effect.
- Offer miniature spoons or themed dessert forks (like skeleton-topped handles) to enhance the spooky vibe and make scooping effortless.
- Arrange the cups on a dark serving tray lined with faux spider webs or black lace to frame your desserts in a haunting tableau.
- Complement the sweetness with a warm spiced cider or a chilled “blood” punch for a contrasting beverage that keeps the Halloween theme strong.
HOW TO STORE SPOOKY GRAVEYARD PUDDING CUPS
If you’re planning ahead or need to prep desserts in advance, proper storage ensures your graveyard cups stay fresh and spooky. These tips will help maintain the creamy texture of the pudding and the crispness of the cookie “dirt” without turning your haunting creation into a soggy mess. Keeping the cups chilled in the fridge not only preserves flavor but also helps the whipped topping and decorative gel maintain their shape and vibrancy. If you’re transporting these treats to a gathering, secure lids or wrap the cups tightly to avoid spills and to protect them from absorbing other fridge odors. With the right approach, you can assemble these cups a few hours before your event and still present a flawless, ghostly dessert.
- Refrigerate in an airtight container or cover each cup with plastic wrap to prevent the pudding surface from forming a skin and to protect against refrigerator odors.
- Use cups with snap-on lids for easy transport, ensuring the decorations stay intact and the gummy worms don’t shift during travel.
- Store the whipped topping and extra edible decorations separately in sealed containers, then add them just before serving to keep them looking fresh and fluffy.
- Avoid freezing, as the pudding and whipped topping will lose their smooth consistency and can become grainy upon thawing.
CONCLUSION
Thanks for joining me on this haunted culinary adventure through the graveyard depths of chocolatey goodness! We’ve covered everything from gathering the essential ingredients to mastering the chilling steps that bring these Spooky Graveyard Pudding Cups to life. With layers of smooth pudding, crunchy cookie soil, and playful gummy worms, this dessert is both beginner-friendly and impressively festive. The recipe requires only 15 minutes of hands-on prep time, zero actual cooking, and a quick 15-minute chill—perfect for busy hosts who still want a show-stopping Halloween treat. Plus, you have plenty of options to customize with flavored whipped toppings, edible glitter, or additional spooky accents, making each cup your own devilishly delightful creation.
Feel free to print and save this article for future spooktacular occasions—Halloween, haunted house parties, or any time you want to delight guests with an eerie twist on a classic dessert. Below, you’ll find a handy FAQ section to answer any lingering questions about technique, substitutions, or troubleshooting. And of course, I’d love to hear from you! If you try this recipe, have ideas for new decorations, or run into any tricks (or treats) along the way, drop a comment or question. Your feedback and stories help everyone become a more confident—and delightfully spooky—home cook. Happy haunting and happy baking!
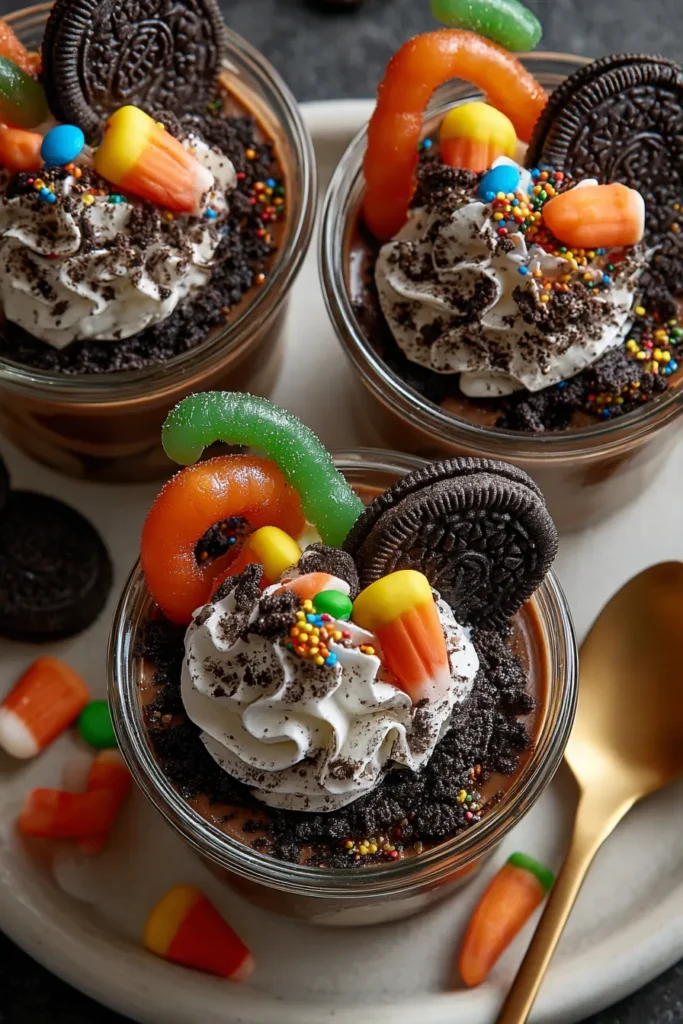

Spooky Graveyard Pudding Cups
Description
These Spooky Graveyard Pudding Cups feature layers of smooth chocolate pudding, crushed cookie 'dirt,' and gummy worms for a frightfully delicious treat perfect for Halloween festivities.
Ingredients
Instructions
-
In a mixing bowl, whisk together the cold milk and instant chocolate pudding mix for about 2 minutes until the pudding is set and smooth.
-
In a zip-top bag, place the chocolate sandwich cookies. Crush them into fine crumbs using a rolling pin or your hands.
-
Fill 6 cups with the crushed cookie base, reserving a small amount for topping.
-
Spoon the chocolate pudding evenly over the crushed cookie layer in each cup.
-
Over the pudding, sprinkle another layer of crushed cookies to resemble dirt.
-
Insert gummy worms partially into the crumb layer so they appear to be crawling out.
-
Using the decorating gel, write spooky or fun inscriptions like "RIP" on the rectangular chocolate cookies to make tombstones.
-
Place one decorated chocolate cookie into each cup, pressing it gently to stand upright.
-
Add a dollop of whipped topping on one side of each cup for added effect.
-
For extra decoration, add candy bones or candy pumpkins around the tombstone cookie.
-
Refrigerate the pudding cups for at least 15 minutes before serving for the best texture and taste.
Note
- For added flavor, you can use flavored whipped topping such as vanilla or chocolate.
- Experiment with different toppings like edible glitter for a spooky night-time effect.
- If making for a Halloween party, consider using transparent cups to showcase the layers.

