

With Halloween creeping closer, there’s nothing quite like the thrill of unveiling a dessert that’s as spooky as it is scrumptious. This Spooky Halloween Marble Cake brings together vivid swirls of orange, jet-black, and tender vanilla layers in a 9×13-inch masterpiece that doubles as a conversation starter. Each bite delivers that classic, moist crumb you love, while the pops of color sneaking through the slices make every serving feel like a treat straight from a haunted house. Whether you’re decorating a dessert table or simply craving a festive indulgence, this cake has the style and flavor to enchant every guest.
As you whisk together the fundamental elements—rich butter, fluffy sugar, farm-fresh eggs, and silky milk—you’ll notice how the batter transforms into a playground of textures and tastes. Dividing it into three bowls and tinting each portion with orange and black gel coloring (plus a hint of cocoa for that deepest midnight hue) is where the real magic begins. Swirling those dollops of batter creates a marbled effect that’s both unpredictable and undeniably fun. With a prep time of 30 minutes, a bake of 35 minutes, and a brief 10-minute rest before slicing, this Intermediate-level dessert is perfect for cooks who want to stretch their skills without spending the entire afternoon in the kitchen.
KEY INGREDIENTS IN SPOOKY HALLOWEEN MARBLE CAKE
Every ingredient in this recipe plays a starring role, combining familiar pantry staples with Halloween flair to create a cake that’s as tasty as it is visually arresting. From the foundation of flour and leavening agents to flavorful boosters and vibrant gel colors, here’s what you’ll need and why each element is essential:
- All-purpose flour
Provides the sturdy framework that gives the cake its tender yet springy crumb, allowing the swirls to hold shape without collapsing.
- Baking powder
Acts as the primary leavening agent, ensuring your marble cake rises evenly and achieves that light, airy texture you crave.
- Salt
Enhances all the sweet and buttery notes, balancing the flavors so each bite tastes more intense and complete.
- Unsalted butter
Adds rich creaminess and moisture, creating a silky batter that traps air during creaming to deliver a soft, velvety cake.
- Granulated sugar
Sweetens and tenderizes the crumb, helping to incorporate tiny air pockets during beating for a light, fluffy result.
- Large eggs
Bind ingredients together, impart structure, moisture, and richness; each egg also helps emulsify the batter for consistent texture.
- Vanilla extract
Boosts flavor depth with warm, aromatic notes that complement the pumpkin-spice vibes of orange and chocolate undertones.
- Whole milk
Contributes additional moisture and fat, making the cake tender on the inside and beautifully golden at the edges.
- Gel food coloring (orange & black)
Ensures vibrant, true-to-theme hues without thinning out the batter, so your marbled design stays pronounced.
- Unsweetened cocoa powder
Intensifies the black portion of the batter, delivering rich chocolate flavor while darkening the swirl to an inky finish.

HOW TO MAKE SPOOKY HALLOWEEN MARBLE CAKE
Before you dive into the step-by-step breakdown, envision transforming simple ingredients into a bewitching bake that’s equal parts tasty treat and spooky spectacle. These instructions will guide you through every essential technique—creaming, whisking, alternating additions, and the all-important swirling—so your marble cake emerges from the oven perfectly baked and Instagram-ready.
1. Preheat your oven to 350°F (175°C). Grease and flour a 9×13-inch cake pan to prevent sticking and ensure the cake releases cleanly once baked.
2. In a medium bowl, whisk together the flour, baking powder, and salt until they’re evenly distributed. Set this dry mixture aside for seamless integration later.
3. In a large mixing bowl, use an electric mixer on medium speed to beat the butter until it’s smooth and slightly fluffy. Gradually add the sugar, continuing to cream for 3–4 minutes until the mixture looks light and velvety.
4. Add the eggs one at a time, beating well after each addition to maintain a smooth emulsion. Stir in the vanilla extract with a gentle spatula to infuse warm, fragrant notes.
5. Gradually add the flour mixture to the butter mixture, alternating with the milk. Start and end with the flour blend, mixing just until combined to avoid overworking the gluten and keep the cake tender.
6. Divide the batter evenly among three bowls. Tint one portion with orange gel food coloring, another with black gel food coloring, and leave the third uncolored for that ghostly vanilla hue.
7. To deepen the black batter, add the cocoa powder and stir until the color is rich and uniform—this step gives your swirl dramatic contrast.
8. Drop spoonfuls of each colored batter randomly into the prepared pan, creating pockets of orange, black, and vanilla. Use a knife or skewer to gently swirl the colors together, taking care not to over-mix.
9. Bake for 30–35 minutes, or until a toothpick inserted into the center comes out clean, indicating a perfectly cooked interior.
10. Allow the cake to cool in the pan for about 10 minutes, then carefully turn it out onto a wire rack to cool completely before slicing.
SERVING SUGGESTIONS FOR SPOOKY HALLOWEEN MARBLE CAKE
After all the thrilling prep and perfectly timed bake, presenting this cake in its best light is the final enchantment. Whether it’s the centerpiece of a Halloween gathering or a seasonal treat for family movie night, thoughtful serving choices can elevate both the flavor and the festivity of each slice. From playful garnishes to complementary beverages, these ideas will ensure your Spooky Halloween Marble Cake dazzles every guest’s senses.
- Slice and plate with flair – Present each generous slice on decorative plates with contrasting colors (think matte black or bright orange) to make the marbled pattern pop. A light dusting of powdered sugar adds a ghostly finish.
- Add a spooky frosting layer – Spread a thin coat of cream cheese or chocolate frosting over the cooled cake, then use a piping bag to sketch cobwebs or jack-o’-lantern faces. For an extra chill factor, drop a few edible sugar eyeballs on top.
- Garnish with themed candies – Scatter candy corn, mini chocolate bats, or orange- and black-hued sprinkles around each slice. This playful topping not only adds texture but also amps up the Halloween aesthetic.
- Pair with autumnal beverages – Serve alongside hot apple cider, spiced latte, or a rich dark roast coffee. The warmth and complementary spices in these drinks balance the cake’s sweetness and intensify its festive flavors.
HOW TO STORE SPOOKY HALLOWEEN MARBLE CAKE
Once your guests have ooh’d and aah’d over the marbled masterpiece, it’s time to think about storing any delightful leftovers. Proper storage not only preserves the cake’s moist crumb and vibrant colors but also lets you enjoy a slice (or five) in the days to come. Follow these tips to maintain that just-baked quality for as long as possible, whether you’re keeping it at room temperature, chilling in the fridge, or even freezing to savor later.
- Room-temperature storage – Place cooled, unfrosted slices in an airtight container or cake keeper. Kept away from direct sunlight and heat, the cake will stay fresh and tender for up to 2 days.
- Refrigeration – If your kitchen is warm or you’ve added a frosting layer, wrap the entire cake or individual slices in plastic wrap and store in an airtight container in the fridge. Chilled slices maintain their texture for up to 5 days.
- Freezing – For longer-term storage, slice the cake, wrap each piece tightly in plastic wrap, then place the slices in a freezer-safe bag. Properly sealed, these portions can last up to 2 months. Thaw overnight in the fridge before serving.
- Portion control – Freeze individual servings separated by parchment paper in a covered container, so you can pull out one spooky slice at a time without thawing the entire batch.
CONCLUSION
This Spooky Halloween Marble Cake is more than just a festive dessert—it’s a celebration of color, flavor, and creativity. From the moment you gather the key ingredients—flour, sugar, butter, eggs, and those striking gel colors—you’re embarking on a baking adventure that brings warmth to chilly autumn days and joy to every Halloween celebration. With a manageable preparation time of about 30 minutes, followed by a 35-minute bake and a brief 10-minute rest, this Intermediate-level project offers both challenge and reward for home cooks looking to impress. The step-by-step instructions guide you through glazing, whisking, dividing, tinting, and swirling, ensuring your marbled pattern turns out just right. Whether you choose to serve it plain or frost it with spiderweb designs, the visual surprise of orange, black, and vanilla ribbons will captivate your friends and family. Feel free to print this article, save it for repeat Halloween festivities, and consult it whenever you need that perfect spooky centerpiece.
I hope you’ve found this guide helpful and inspiring. Now that you’re armed with tips on serving, storing, and putting together this hauntingly delicious cake, your Halloween party is sure to be a smashing success. Don’t forget to share your own experiences below—whether you have questions about the swirling technique, need clarity on ingredient swaps, or want to brag about your finished masterpiece, I’m here to help. Feel free to leave comments, ask for feedback, or let me know how your Spooky Halloween Marble Cake turned out. There’s a FAQ section waiting just below, but your personal insights and creative twists are what really make this recipe come alive. Happy baking—and may your Halloween be as delightfully eerie as this cake!
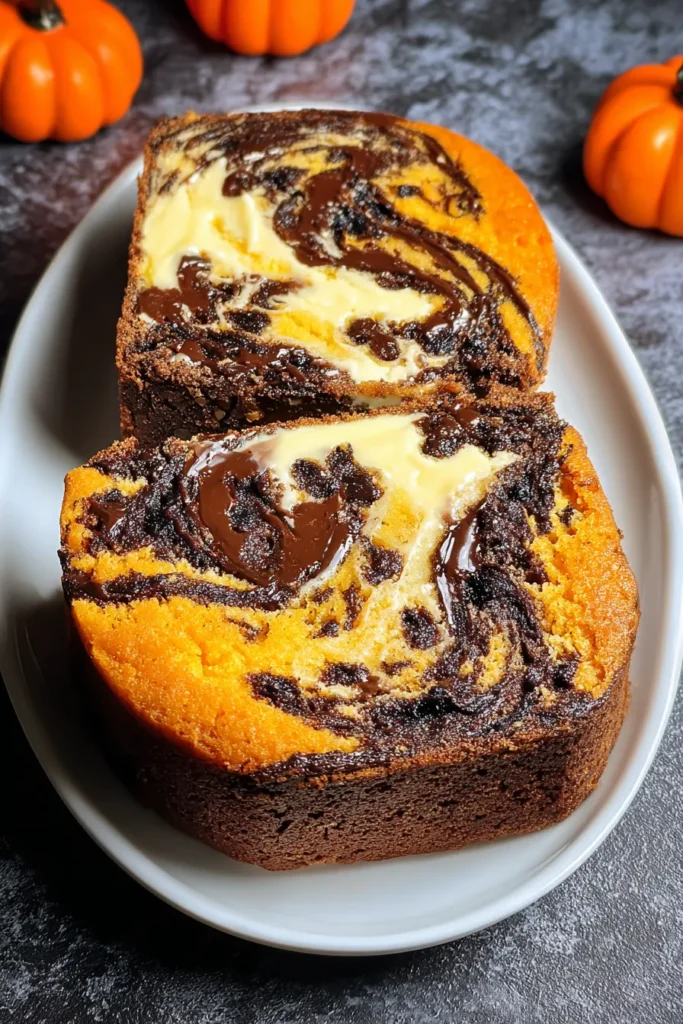

Spooky Halloween Marble Cake
Description
This spooky Halloween marble cake combines rich chocolate, vibrant orange, and eerie black colors, making it a spooky and delightful centerpiece for your celebration.
Ingredients
Instructions
-
Preheat your oven to 350°F (175°C). Grease and flour a 9x13-inch cake pan.
-
In a medium bowl, whisk together the flour, baking powder, and salt. Set aside.
-
In a large mixing bowl, beat the butter on medium speed until creamy. Gradually add the sugar and continue to beat until light and fluffy, for about 3-4 minutes.
-
Add the eggs one at a time, beating well after each addition. Stir in the vanilla extract.
-
Gradually add the flour mixture to the butter mixture, alternating with the milk, starting and ending with the flour mixture. Mix until just combined.
-
Divide the batter evenly among three bowls. Color one portion with orange gel food coloring and another with black gel food coloring. Leave the third portion uncolored.
-
To make the black batter darker, you can add the cocoa powder into it. Mix thoroughly until the color is distributed evenly.
-
Drop spoonfuls of each batter color randomly into the prepared cake pan to create a marbled effect. Use a knife or skewer to gently swirl the batters together.
-
Bake in the preheated oven for 30-35 minutes, or until a toothpick inserted into the center of the cake comes out clean.
-
Allow the cake to cool in the pan for about 10 minutes, then turn it out onto a wire rack to cool completely.
Note
- Use gel food coloring for more vibrant colors without altering the batter consistency.
- The cake can be frosted with a spooky-themed or your favorite frosting for a more festive touch.
- Feel free to add Halloween decorations on top like candy corn or edible eyeballs.
- Perfect for a Halloween party, this cake adds a pop of color and fun to your dessert table.

