

Spooky spiced Halloween cookies are everything you never knew you needed for a hauntingly delightful autumn gathering. The moment these sweet little treats slide out of the oven, they reveal edges tinged with a golden hug of warmth, and the dough itself holds just the right amount of pumpkin’s silky richness. Each bite brings a symphony of cinnamon, ginger, cloves, and nutmeg dancing across your taste buds, leaving a trail of cozy memories that lingers long after the final crumb is gone. There’s something magical about the way these flavors blend—a gentle heat from the spices, the deep sweetness of brown sugar, and that tender kiss of vanilla that ties it all together.
Carving out time to whip up a batch of these spooktacular cookies feels like stepping into your own cozy kitchen laboratory, where the simple act of measuring flour and whisking spices becomes part of the thrill. Whether you’re rolling dough into jack-o’-lanterns, bats, or witches’ hats with festive cookie cutters, or piping on eerie faces with black and orange royal icing, the process is as delightful as the end result. Perfect for trick-or-treaters, neighborhood potlucks, or just curling up with a mug of cider, these cookies take beginner bakers from zero to Halloween hero. Embrace the fun and let the delicious aromas of fall work their magic—your taste buds are in for a spellbinding treat!
KEY INGREDIENTS IN SPOOKY SPICED HALLOWEEN COOKIES
Every great recipe starts with the best building blocks, and these spooky spiced Halloween cookies are no exception. From pantry staples to festive finishing touches, each ingredient plays its own part in creating that perfect balance of sweetness, spice, and pumpkin warmth.
- All-purpose flour
Provides the sturdy base for the dough, ensuring the cookies hold their shape when cut with themed cookie cutters.
- Baking powder
Acts as a gentle leavening agent, giving the cookies just enough lift to keep them tender without spreading too much.
- Baking soda
Works in tandem with the baking powder to help achieve that ideal texture, contributing to a slightly crisp edge.
- Salt
Balances the sweetness and rounds out the flavor profile, sharpening the warm spice notes.
- Ground cinnamon
Infuses each bite with a classic fall aroma, bringing warmth and depth to the cookie’s flavor.
- Ground ginger
Adds a subtle, zesty zing that complements the sweet pumpkin and cozy cinnamon.
- Ground cloves
Introduces a slightly pungent kick that elevates the cookie’s overall spiciness.
- Ground nutmeg
Rounds out the spice blend with its signature sweet and nutty undertones.
- Unsalted butter
Provides rich creaminess and helps create that melt-in-your-mouth texture.
- Granulated sugar
Contributes sweetness and helps with the cookie’s structure.
- Brown sugar
Packs moisture and a hint of molasses flavor, keeping the cookies soft and chewy.
- Canned pumpkin puree
Brings moistness, gentle sweetness, and that unmistakable pumpkin essence, perfectly marrying with the spices.
- Egg
Binds all the ingredients together and adds structure for easy slicing or cutting after chilling.
- Vanilla extract
Rounds out the flavor profile with its smooth and fragrant notes.
- Halloween-themed cookie cutters
Transform ordinary dough into festive shapes—witches’ hats, pumpkins, ghosts, and more.
- Orange and black royal icing or gel food coloring
Optional decoration tools to add an extra spooky, eye-catching finish to your cookies.

HOW TO MAKE SPOOKY SPICED HALLOWEEN COOKIES
Get ready to transform simple ingredients into a batch of festive treats that look almost too cute to eat. Follow these steps to ensure your dough is perfectly spiced, chilled, rolled, and baked to golden perfection before adding your final decorative flourishes.
1. Preheat your oven to 350°F (175°C) and line your baking sheet with parchment paper to prevent sticking and promote even browning along the edges.
2. In a medium bowl, whisk together the flour, baking powder, baking soda, salt, cinnamon, ginger, cloves, and nutmeg. This ensures all spices are evenly distributed. Set the dry mixture aside.
3. In a large bowl, use an electric mixer to cream together the softened butter, granulated sugar, and brown sugar until light, fluffy, and pale in color—about 3–4 minutes.
4. Add the pumpkin puree, egg, and vanilla extract to the butter mixture. Mix well on medium speed until fully incorporated and smooth.
5. Gradually add the dry ingredients to the wet mixture, stirring with a spatula or mixer on low speed until the dough comes together without any streaks of flour.
6. Shape the dough into a ball, wrap it tightly in plastic wrap, and refrigerate for at least 1 hour or until firm. This resting time helps the flavors meld and prevents excessive spreading during baking.
7. Once chilled, roll out the dough on a lightly floured surface to about 1/4-inch thickness. Use your Halloween-themed cookie cutters to press out shapes.
8. Place the cut cookies onto the prepared baking sheet, leaving a small gap between each for proper air circulation.
9. Bake in the preheated oven for 10–12 minutes, or until the edges are lightly golden and the centers look just set.
10. Allow the cookies to cool on the baking sheet for 5 minutes, then transfer them carefully to a wire rack to cool completely.
11. If desired, decorate the cooled cookies with royal icing or gel food coloring to add faces, patterns, and spooky accents for an extra festive presentation.
SERVING SUGGESTIONS FOR SPOOKY SPICED HALLOWEEN COOKIES
When it comes to serving these spiced delights, presentation and pairing play a huge role in creating a memorable Halloween spread. Whether you’re hosting a haunted house party or setting out treats for trick-or-treaters, these serving suggestions will ensure your spooky spiced cookies stand out in the most delicious way possible. Feel free to mix and match ideas, experiment with color contrasts, and even weave in some thematic décor—think miniature pumpkins, candlelight, or cobweb tablecloths—to elevate the moment.
- Festive cookie platter
Arrange an assortment of shapes and sizes on a large, dark-toned tray. Garnish with fresh autumn leaves or faux spider webs for a dramatic contrast, and place small bowls of extra royal icing colors so guests can customize their own.
- Warm milk or cider pairing
Serve the cookies alongside small mugs of steamed apple cider or frothy caramel-spiced milk. The creamy beverages complement the warming spices and keep everyone cozy on a crisp Halloween evening.
- Dessert bar display
Incorporate the cookies into a larger dessert spread featuring pumpkin bars, dark chocolate truffles, and candied nuts. Use tiered cake stands and black lace doilies to create height and visual interest.
- Individual treat bags
Package two to three cookies per clear cellophane bag, tie with orange and black ribbon, and place on place settings or hand out as party favors. Add a mini name tag with a cheeky Halloween pun for a personalized touch.
HOW TO STORE SPOOKY SPICED HALLOWEEN COOKIES
Proper storage ensures these spiced pumpkin treats stay soft, flavorful, and ready to impress long after baking day. Whether you’re preparing them in advance for a party or saving leftovers for midnight snacking, following a few key steps will help maintain their texture and taste. Remember that temperature and airtight conditions are your best friends when it comes to prolonging freshness and preserving those delightful spice notes.
- Room-temperature airtight container
Once fully cooled, layer cookies between sheets of parchment paper inside an airtight container. Store at room temperature for up to 3 days to preserve softness and flavor balance.
- Refrigeration for extended freshness
If you need to keep cookies fresh beyond three days, refrigerate them in an airtight container. The chill slows down staling, extending shelf life up to one week. Bring cookies to room temperature before serving.
- Freezing unbaked dough
Shape the dough into logs or press it flat, then wrap tightly in plastic wrap and aluminum foil. Freeze for up to 3 months. Thaw overnight in the refrigerator before slicing or rolling, then bake as directed.
- Freezing baked cookies
Flash-freeze fully baked, cooled cookies on a baking sheet for 1 hour, then transfer to a freezer-safe container with parchment layers. Freeze up to 2 months, then thaw at room temperature for 15–20 minutes before decorating or serving.
CONCLUSION
Bringing these spooky spiced Halloween cookies into your kitchen is like summoning a batch of edible magic that delights bakers of all skill levels—especially beginners who want a simple yet impressive project. We’ve covered everything from selecting pantry staples like all-purpose flour and aromatic spices to guiding you through each step of whisking, creaming, chilling, and baking. You’ll emerge with a tray full of perfectly shaped, golden-edged cookies that capture the very essence of fall festivities. Don’t forget to decorate them with black and orange royal icing for an extra eerie flair or get creative with gel food coloring to match your party theme. Whether you’re leaving some out for trick-or-treaters or serving them as the highlight of your Halloween dessert table, these cookies promise to be an instant crowd-pleaser.
Feel free to print this article and tuck it into your recipe binder for future Halloween celebrations. You can also save it for later reference—or revisit it any time you need that cozy fix of pumpkin sweetness and warming spices. Below, you’ll find an FAQ section that answers common baking questions and helps troubleshoot any hiccups you might encounter. If you give these cookies a try, please let me know how they turned out! I’d love to hear your questions, comments, or feedback, especially if you add your own twist—like a dash of cayenne for a spicy kick or a swirl of chocolate icing. Happy baking, and may your Halloween be both spooky and delicious!
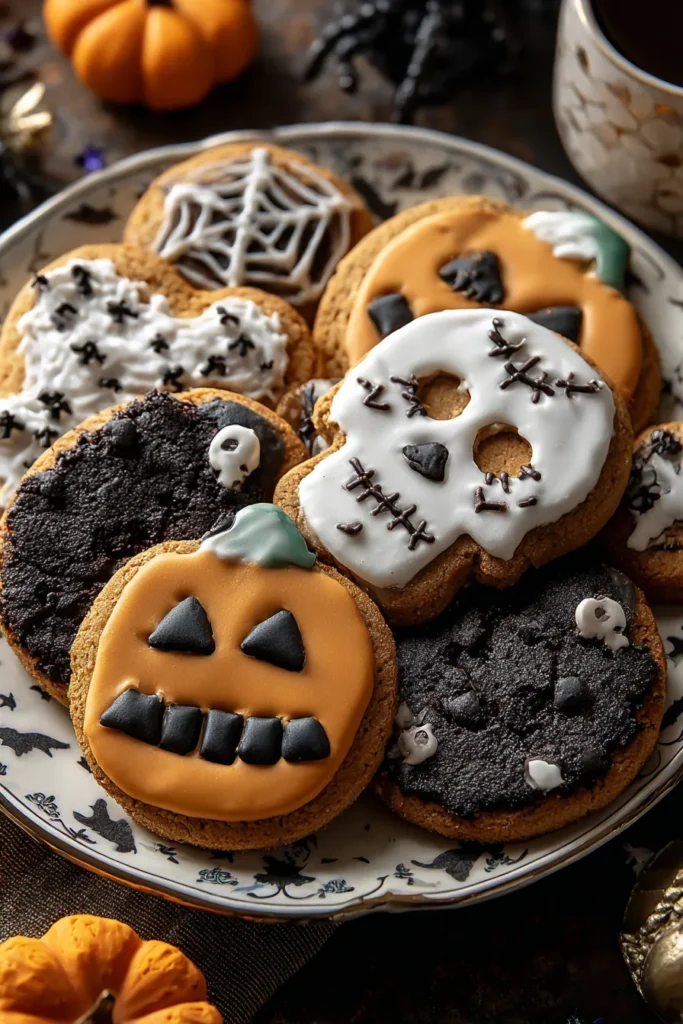

Spooky Spiced Halloween Cookies
Description
These spooky spiced Halloween cookies combine warm, aromatic spices with the sweetness of pumpkin, creating a hauntingly delicious treat perfect for fall festivities.
Ingredients
Instructions
-
Preheat your oven to 350°F (175°C) and line your baking sheet with parchment paper.
-
In a medium bowl, whisk together the flour, baking powder, baking soda, salt, cinnamon, ginger, cloves, and nutmeg. Set aside.
-
In a large bowl, cream together the softened butter, granulated sugar, and brown sugar until light and fluffy.
-
Add the pumpkin puree, egg, and vanilla extract to the butter mixture, mixing well until fully incorporated.
-
Gradually add the dry ingredients to the wet ingredients, stirring until the dough is well combined.
-
Shape the dough into a ball, wrap in plastic wrap, and refrigerate for at least 1 hour, or until firm.
-
Once chilled, roll out the dough on a lightly floured surface to about 1/4-inch thickness.
-
Use your Halloween-themed cookie cutters to cut out shapes and place them onto the prepared baking sheet.
-
Bake the cookies in the preheated oven for 10-12 minutes, or until the edges are lightly golden.
-
Allow the cookies to cool on the baking sheet for 5 minutes, then transfer to a wire rack to cool completely.
-
If desired, decorate the cooled cookies with royal icing or gel food coloring for an extra spooky touch.
Note
- These cookies can be made up to 3 days in advance and stored in an airtight container.
- For a gluten-free option, substitute all-purpose flour with a gluten-free flour blend.
- Experiment with different spices to customize your flavor profile.
- Royal icing can be colored with gel food coloring to enhance the spooky theme.
- Add a pinch of cayenne pepper for a surprising kick of heat.

